
日历控件基本上所有的前端都会用到,而且我相信8成的JSer都是直接把开源的组件拿来用,很多设计师似乎跟开发们也有默契,对日历控件只要能用就行,样式啥的不做太多要求,但是某些设计师就是有强迫症,一定要你按着TA的设计来,保不准产品也要舔一把火,往日历里塞些稀奇古怪的业务,咋办?初级开发可能就去网上找符合要求的控件,然后拼命说服他们;普通的开发就可能直接在已有的控件上修修补补,除了问题再回炉重造;高级的开发直接怼回去:什么J8需求,不接!顶级的程序员呢?当然是一言不合直接造轮子啊(笑。
先放最终效果,审美有限,将就着看吧~
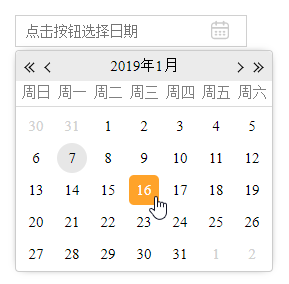
先不管js或是jquery怎么写,咱先把日历的样子搭出来
html:
1<div id="application">
2    <div class="date-picker-group">
3        <input type="text" placeholder="点击按钮选择日期" readonly/>
4        <i class="trigger"></i>
5    </div>
6    <div id="_date-picker" class="calendar-panel" style="left: 120px; top: 135px; display: block;">
7        <div class="panel-header">
8            <i class="btn-control prev-year" title="上一年"></i>
9            <i class="btn-control prev-month" title="上一月"></i>
10            <span class="YY-MM">2019年1月</span>
11            <i class="btn-control next-year" title="下一年"></i>
12            <i class="btn-control next-month" title="下一月"></i>
13        </div>
14        <div class="grid" tabindex="0">
15            <ul class="weekdays">
16                <li>周日</li>
17                <li>周一</li>
18                <li>周二</li>
19                <li>周三</li>
20                <li>周四</li>
21                <li>周五</li>
22                <li>周六</li>
23            </ul>
24            <ul class="days">
25                <li class="row">
26                    <ul>
27                        <li class="day disabled">30</li>
28                        <li class="day disabled">31</li>
29                        <li class="day">1</li>
30                        <li class="day">2</li>
31                        <li class="day">3</li>
32                        <li class="day">4</li>
33                        <li class="day">5</li>
34                    </ul>
35                </li>
36                <li class="row">
37                    <ul>
38                        <li class="day">6</li>
39                        <li class="day today">7</li>
40                        <li class="day">8</li>
41                        <li class="day">9</li>
42                        <li class="day">10</li>
43                        <li class="day">11</li>
44                        <li class="day">12</li>
45                    </ul>
46                </li>
47                <li class="row">
48                    <ul>
49                        <li class="day">13</li>
50                        <li class="day">14</li>
51                        <li class="day">15</li>
52                        <li class="day">16</li>
53                        <li class="day">17</li>
54                        <li class="day">18</li>
55                        <li class="day">19</li>
56                    </ul>
57                </li>
58                <li class="row">
59                    <ul>
60                        <li class="day">20</li>
61                        <li class="day">21</li>
62                        <li class="day">22</li>
63                        <li class="day">23</li>
64                        <li class="day">24</li>
65                        <li class="day">25</li>
66                        <li class="day">26</li>
67                    </ul>
68                </li>
69                <li class="row">
70                    <ul>
71                        <li class="day">27</li>
72                        <li class="day">28</li>
73                        <li class="day">29</li>
74                        <li class="day">30</li>
75                        <li class="day">31</li>
76                        <li class="day disabled">1</li>
77                        <li class="day disabled">2</li>
78                    </ul>
79                </li>
80            </ul>
81        </div>
82    </div>
83</div>
因为层级关系较多,我这里使用scss样式,需要css的小伙伴可以使用这个sass2css转换工具。
scss:
1* {
2  margin: 0;
3  padding: 0;
4  outline: none;
5}
6
7html, body {
8  width: 100%;
9  height: 100%;
10}
11
12ul, li {
13  list-style: none;
14}
15
16body {
17  margin: 0;
18  padding: 0;
19  overflow: hidden;
20  padding-left: 20px;
21}
22
23.date-picker-group {
24  width: 220px;
25  height: 30px;
26  border-radius: 50px;
27  position: relative;
28  margin: 100px;
29  & > input {
30    display: block;
31    width: 100%;
32    height: 100%;
33    line-height: 28px;
34    border: 1px solid #d0d0d0;
35    font-size: 14px;
36  }
37  & > .trigger {
38    position: absolute;
39    top: 0;
40    right: 5px;
41    height: 100%;
42    width: 20px;
43    background: url("./date_trigger.png") no-repeat center;
44    background-size: contain;
45    cursor: pointer;
46  }
47}
48
49#dialog-calendar {
50  display: none;
51  font-size: 20px;
52  position: absolute;
53  background-color: #fff;
54  border: 1px solid #ccc;
55  user-select: none;
56  border-radius: 4px;
57  box-shadow: 0 0 15px -7px #000;
58  & > .panel-header {
59    text-align: center;
60    height: 1.5em;
61    line-height: 1.5em;
62    position: relative;
63    background-color: #ebebeb;
64    border-radius: 5px 5px 0 0;
65    & > .YY-MM {
66      display: inline-block;
67      font-size: 0.75em;
68      height: 2em;
69      line-height: 2em;
70      vertical-align: top;
71    }
72    & > .btn-control {
73      position: absolute;
74      top: 50%;
75      width: 6px;
76      height: 6px;
77      border: 1px solid #000;
78      border-top: none;
79      border-right: none;
80      transform-origin: center;
81      cursor: pointer;
82      &.prev-year {
83        border-width: 1px;
84        left: 0.5em;
85        transform: translateY(-30%) rotate(45deg);
86        &::after {
87          content: " ";
88          display: block;
89          width: 100%;
90          height: 100%;
91          border: 1px solid #000;
92          border-top: none;
93          border-right: none;
94          transform-origin: center;
95          margin: -3px 0 0 2px;
96        }
97      }
98      &.prev-month {
99        left: 1.5em;
100        transform: translateY(-30%) rotate(45deg);
101      }
102      &.next-year {
103        border-width: 1px;
104        right: 0.5em;
105        transform: translateY(-30%) rotate(-135deg);
106        &::after {
107          content: " ";
108          display: block;
109          width: 100%;
110          height: 100%;
111          border: 1px solid #000;
112          border-top: none;
113          border-right: none;
114          transform-origin: center;
115          margin: -3px 0 0 2px;
116        }
117      }
118      &.next-month {
119        right: 1.5em;
120        transform: translateY(-30%) rotate(-135deg);
121      }
122    }
123  }
124  & > .grid {
125    text-align: center;
126    & > .weekdays {
127      /* display: none; */
128      padding: 0 0.1em;
129      color: #808080;
130      border-bottom: 1px solid #dadada;
131      height: 1.25em;
132      line-height: 1.25em;
133      white-space: nowrap;
134      & > li {
135        float: left;
136        width: 2em;
137        margin: 0 0.2em;
138        font-size: 0.75em;
139        height: 1.667em;
140        line-height: 1.667em;
141        vertical-align: top;
142      }
143    }
144    & > .days {
145      padding: 0.1em;
146      & > .row {
147        margin-top: 0.1em;
148        & > ul {
149          height: 1.5em;
150          white-space: nowrap;
151          & > .day {
152            float: left;
153            width: 2em;
154            margin: 0 0.2em;
155            font-size: 0.75em;
156            height: 2em;
157            line-height: 2em;
158            border-radius: 50%;
159            text-align: center;
160            box-sizing: border-box;
161            cursor: pointer;
162            &.today {
163              background-color: #e7e7e7;
164              &:hover {
165                background-color: #ffa32a;
166              }
167            }
168            &:hover,
169            &.focus {
170              border-radius: 5px;
171              background-color: #ffa32a;
172              color: #fff;
173            }
174            &.disabled {
175              color: #d0d0d0;
176              cursor: default;
177              &:hover {
178                background-color: transparent;
179                color: #d0d0d0;
180              }
181            }
182          }
183        }
184      }
185    }
186  }
187}
样式用em来做单位,可以通过修改根元素.calendar-panel的font-size来调整面板和字体的整体尺寸
最终呈现的效果见下图
重点来了——
首先创建一个DatePicker 类,思考一下这个类会有哪些对外开放的功能,以及哪些必须的私有变量/函数:
构造方法:传入触发元素
开放的api:进入上个月、进入下个月、进入前一年、进入后一年、显示控件、隐藏控件、设置控件位置
内部函数:设置窗体位置,更新窗体年月,更新窗体日期网格、绑定事件
于是先大概组织出这样一个结构
1function DatePicker (opts) {
2
3  var _this = this
4  this.$calendar = $('#_calendar-panel') // 日期弹窗
5  this.$YYMM = this.$calendar.find('.YY-MM') // 顶部年月显示
6  this.$btnControl = this.$calendar.find('.btn-control') // 头部年月跳转按钮
7  this.$days = this.$calendar.find('.days') // 日期网格
8
9  // 今天的年月日
10  this.today = new Date()
11  this.currentYear = this.today.getFullYear()
12  this.currentMonth = this.today.getMonth()  // 月份数组的下标
13  this.currentDate = this.today.getDate()
14
15  // 日历头部显示的年月
16  this.displayYear = this.currentYear
17  this.displayMonth = this.currentMonth
18
19  // 被选中的年月日
20  this.selectYear = null
21  this.selectMonth = null
22  this.selectDate = null
23
24  bindHandlers()
25
26  /**
27   * 进入上个月
28   */
29  this.prevMonth = function () {
30  }
31
32  /**
33   * 进入下个月
34   */
35  this.nextMonth = function () {
36  }
37
38  /**
39   * 进入前一年
40   */
41  this.prevYear = function () {
42  }
43
44  /**
45   * 进入后一年
46   */
47  this.nextYear = function () {
48  }
49
50  /**
51   * 显示控件
52   */
53  this.showCalendar = function () {
54  }
55
56  /**
57   * 隐藏控件
58   */
59  this.hideCalendar = function () {
60  }
61
62  /**
63   * 设置控件位置
64   */
65  this.setPosition = function () {
66  }
67
68  /**
69   * 更新日期网格数据
70   */
71  function updateDays () {
72  }
73
74  /**
75   * 更新日历
76   */
77  function update () {
78    // 更新头部年月数据
79    // ....
80    updateDays()
81  }
82
83  /**
84   * 绑定事件
85   */
86  function bindHandlers () {
87  }
88
89}
先完成前面几个简单的方法,它们只用来修改DatePicker对象的属性,具体的渲染逻辑放在私有函数update中
1/**
2 * 进入上个月
3 */
4this.prevMonth = function () {
5  if (this.displayMonth === 0) {
6    this.displayMonth = 11
7    this.displayYear--
8  }
9  else {
10    this.displayMonth--
11  }
12  update() // 更新日历
13}
14
15/**
16 * 进入下个月
17 */
18this.nextMonth = function () {
19  if (this.displayMonth === 11) {
20    this.displayMonth = 0
21    this.displayYear++
22  }
23  else {
24    this.displayMonth++
25  }
26  update() // 更新日历
27}
28
29/**
30 * 进入前一年
31 */
32this.prevYear = function () {
33  this.displayYear--
34  update() // 更新日历
35}
36
37/**
38 * 进入后一年
39 */
40this.nextYear = function () {
41  this.displayYear++
42  update() // 更新日历
43}
44
45/**
46 * 显示控件
47 */
48this.showCalendar = function () {
49  this.$calendar.css({display: 'block'})
50}
51
52/**
53 * 隐藏控件
54 */
55this.hideCalendar = function () {
56  this.$calendar.css({display: 'none'})
57}
58
59/**
60 * 设置控件位置
61 */
62this.setPosition = function () {
63  this.$calendar.css({
64    left: this.$input.offset().left + 'px',
65    top: (this.$input.height() + this.$input.offset().top + 5) + 'px'
66  })
67}
68
69/**
70 * 更新日历
71 */
72function update () {
73  _this.$YYMM.html(_this.currentYear + '年' + (_this.currentMonth + 1) + '月') // 更新头部年月数据
74  updateDays()
75}
updateDays是我们渲染日期面板的核心方法,先理一下逻辑:
① 首先我们要获取当前需要展示的月份的天数(dayNum)以及该月第一天是星期几(startWeekday)
② 如果不是星期日(0)则获取上个月最后一天的日期(endDateOfLastMonth),将该星期用上个月的最后 startWeekday 天填满
③ 循环填充本月的所有日期,并记录最后一天是星期几(weekday)
④ 如果不是星期六,则从1号开始填完本周剩余 7 - weekday -1 天
按照以上的逻辑,完成了updateDays函数
1/**
2 * 更新日期网格数据
3 */
4function updateDays () {
5
6  var weekday, displayDate
7  var rowCount = 1
8  var gridHtmlArray = ['<li class="row"><ul>']
9
10  // 插入首行上个月日期
11  var endDateOfLastMonth = new Date(_this.displayYear, _this.displayMonth, 0).getDate() // 当前展示的年月的上个月的最后一天的日期
12  var startWeekday = new Date(_this.displayYear, _this.displayMonth, 1).getDay() // 当前展示的年月的第一天是星期几
13  for (weekday = 0; weekday < startWeekday; weekday++) {
14    displayDate = endDateOfLastMonth - startWeekday + weekday + 1
15    gridHtmlArray.push('<li data-day="' + displayDate + '" class="day disabled">' + displayDate + '</li>')
16  }
17
18  // 继续插入后面的日期
19  var dayNum = new Date(_this.displayYear, _this.displayMonth + 1, 0).getDate() // 当前展示的年月的天数
20  for (displayDate = 1; displayDate <= dayNum; displayDate++) {
21    if (displayDate === _this.todayDate && _this.displayMonth === _this.todayMonth && _this.displayYear === _this.todayYear) { // 如果是今天
22      gridHtmlArray.push('<li data-day="' + displayDate + '" class="day today">' + displayDate + '</li>')
23    }
24    else if (displayDate === _this.selectDate && _this.displayMonth === _this.selectMonth && _this.displayYear === _this.selectYear) { // 如果是选中的那天
25      gridHtmlArray.push('<li data-day="' + displayDate + '" class="day focus">' + displayDate + '</li>')
26    }
27    else {
28      gridHtmlArray.push('<li data-day="' + displayDate + '" class="day">' + displayDate + '</li>')
29    }
30
31    if (weekday === 6 && displayDate < dayNum) {
32      // 如果到周六还没展示完整月则继续添加行
33      gridHtmlArray.push('</ul><li class="row"><ul>')
34      rowCount++
35      weekday = 0
36    }
37    else {
38      weekday++
39    }
40  }
41
42  // 用下个月的日期补充玩本周
43  var fromDate = 1 // 1号开始
44  for (weekday; weekday < 7; weekday++) {
45    gridHtmlArray.push('<li class="day disabled">' + (fromDate++) + '</li>')
46  }
47
48  gridHtmlArray.push('</ul></li>')
49
50  _this.$days.html(gridHtmlArray.join(''))
51}
最后绑定事件:
1/**
2 * 绑定事件
3 */
4function bindHandlers () {
5  _this.$calendar.on('click', '.prev-month', function () { _this.prevMonth() })
6  _this.$calendar.on('click', '.next-month', function () { _this.nextMonth() })
7  _this.$calendar.on('click', '.prev-year', function () { _this.prevYear() })
8  _this.$calendar.on('click', '.next-year', function () { _this.nextYear() })
9}
后面待补充的功能还有很多,面板定位,dom元素创建,触发事件,事件格式化,jquery封装,挖个坑先~
