
应用场景
随着项目的逐渐扩大,日志的增加也变得更快。Log4j是常用的日志记录工具,在有些时候,我们可能需要将Log4j的日志发送到专门用于记录日志的远程服务器,特别是对于稍微大一点的应用。这么做的优点有:
-
可以集中管理日志:可以把多台服务器上的日志都发送到一台日志服务器上,方便管理、查看和分析
-
可以减轻服务器的开销:日志不在服务器上了,因此服务器有更多可用的磁盘空间
-
可以提高服务器的性能:通过异步方式,记录日志时服务器只负责发送消息,不关心日志记录的时间和位置,服务器甚至不关心日志到底有没有记录成功
远程打印日志的原理:项目A需要打印日志,而A调用Log4j来打印日志,Log4j的JMSAppender又给配置的地址(ActiveMQ地址)发送一条JMS消息,此时绑定在Queue上的项目B的监听器发现有消息到来,于是立即唤醒监听器的方法开始输出日志。
本文将使用两个Java项目Product和Logging,其中Product项目就是模拟线上的项目,而Logging项目模拟运行在专用的日志服务器上的项目。说明:本文的例子是在Windows平台下。
安装ActiveMQ
1. 下载:http://activemq.apache.org/download.html
2. 解压后不需要任何配置,进入到bin下对应的系统架构文件夹
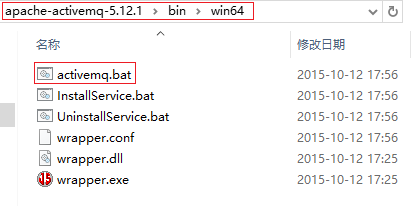
3. 双击activemq.bat启动,如果看到类似下面的页面,就代表activemq启动好了:
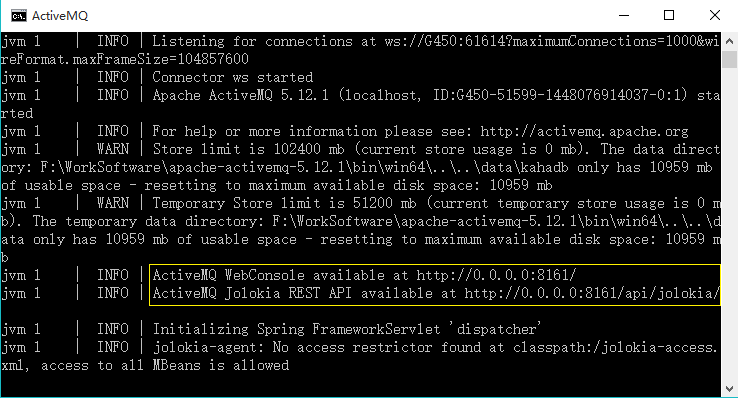
然后打开浏览器,输入地址:http://localhost:8161进入管理页面,用户名admin,密码admin:

可以点击Manage ActiveMQ broker进入Queue的查看界面。
实战
我用Maven来管理项目,方便维护各种依赖的jar包。先看下项目结构:
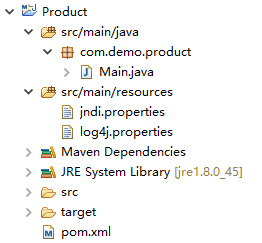
项目不复杂,主要是4个文件:pom.xml,Main.java,log4j.properties和jndi.properties
pom.xml中主要是声明项目的依赖包,其余没有什么东西了:
1<!-- Use to call write log methods -->
2<dependency>
3    <groupId>log4j</groupId>
4    <artifactId>log4j</artifactId>
5    <version>1.2.17</version>
6</dependency>
7
8<!-- Log4j uses this lib -->
9<dependency>
10    <groupId>org.slf4j</groupId>
11    <artifactId>slf4j-log4j12</artifactId>
12    <version>1.7.13</version>
13</dependency>
14
15<!-- Spring jms lib -->
16<dependency>
17    <groupId>org.springframework</groupId>
18    <artifactId>spring-jms</artifactId>
19    <version>4.0.0.RELEASE</version>
20</dependency>
21
22<!-- ActiveMQ lib -->
23<dependency>
24    <groupId>org.apache.activemq</groupId>
25    <artifactId>activemq-core</artifactId>
26    <version>5.7.0</version>
27</dependency>
Main.java:
1package com.demo.product;
2
3import javax.jms.Connection;
4import javax.jms.Destination;
5import javax.jms.Message;
6import javax.jms.MessageConsumer;
7import javax.jms.MessageListener;
8import javax.jms.Session;
9
10import org.apache.activemq.ActiveMQConnectionFactory;
11import org.apache.activemq.command.ActiveMQObjectMessage;
12import org.apache.log4j.Logger;
13import org.apache.log4j.spi.LoggingEvent;
14
15public class Main implements MessageListener {
16
17    public Main() throws Exception {
18        // create consumer and listen queue
19        ActiveMQConnectionFactory factory =
20                new ActiveMQConnectionFactory("tcp://localhost:61616");
21        Connection connection = factory.createConnection();
22        Session session = connection.createSession(false, Session.AUTO_ACKNOWLEDGE);
23        connection.start();
24        //////////////注意这里JMSAppender只支持TopicDestination,下面会说到////////////////
25        Destination topicDestination = session.createTopic("logTopic");
26        MessageConsumer consumer = session.createConsumer(topicDestination);
27        consumer.setMessageListener(this);
28
29        // log a message
30        Logger logger = Logger.getLogger(Main.class);
31        logger.info("Info Log.");
32        logger.warn("Warn Log");
33        logger.error("Error Log.");
34
35        // clean up
36        Thread.sleep(1000);
37        consumer.close();
38        session.close();
39        connection.close();
40        System.exit(1);
41    }
42
43    public static void main(String[] args) throws Exception {
44        new Main();
45    }
46
47    public void onMessage(Message message) {
48        try {
49            // receive log event in your consumer
50            LoggingEvent event = (LoggingEvent)((ActiveMQObjectMessage)message).getObject();
51            System.out.println("Received log [" + event.getLevel() + "]: "+ event.getMessage());
52        } catch (Exception e) {
53            e.printStackTrace();
54        }
55    }
56
57}
说明:然后是log4j.properties:
1log4j.rootLogger=INFO, stdout, jms
2
3## Be sure that ActiveMQ messages are not logged to 'jms' appender
4log4j.logger.org.apache.activemq=INFO, stdout
5
6log4j.appender.stdout=org.apache.log4j.ConsoleAppender
7log4j.appender.stdout.layout=org.apache.log4j.PatternLayout
8log4j.appender.stdout.layout.ConversionPattern=%d %-5p %c - %m%n
9
10## Configure 'jms' appender. You'll also need jndi.properties file in order to make it work
11log4j.appender.jms=org.apache.log4j.net.JMSAppender
12log4j.appender.jms.InitialContextFactoryName=org.apache.activemq.jndi.ActiveMQInitialContextFactory
13log4j.appender.jms.ProviderURL=tcp://localhost:61616
14log4j.appender.jms.TopicBindingName=logTopic
15log4j.appender.jms.TopicConnectionFactoryBindingName=ConnectionFactory
其实按理说只需要这么三个文件就可以了,但是这时候执行会报错:
1javax.naming.NameNotFoundException: logTopic
2	at org.apache.activemq.jndi.ReadOnlyContext.lookup(ReadOnlyContext.java:235)
3	at javax.naming.InitialContext.lookup(Unknown Source)
4	at org.apache.log4j.net.JMSAppender.lookup(JMSAppender.java:245)
5	at org.apache.log4j.net.JMSAppender.activateOptions(JMSAppender.java:222)
6	at org.apache.log4j.config.PropertySetter.activate(PropertySetter.java:307)
7        ...
8	at org.apache.activemq.ActiveMQPrefetchPolicy.<clinit>(ActiveMQPrefetchPolicy.java:39)
9	at org.apache.activemq.ActiveMQConnectionFactory.<init>(ActiveMQConnectionFactory.java:84)
10	at org.apache.activemq.ActiveMQConnectionFactory.<init>(ActiveMQConnectionFactory.java:137)
11	at com.demo.product.Main.<init>(Main.java:20)
12	at com.demo.product.Main.main(Main.java:43)
为什么会报错呢?来看看JMSAppender的javadoc文档,它是这么描述的:
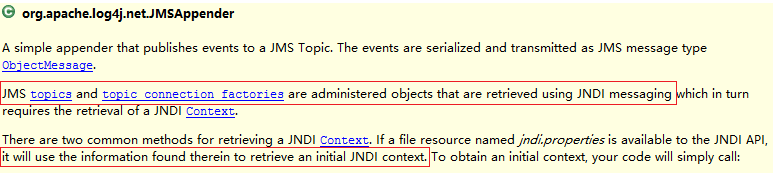
大意是说,JMSAppender需要一个jndi配置来初始化一个JNDI上下文(Context)。因为有了这个上下文才能管理JMS Topic和topic的连接。于是为项目配置一个叫jndi.properties的文件,其内容为:
topic.logTopic=logTopic
然后再运行就不会报错了。我们先来看看ActiveMQ(注意切换到Topic标签页下):
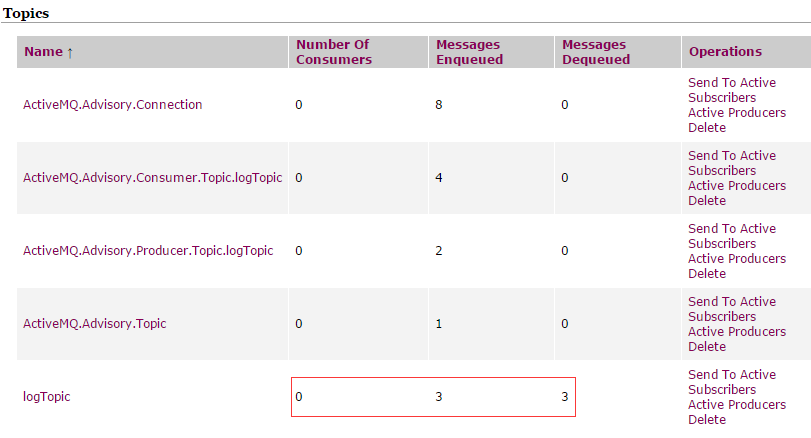
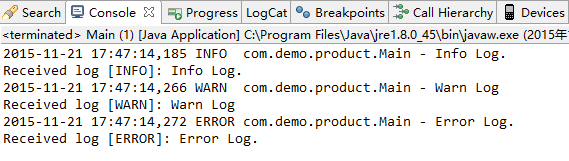
可以看到,主题为logTopic的消息,有3条进Queue,这3条也出Queue了。而出Queue的消息,已经被我们的监听器收到并打印出来了:
Spring整合
需要注意的是,本例只是一个很简单的例子,目的是阐明远程打印日志的原理。实际项目中,一般日志服务器上运行着的,不是项目,而是专用的日志记录器。下面,我们就把这个项目拆分成两个项目,并用Spring来管理这些用到的Bean
修改Product项目
修改后的Product的项目结构并没有改变,改变的只是Main类:
1package com.demo.product;
2
3import org.apache.log4j.Logger;
4
5public class Main{
6    private static final Logger logger = Logger.getLogger(Main.class);
7    public static void main(String[] args) throws Exception {
8        // just log a message
9        logger.info("Info Log.");
10        logger.warn("Warn Log");
11        logger.error("Error Log.");
12        System.exit(0);
13    }
14}
这个Main类和普通的logger调用一样,仅仅负责打印日志。有没有觉得太简单了呢?
Logging项目
来看看项目结构图:
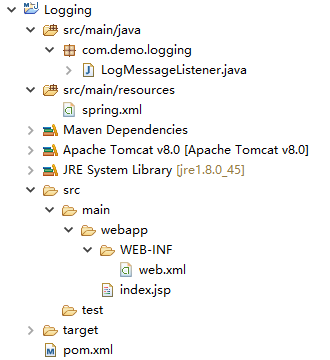
为了让监听器一直活着,我把Logging写成了一个Web项目,跑在Tomcat上。index.jsp就是个Hello World字符串而已,用来验证Logging活着。注意,在Logging项目中,已没有Product项目中的log4j.properties和jndi.properties两个文件。
来看看另外几个文件:
pom.xml(每个包的目的都写在注释里了):
1<!-- Use to cast object to LogEvent when received a log -->
2<dependency>
3    <groupId>log4j</groupId>
4    <artifactId>log4j</artifactId>
5    <version>1.2.17</version>
6</dependency>
7
8<!-- Use to receive jms message -->
9<dependency>
10    <groupId>org.springframework</groupId>
11    <artifactId>spring-jms</artifactId>
12    <version>4.0.0.RELEASE</version>
13</dependency>
14
15<!-- Use to load spring.xml -->
16<dependency>
17    <groupId>org.springframework</groupId>
18    <artifactId>spring-web</artifactId>
19    <version>4.0.0.RELEASE</version>
20</dependency>
21
22<!-- ActiveMQ lib -->
23<dependency>
24    <groupId>org.apache.activemq</groupId>
25    <artifactId>activemq-core</artifactId>
26    <version>5.7.0</version>
27</dependency>
web.xml
1<!DOCTYPE web-app PUBLIC
2 "-//Sun Microsystems, Inc.//DTD Web Application 2.3//EN"
3 "http://java.sun.com/dtd/web-app_2_3.dtd" >
4
5<web-app>
6    <context-param>
7        <param-name>contextConfigLocation</param-name>
8        <param-value>classpath:spring.xml</param-value>
9    </context-param>
10
11    <!-- Use to load spring.xml -->
12    <listener>
13        <listener-class>
14            org.springframework.web.context.ContextLoaderListener
15        </listener-class>
16    </listener>
17
18    <welcome-file-list>
19        <welcome-file>index.jsp</welcome-file>
20    </welcome-file-list>
21</web-app>
spring.xml
1<?xml version="1.0" encoding="UTF-8"?>
2<beans xmlns="http://www.springframework.org/schema/beans"
3    xmlns:xsi="http://www.w3.org/2001/XMLSchema-instance"
4    xsi:schemaLocation="
5        http://www.springframework.org/schema/beans
6        http://www.springframework.org/schema/beans/spring-beans-4.0.xsd">
7
8    <bean id="jmsTemplate" class="org.springframework.jms.core.JmsTemplate">
9        <property name="connectionFactory" ref="connectionFactory"/>
10    </bean>
11    <bean id="connectionFactory" class="org.springframework.jms.connection.SingleConnectionFactory">
12        <property name="targetConnectionFactory" ref="targetConnectionFactory"/>
13    </bean>
14    <bean id="targetConnectionFactory" class="org.apache.activemq.ActiveMQConnectionFactory">
15        <property name="brokerURL" value="tcp://localhost:61616"/>
16    </bean>
17<!-- As JMSAppender only support the topic way to send messages,
18     thus queueDestination here is useless.
19    <bean id="queueDestination" class="org.apache.activemq.command.ActiveMQQueue">
20        <constructor-arg name="name" value="queue" />
21    </bean>
22 -->
23    <bean id="topicDestination" class="org.apache.activemq.command.ActiveMQTopic">
24        <constructor-arg name="name" value="logTopic" />
25    </bean>
26    <bean id="jmsContainer" class="org.springframework.jms.listener.DefaultMessageListenerContainer">
27        <property name="connectionFactory" ref="connectionFactory" />
28         <!-- <property name="destination" ref="queueDestination" />  -->
29         <property name="destination" ref="topicDestination" />
30         <property name="messageListener" ref="logMessageListener" />
31    </bean>
32    <bean id="logMessageListener" class="com.demo.logging.LogMessageListener"/>
33</beans>
logMessageListener指向我们自己实现的日志消息处理逻辑类,topicDestination则关注topic为“logTopic”的消息,而jmsContainer把这两个对象绑在一起,这样就能接收并处理消息了。
最后就是伟大的监听器了LogMessageListener了:
1package com.demo.logging;
2
3import javax.jms.Message;
4import javax.jms.MessageListener;
5import org.apache.activemq.command.ActiveMQObjectMessage;
6import org.apache.log4j.spi.LoggingEvent;
7
8public class LogMessageListener implements MessageListener {
9    public void onMessage(Message message) {
10        try {
11            // receive log event in your consumer
12            LoggingEvent event = (LoggingEvent)((ActiveMQObjectMessage)message).getObject();
13            System.out.println("Logging project: [" + event.getLevel() + "]: "+ event.getMessage());
14        } catch (Exception e) {
15            e.printStackTrace();
16        }
17    }
18}
哈哈,说伟大,其实太简单了。但是可以看到,监听器里面就是之前Product项目中Main类里面移除的实现了MessageListener接口中的代码。
测试
在执行测试前,删掉ActiveMQ中所有的Queue,确保测试效果。
先运行Logging项目,开始Queue的监听。再运行Product的Main类的main函数,可以先看到Main类打印到控制台的日志:

接下来去看看Queue中的情况:
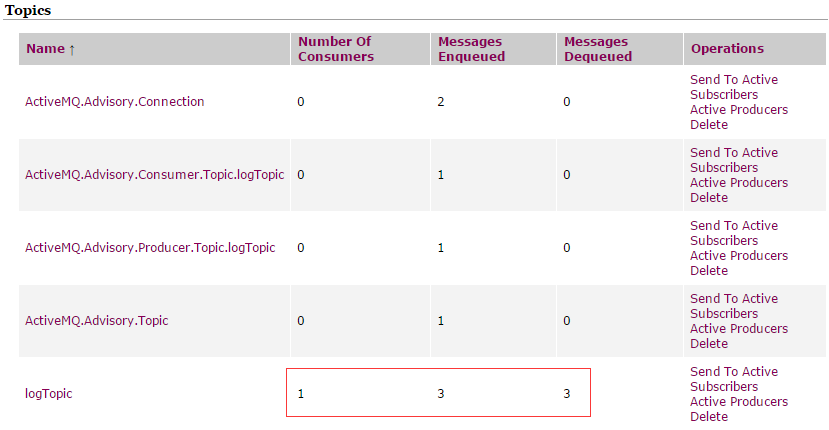
可以看到有个叫logTopic的主题的消息,进了3条,出了3条。不用想,出Queue的3条日志已经被Logging项目的Listener接收并打印出来了,现在去看看Tomcat的控制台:
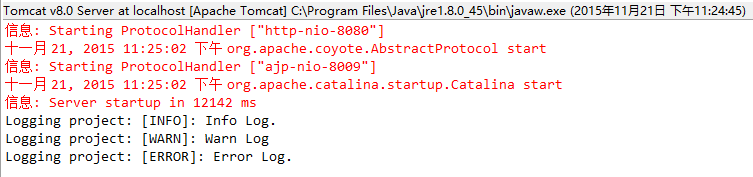
还要注意Queue中的logTopic的Consumer数量为1而不是0,这与开始的截图不同。我们都知道这个Consumer是Logging项目中的LogMessageListener对象,它一直活着,是因为Tomcat一直活着;之前的Consumer数量为0,是因为在main函数执行完后,Queue的监听器(也是写日志的对象)就退出了。
通过把Product和Logging项目分别放在不同的机器上执行,在第三台机器上部署ActiveMQ(当然你可以把ActiveMQ搭建在任意可以访问的地方),再配置一下Product项目的log4j.properties文件和Logging项目的spring.xml文件就能用于生产环境啦。
JMSAppender类的分析
JMSAppender类将LoggingEvent实例序列化成ObjectMessage,并将其发送到JMS Server的一个指定Topic中,**因此,使用此种将日志发送到远程的方式只支持Topic方式发送,不支持Queue方式发送。**我们再log4j.properties中配置了这一句:
log4j.appender.jms=org.apache.log4j.net.JMSAppender
这一句指定了使用的Appender,打开这个Appender,在里面可以看到很多setter,比如:
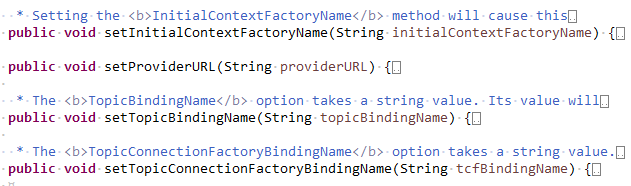
这些setter不是巧合,而正是对应了我们在log4j.properties中设置的其他几个选项:
1log4j.appender.jms.InitialContextFactoryName=org.apache.activemq.jndi.ActiveMQInitialContextFactory
2log4j.appender.jms.ProviderURL=tcp://localhost:61616
3log4j.appender.jms.TopicBindingName=logTopic
4log4j.appender.jms.TopicConnectionFactoryBindingName=ConnectionFactory
来看看JMSAppender的activeOptions方法,这个方法是用于使我们在log4j.properties中的配置生效的:
1/**
2 * Options are activated and become effective only after calling this method.
3 */
4public void activateOptions() {
5    TopicConnectionFactory topicConnectionFactory;
6    try {
7        Context jndi;
8        LogLog.debug("Getting initial context.");
9        if (initialContextFactoryName != null) {
10            Properties env = new Properties();
11            env.put(Context.INITIAL_CONTEXT_FACTORY, initialContextFactoryName);
12            if (providerURL != null) {
13                env.put(Context.PROVIDER_URL, providerURL);
14            } else {
15                LogLog.warn("You have set InitialContextFactoryName option but not the "
16                        + "ProviderURL. This is likely to cause problems.");
17            }
18            if (urlPkgPrefixes != null) {
19                env.put(Context.URL_PKG_PREFIXES, urlPkgPrefixes);
20            }
21
22            if (securityPrincipalName != null) {
23                env.put(Context.SECURITY_PRINCIPAL, securityPrincipalName);
24                if (securityCredentials != null) {
25                    env.put(Context.SECURITY_CREDENTIALS, securityCredentials);
26                } else {
27                    LogLog.warn("You have set SecurityPrincipalName option but not the "
28                            + "SecurityCredentials. This is likely to cause problems.");
29                }
30            }
31            jndi = new InitialContext(env);
32        } else {
33            jndi = new InitialContext();
34        }
35
36        LogLog.debug("Looking up [" + tcfBindingName + "]");
37        topicConnectionFactory = (TopicConnectionFactory) lookup(jndi, tcfBindingName);
38        LogLog.debug("About to create TopicConnection.");
39
40        ///////////////////////////////注意这里只会创建TopicConnection////////////////////////////
41        if (userName != null) {
42            topicConnection = topicConnectionFactory.createTopicConnection(userName, password);
43        } else {
44            topicConnection = topicConnectionFactory.createTopicConnection();
45        }
46
47        LogLog.debug("Creating TopicSession, non-transactional, " + "in AUTO_ACKNOWLEDGE mode.");
48        topicSession = topicConnection.createTopicSession(false, Session.AUTO_ACKNOWLEDGE);
49
50        LogLog.debug("Looking up topic name [" + topicBindingName + "].");
51        Topic topic = (Topic) lookup(jndi, topicBindingName);
52
53        LogLog.debug("Creating TopicPublisher.");
54        topicPublisher = topicSession.createPublisher(topic);
55
56        LogLog.debug("Starting TopicConnection.");
57        topicConnection.start();
58
59        jndi.close();
60    } catch (JMSException e) {
61        errorHandler.error("Error while activating options for appender named [" + name + "].", e,
62                ErrorCode.GENERIC_FAILURE);
63    } catch (NamingException e) {
64        errorHandler.error("Error while activating options for appender named [" + name + "].", e,
65                ErrorCode.GENERIC_FAILURE);
66    } catch (RuntimeException e) {
67        errorHandler.error("Error while activating options for appender named [" + name + "].", e,
68                ErrorCode.GENERIC_FAILURE);
69    }
70}
上面初始化了一个TopicConnection,一个TopicSession,一个TopicPublisher。咱们再来看看这个Appender的append方法:
1/**
2 * This method called by {@link AppenderSkeleton#doAppend} method to do most
3 * of the real appending work.
4 */
5public void append(LoggingEvent event) {
6    if (!checkEntryConditions()) {
7        return;
8    }
9    try {
10        ObjectMessage msg = topicSession.createObjectMessage();
11        if (locationInfo) {
12            event.getLocationInformation();
13        }
14        msg.setObject(event);
15        topicPublisher.publish(msg);///////////////注意这一句//////////////
16    } catch (JMSException e) {
17        errorHandler.error("Could not publish message in JMSAppender [" + name + "].",
18            e, ErrorCode.GENERIC_FAILURE);
19    } catch (RuntimeException e) {
20        errorHandler.error("Could not publish message in JMSAppender [" + name + "].",
21            e, ErrorCode.GENERIC_FAILURE);
22    }
23}
这里使用TopicPublisher.publish()方法,把序列化的消息发布出去。可见这也证明了JMSAppender只支持以Topic方式发送消息。
样例下载:百度网盘
链接: http://pan.baidu.com/s/1pJF1ybx 密码: x5r6
参考:
http://activemq.apache.org/how-do-i-use-log4j-jms-appender-with-activemq.html