
提个问题:Java程序的入口是main方法,而JUnit类中没有main方法,那么JUnit是如何运行的呢?
假如有以下JUnit例子:
1import org.junit.Test;
2
3public class TestA {
4    @Test
5    public void testAdd() {
6        System.out.println("A.testAdd");
7    }
8}
一、在Eclipse中执行JUnit
在Eclipse中右键->Run As->JUnit Test,即可执行这个测试。如果在testAdd方法中打上断点(即第6行),我们来看下程序调用的栈:
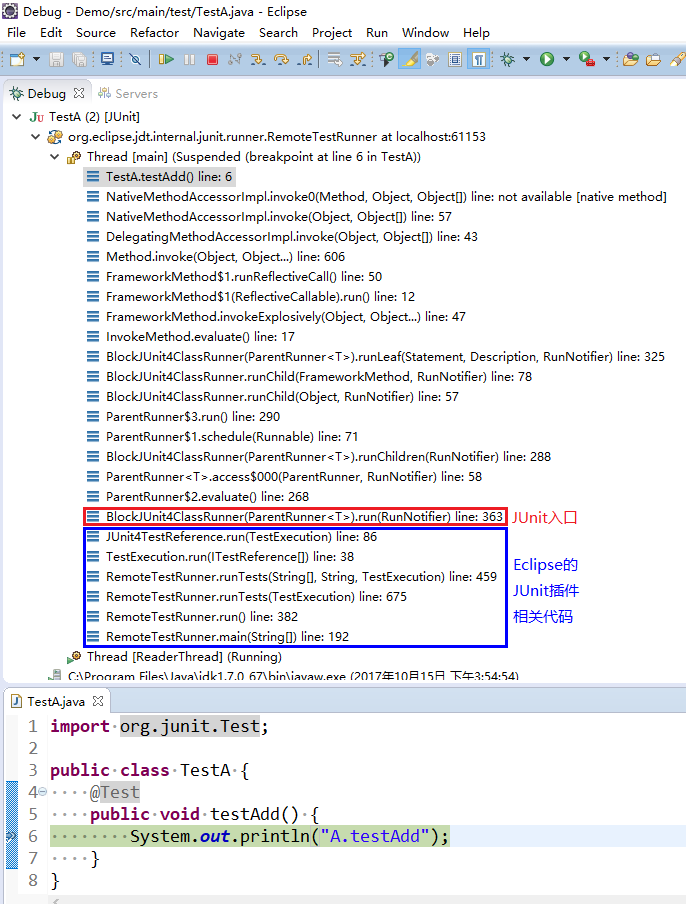
可以看到,这个测试的JVM进程由RemoteTestRunner.main()方法启动,这个类是来自Eclipse的JUnit插件的,真正进入到JUnit的代码是BlockJUnit4ClassRunner.run(RunNotifier)。那么,Eclipse是如何开始调用BlockJUnit4ClassRunner的呢?
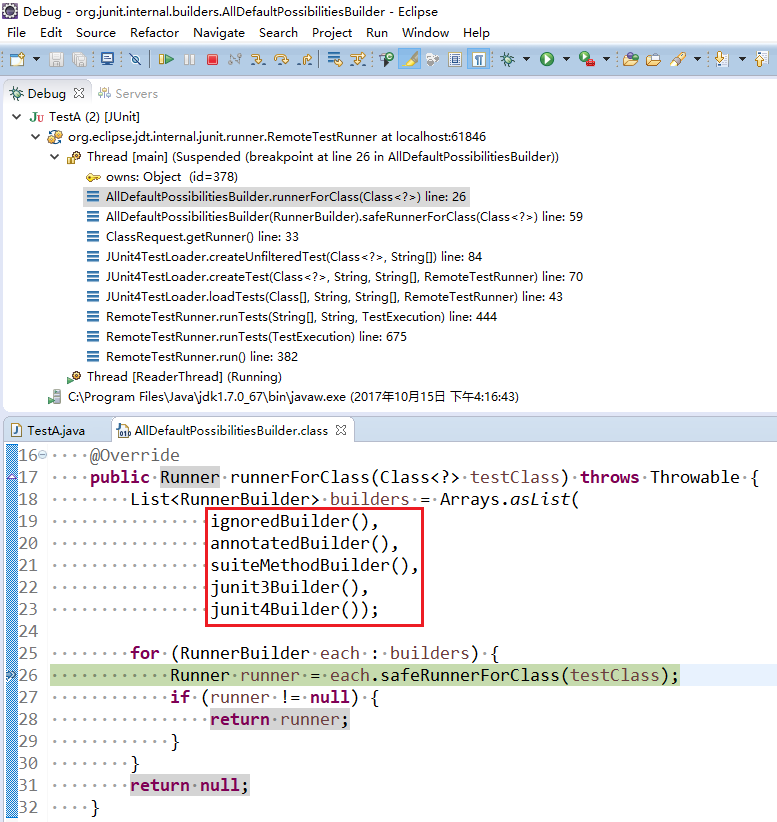
原来,在执行JUnit测试用例之前,Eclipse将会为这个测试类找到合适的Runner。看这段代码,这里给出了5种RunnerBuilder,它们会被按顺序依次遍历,找到一个合适的Runner后即停止:
- IgnoreBuilder。检查被测类是否含有@Ignore注解,如果有,则初始化一个IgnoredClassRunner,否则返回null。
- AnnotatedBuilder。检查被测类是否含有@RunWith注解,如果有,则用该注解的value初始化一个Runner,否则返回null。
- SuiteMethodBuilder。检查被测类是否含有一个叫“suite”的方法,如果有,则初始化一个SuiteMethod(这是JUnit3.8中使用的Runner),否则返回null。
- JUnit3Builder。检查被测类是否是TestCase的子类,如果是,则初始化一个JUnit38ClassRunner,否则返回null。
- JUnit4Builder。没有检查条件。将初始化一个BlockJUnint4ClassRunner。这也是JUnit4默认的Runner。
经过这5步,必然会找到一个Runner,我们这个了例子就会返回BlockJUnit4ClassRunner。接下来,我们看看这个JUnit4ClassRunner中发生了什么。
在上面已经提到,程序会在执行时会调用到BlockJUnit4ClassRunner.run方法,下面是在其父类ParentRunner类中的实现:
1@Override
2public void run(final RunNotifier notifier) {
3	EachTestNotifier testNotifier = new EachTestNotifier(notifier, getDescription());
4	try {
5		Statement statement = classBlock(notifier);
6		statement.evaluate(); // Would trigger the whole test case execution flow.
7	} catch (AssumptionViolatedException e) {
8		testNotifier.addFailedAssumption(e);
9	} catch (StoppedByUserException e) {
10		throw e;
11	} catch (Throwable e) {
12		testNotifier.addFailure(e);
13	}
14}
这里主要调用classBlock(RunNotifier)方法(这是一个处理测试类的函数)创建了一个Statement,然后调用Statement.evaluate()完成测试。接下来看看classBlock方法做了些什么:
1protected Statement classBlock(final RunNotifier notifier) {
2	Statement statement = childrenInvoker(notifier); // Execute test cases
3	if (!areAllChildrenIgnored()) {
4		statement = withBeforeClasses(statement);
5		statement = withAfterClasses(statement);
6		statement = withClassRules(statement);
7	}
8	return statement;
9}
主要的逻辑是调用了childrenInvoker生成了一条Statement,而这个Statement的evaluate方法是调用一个runChildren方法(这个方法将在BlockJUnit4ClassRunner.run方法中调用statement.evalueate()方法是被回调):
1protected Statement childrenInvoker(final RunNotifier notifier) {
2	return new Statement() {
3		@Override
4		public void evaluate() {
5			runChildren(notifier);
6		}
7	};
8}
这个runChildren()会遍历这个测试类中的所有测试用例,并为每个用例进一步调用ParentRunner中的抽象方法:
protected abstract void runChild(T child, RunNotifier notifier);
在classBlock中还可以看到,如果测试类中的不是所有用例都用例(带有@Test注解)都被忽略(带有@Ignore注解)的时候,会把@BeforeClass,@AfterClass,@ClassRule这几个注解对应的信息添加到Statement中。
接下来看BlockJUnit4ClassRunner的runChild的实现:
1@Override
2protected void runChild(final FrameworkMethod method, RunNotifier notifier) {
3	Description description = describeChild(method);
4	if (isIgnored(method)) {  // Test if current case is annotated with @Ignore
5		notifier.fireTestIgnored(description);
6	} else {
7		runLeaf(methodBlock(method), description, notifier);
8	}
9}
runChild表示运行一个带有@Test注解的测试用例。可以看到,如果这个用例标注了@Ignore(isIgnored方法即是探测该用例是否含有@Ignore注解),则不会执行。否则会调用runLeaf方法来执行,这里面就是调用了Statement的evaluate方法:
1protected final void runLeaf(Statement statement, Description description,
2		RunNotifier notifier) {
3	EachTestNotifier eachNotifier = new EachTestNotifier(notifier, description);
4	eachNotifier.fireTestStarted();
5	try {
6		statement.evaluate(); // This is a chain call and would handle all steps of a case.
7	} catch (AssumptionViolatedException e) {
8		eachNotifier.addFailedAssumption(e);
9	} catch (Throwable e) {
10		eachNotifier.addFailure(e);
11	} finally {
12		eachNotifier.fireTestFinished();
13	}
14}
再看看这个methodBlock方法(和前文classBlock类似,这是一个处理测试方法的函数)都做了些什么:
1protected Statement methodBlock(FrameworkMethod method) {
2  Object test;
3  try {
4      test = new ReflectiveCallable() {
5          @Override
6          protected Object runReflectiveCall() throws Throwable {
7              return createTest();
8          }
9      }.run();
10  } catch (Throwable e) {
11      return new Fail(e);
12  }
13
14  Statement statement = methodInvoker(method, test);
15  statement = possiblyExpectingExceptions(method, test, statement);
16  statement = withPotentialTimeout(method, test, statement);
17  statement = withBefores(method, test, statement);
18  statement = withAfters(method, test, statement);
19  statement = withRules(method, test, statement);
20  return statement;
21}
这里面通过使用多次组合的方式,形成了一个复杂的Statement对象:
- 先调用methodInvoker创建了一个InvokeMethod(Statement的子类)对象
- 如果该用例用@Test(expected="xxx")标注,则用statement组装并返回一个ExpectException(Statement的子类)对象
- 如果该用例用@Test(timeout="xxx")标注,则用statement组装并返回一个FailOnTimeout(Statement的子类)对象
- 如果该测试类中有方法用@Before标记,则用statement组装并返回一个RunBefores(Statement的子类)对象
- 如果该测试类中有方法用@After标记,则用statement组装并返回一个RunAfters(Statement的子类)对象
- 如果该用例上有@Rule,则用statement组装并返回一个RunRules(Statement的子类)对象
注意,Statement是一个抽象类,这里提到的InvokeMethod,ExpectException,FailOnTimeout,RunBefores,RunAfters,RunRules这些对象都是Statement类的子类,都实现了evaluate方法,在不同对象的evaluate方法中除了调用子对象的evaluate方法,还有其他的事情。
前文提到,runLeaf方法会调用这个这个statement对象的evaluate方法,这样这个复杂的statement对象会被依次当作各种对象处理并将调用相应对象的evaluate方法,这种链式调用将在合适的时机完成测试用例的所有步骤。
总结
最关键的地方是BlockJUnit4ClassRunner.run()方法:
1Statement statement = classBlock(notifier);
2statement.evaluate(); // Would trigger the whole test case execution flow.
第一句用于生成一个Statement对象,这个对象里面封装了类级别(classBlock)和方法级别(methodBlock)的所有注解相关的信息。
第二句statement.evaluate()方法将触发整个链式调用,将会按照组合的先后顺序倒序执行,比如,生成Statement的顺序为:
1Statement statement = childrenInvoker(notifier);
2statement = withBeforeClasses(statement);
3statement = withAfterClasses(statement);
4statement = withClassRules(statement);
那么在执行evaluate方法的时候:
- 会先将Statement看做是RunRules并调用其evaluate,
- 这会把Statement看做是RunAfters并调用其evaluate,
- 这又会把Statement看做是RunBefores并会调用其evalueate,
- 这样又会调用childrenInvoker返回的Statement的evaluate,而这是一个回调函数,即会调用runChildren(notifier);
- 遍历所有的用例并为每个用例调用runChild(each, notifier);
- runChild()方法会调用runLeaf()方法(里面也同样是倒叙执行的过程),以完成一个用例的执行。
有同学可能会问了,以上都是使用Eclipse自带的插件来执行JUnit的,如果不用Eclipse,如何执行呢?手动执行的入口又在哪里呢?
二、在命令行中执行JUnit
接下来,我们用命令行来执行这个用例。不过,在执行前需要先确保JUnit4相关的jar包(主要是junit和hamcrest-core这两个jar包)在classpath中。Win10中可以对classpath环境变量如下配置:
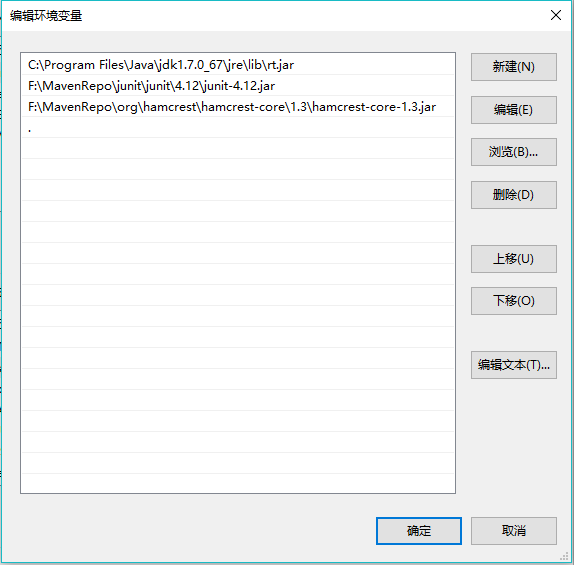
之后打开命令行,可以先用以下方式检查配置的classpath是否生效:
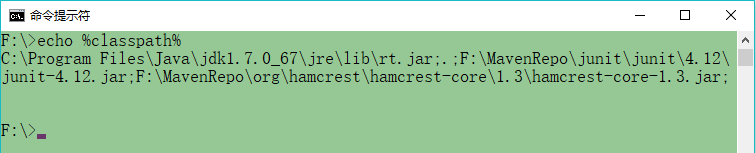
这里我直接复制这个TestA.java到F根目录并编译它:
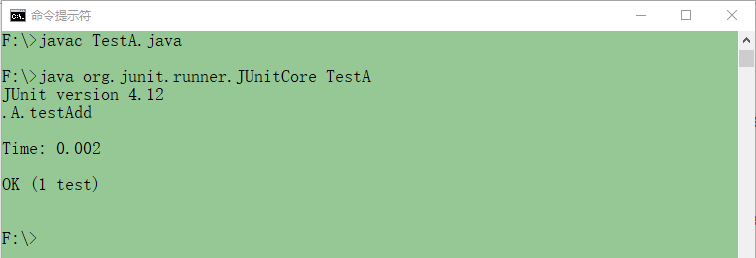
注意执行测试的时候,需要使用如下命令:
java org.junit.runner.JUnitCore TestA
这里的org.junit.runner.JUnitCore类来自junit.jar包,它里面的main方法就是整个程序的入口了,一起看看源代码:
1public class JUnitCore {
2    private final RunNotifier notifier = new RunNotifier();
3
4    /**
5     * Run the tests contained in the classes named in the <code>args</code>.
6     * If all tests run successfully, exit with a status of 0. Otherwise exit with a status of 1.
7     * Write feedback while tests are running and write
8     * stack traces for all failed tests after the tests all complete.
9     *
10     * @param args names of classes in which to find tests to run
11     */
12    public static void main(String... args) {
13        Result result = new JUnitCore().runMain(new RealSystem(), args);
14        System.exit(result.wasSuccessful() ? 0 : 1);
15    }
16    // Ignore other codes
17}
args参数即为我们指定的要执行的测试类名字,这里为TestA。可以看见,main方法中创建了一个JUnitCore实例,然后调用runMain()方法:
1Result runMain(JUnitSystem system, String... args) {
2	system.out().println("JUnit version " + Version.id());
3	JUnitCommandLineParseResult jUnitCommandLineParseResult =
4		JUnitCommandLineParseResult.parse(args);
5	RunListener listener = new TextListener(system);
6	addListener(listener);
7	return run(jUnitCommandLineParseResult.createRequest(defaultComputer()));
8}
runMain方法第一句输出了JUnit的版本信息,这和上图的执行结果一致。接下来调用了run()方法:
1public Result run(Request request) {
2    return run(request.getRunner());
3}
4
5public Result run(Runner runner) {
6	Result result = new Result();
7	RunListener listener = result.createListener();
8	notifier.addFirstListener(listener);
9	try {
10		notifier.fireTestRunStarted(runner.getDescription());
11		runner.run(notifier); // !!!IMPORTANT!!!
12		notifier.fireTestRunFinished(result);
13	} finally {
14		removeListener(listener);
15	}
16	return result;
17}
可见,最终还是调用了Runner.run方法。由于这个该方法是一个抽象函数,那么,程序是如何知道最终应该调用默认的BlockJUnit4ClassRunner的run方法呢?
答案就在这个jUnitCommandLineParseResult.createRequest方法中:
1public Request createRequest(Computer computer) {
2	if (parserErrors.isEmpty()) {
3		Request request = Request.classes(
4				computer, classes.toArray(new Class<?>[classes.size()]));
5		return applyFilterSpecs(request);
6	} else {
7		return errorReport(new InitializationError(parserErrors));
8	}
9}
这里面又调用了Request.classes()方法来创建一个request:
1public static Request classes(Computer computer, Class<?>... classes) {
2	try {
3        // Note this builder, it is the same as the 2nd screenshot.
4		AllDefaultPossibilitiesBuilder builder = new AllDefaultPossibilitiesBuilder(true);
5		Runner suite = computer.getSuite(builder, classes);
6		return runner(suite);
7	} catch (InitializationError e) {
8		throw new RuntimeException(
9				"Bug in saff's brain: Suite constructor, called as above, should always complete");
10	}
11}
而Computer.getSuite的代码如下:
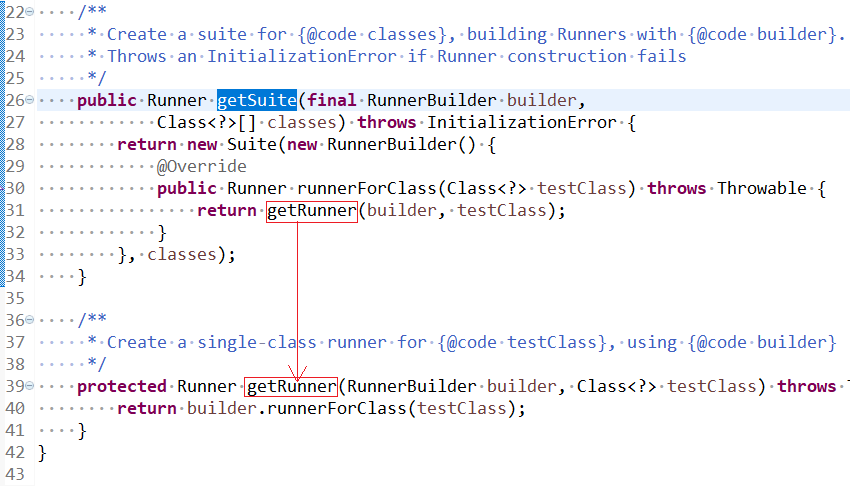
这样最终就会调用到builder.runnerForClasses(testClass)。由上方可知,这个builder是AllDefaultPossibilitiesBuilder,而builder.runnerForClasses(testClass)方法正是之前分析Eclipse中执行JUnit过程时分析到的获取BlockJUnit4ClassRunner的过程(见图2)。
就是说,从这里开始就和使用Eclipse来执行JUnit的调用过程BlockJUnit4ClassRunner.run吻合了。