
一、Ajax基本概念
【参考】:https://www.runoob.com/jquery/jquery-ajax-intro.html 异步的javascript。在不全部加载某一个页面部的情况下,对页面进行局的刷新,ajax请求都在后台。 图片,css文件,js文件都是静态文件。
1.1ajax基本用法
1$.ajax({
2'url':请求地址,
3'type':请求方式,
4'dataType':预期返回的数据格式
5'data':参数
6}).success(function(data){
7//回调函数(data即返回的数据)
8})
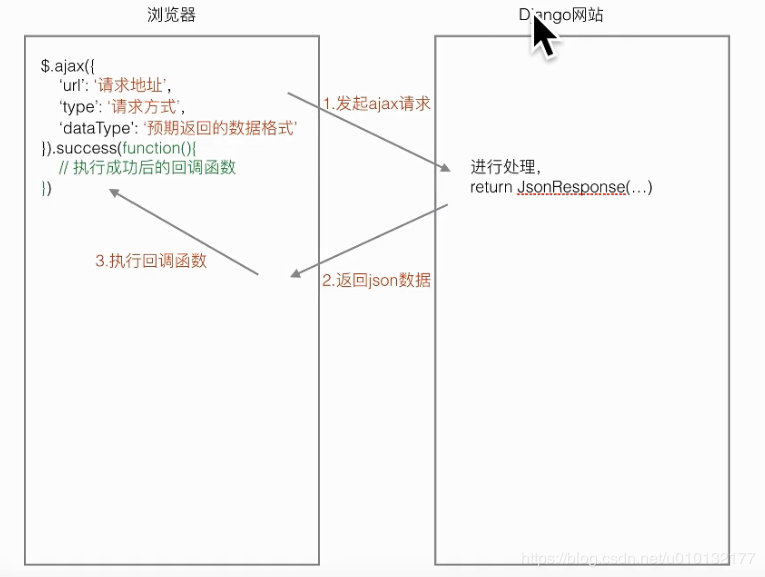
1.2完整过程示意
- 发起ajax请求:jquery发起
- 执行相应的视图函数,返回json内容
- 执行相应的回调函数。通过判断json内容,进行相应处理。
二、Ajax登录案例
2.1ajax测试案例
第1步,下载 jquery:https://jquery.com/download/
下载第2个开发,未压缩版本 https://code.jquery.com/jquery-3.4.1.js 【1】compressed, production jQuery 3.4.1- 用于实际的网站中,已被精简和压缩。 【2】uncompressed, development jQuery 3.4.1 - 用于测试和开发(未压缩,是可读的代码)
第2步,部署jquery,在根目录下建立 /static/js、css、images、
- 把jquery.js文件放入js文件夹
第3步,设置project1/settings.py,拉到最底下:
设置静态文件的保存目录
1# Static files (CSS, JavaScript, Images)
2# https://docs.djangoproject.com/en/3.0/howto/static-files/
3
4STATIC_URL = '/static/'
5STATICFILES_DIRS = [os.path.join(BASE_DIR, 'static')] # 设置静态文件的保存目录
第4步,创建ajax请求示例页面templates/app1/test_ajax.html,
1<!DOCTYPE html>
2<html lang="en">
3<head>
4    <meta charset="UTF-8">
5    <title>ajax</title>
6    <script src="https://my.oschina.net/static/js/jquery-1.12.4.min.js"></script>
7    <script>
8        $(function () {
9
10            // 绑定btnAjax的click事件
11            $('#btnAjax').click(function () {
12                alert(1)
13                $.ajax({
14                    'url': '/ajax_handle',
15                    'dataType': 'json',
16                    // 'async': false, // 同步的ajax请求
17                }).success(function (data) {
18                    // 进行处理
19                    alert(2)
20                    if (data.res == 1){
21                        $('#message').show().html('提示信息')
22                    }
23                })
24                alert(3)
25            })
26
27        })
28    </script>
29    <style>
30        #message {
31            display: none;
32            color: red;
33        }
34    </style>
35</head>
36<body>
37<input type="button" id="btnAjax" value="ajax请求">
38<div id="message"></div>
39</body>
40</html>
第5步,配置app1/urls.py
1path(r'test_ajax',views.test_ajax),#ajax测试页
2path(r'ajax_handle/',views.ajax_handle),#ajax处理页
第6步,编写app1/views.py
-
引入json模块
-
ajax测试页面
-
ajax请求处理
from django.shortcuts import render,redirect #引入重定向简写模块 from app1.models import BookInfo,AreaInfo #从模型下导入bookinfo数据模型 from django.http import HttpResponse,HttpResponseRedirect,JsonResponse #引入返回请求模块、重新定向模块、json模块 from datetime import date # 引用时间模块
/test_ajax
def test_ajax(request): '''显示ajax页面''' return render(request, 'app1/test_ajax.html')
def ajax_handle(request): '''接收ajax请求处理,返回json数据''' # 返回的json数据 {'res':1} return JsonResponse({'res':1})
效果:http://127.0.0.1:8000/test_ajax
点击按钮后,用jquery发起ajax请求,服务器返回请求,jquery处理返回数据,在页面显示出来提示信息,但页面并未整体刷新: 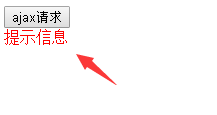 后台的ajax请求查看: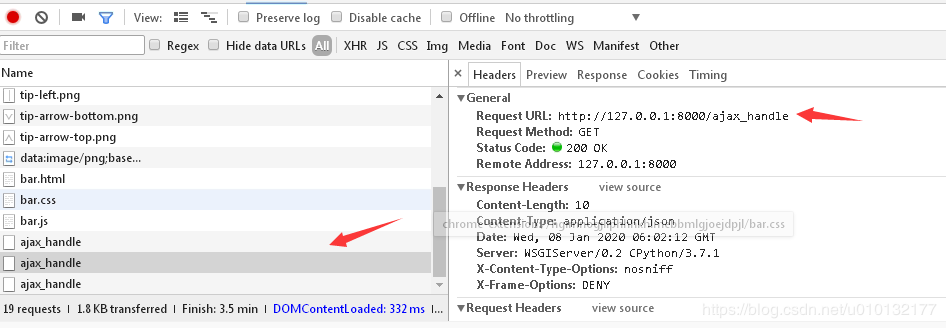
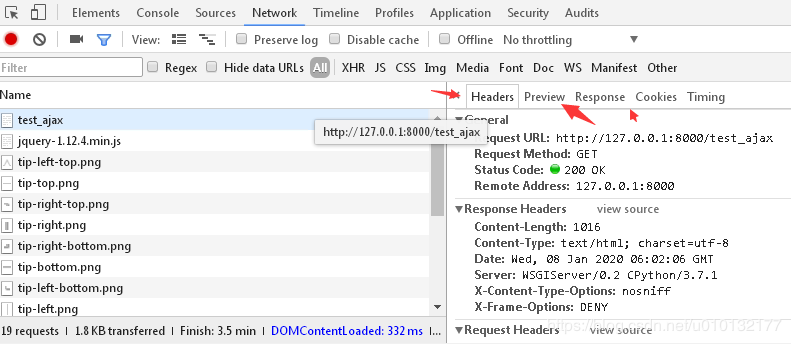
技巧:出错调试也在调试里的network里查看
2.2 ajax的异步和同步请求控制(上步的4步)
还是在templates/app1/test_ajax.html把js部分加上alert(1),2,3查看运行顺序
1<!DOCTYPE html>
2<html lang="en">
3<head>
4    <meta charset="UTF-8">
5    <title>ajax</title>
6    <script src="https://my.oschina.net/static/js/jquery-1.12.4.min.js"></script>
7    <script>
8        $(function () {
9
10            // 绑定btnAjax的click事件
11            $('#btnAjax').click(function () {
12                alert(1)//【1】
13                $.ajax({
14                    'url': '/ajax_handle',
15                    'dataType': 'json',
16                    // 'async': false, // 【4】同步的ajax请求
17                }).success(function (data) {
18                    // 进行处理
19                    alert(2)//【2】
20                    if (data.res == 1){
21                        $('#message').show().html('提示信息')
22                    }
23                })
24                alert(3)//【3】
25            })
26
27        })
28    </script>
29    <style>
30        #message {
31            display: none;
32            color: red;
33        }
34    </style>
35</head>
36<body>
37<input type="button" id="btnAjax" value="ajax请求">
38<div id="message"></div>
39</body>
40</html>
效果:运行发现运行顺序为1,3,2,而不是预期的1,2,3这即是异步
把第【4】项注释取消,顺序即变成1,2,3,又变回同步
同步设置:'async': false,
1<script>
2        $(function () {
3
4            // 绑定btnAjax的click事件
5            $('#btnAjax').click(function () {
6                alert(1)//【1】
7                $.ajax({
8                    'url': '/ajax_handle',
9                    'dataType': 'json',
10                    'async': false, // 【4】同步的ajax请求
11                }).success(function (data) {
12                    // 进行处理
13                    alert(2)//【2】
14                    if (data.res == 1){
15                        $('#message').show().html('提示信息')
16                    }
17                })
18                alert(3)//【3】
19            })
20
21        })
22    </script>
<font color='red'>2.3 ajax登录案例</font>
【目标】:实现用户信息输入错误,也不刷新页面清空数据,直接提示错误,省得再次输入信息
1) 首先,分析出请求地址时需要携带的参数。
- 视图函数处理完成之后,所返回的json的格式。
- 显示出登录页面: a) 设计url,通过浏览器访问 http://127.0.0.1:8000/login_ajax 时显示登录页面。 b) 设计url对应的视图函数login_ajax。 c) 编写模板文件login_ajax.html:在里面写jquery代码发起ajax请求。
2) 然后,登录校验功能
a) 设计url,点击登录页的登录按钮发起请求http://127.0.0.1:8000/login_ajax_check时进行登录校验。 b) 设计url对应的视图函数login_ajax_check:
-
接收post提交过来的数据。
-
进行登录校验,并返回json内容。 JsonRepsone
-
Json格式如下:
{'res':'1'} #表示登录成功 {'res':'0'} #表示登录失败
第1步,templates/app1/login.html
1<!DOCTYPE html>
2<html lang="zh">
3<head>
4    <meta charset="UTF-8">
5    <!-- 【0】引入jquery -->
6    <script src="https://my.oschina.net/static/js/jquery-1.12.4.min.js"></script>
7    <title>登录页面</title>
8</head>
9<script>
10    // 【5】写ajax处理函数
11    $(function () {
12        $('#btnLogin').click(function () {
13            //1.获取用户名、密码
14            username=$('#username').val()
15            password=$('#password').val()
16            //2.发起ajax--post(username,password)请求验证,地址:/login_check
17            $.ajax({
18                'url':'/login_check',//验证地址
19                'type':'post',//请求类型
20                'data':{'username':username,'password':password},//发送数据
21                'dataType':'json',//希望返回数据类型
22            }).success(function(data){
23                //成功返回{'res':1},失败{'res':0}
24                if(data.res===0){
25                    $('#msg').show().html('用户名或密码错误请重试!')//登录失败则显示msg,并在里写入信息
26                }else{//成功跳转到books页面
27                    location.href='/books'
28                }
29            })
30
31        })
32    })
33</script>
34<style>
35    /* 【4】信息提示样式 */
36#msg{
37    display: none;
38    color:red;
39}
40</style>
41<body>
42    <!-- 【1】原form删除,input的name变id,方便jquery操作 -->
43    用户名:<input type="text" id="username"><br/>
44    密码:<input type="password" id="password"><br/>
45    <!-- 【2】加入一个信息提示框,用于密码等错误提示 -->
46    <div id="msg"></div>
47    <!-- 【3】按钮type改button,加一个id方便jquery操作 -->
48    <input type="button" id="btnLogin" value="登录">
49
50</body>
51</html>
第2步,app1/views.py处理函数
-
登录页函数
-
登录校验函数
from django.shortcuts import render,redirect #引入重定向简写模块 from app1.models import BookInfo,AreaInfo #从模型下导入bookinfo数据模型 from django.http import HttpResponse,HttpResponseRedirect,JsonResponse #引入返回请求模块、重新定向模块 from datetime import date # 引用时间模块
def login(request): '''登录页''' return render(request,'app1/login.html')
def login_check(request): '''登录校验''' #1.获取用户名密码 username=request.POST.get('username') password=request.POST.get('password') #2.进行校验,并返回json数据 if username=='jim' and password=='123': #return redirect('/books') return JsonResponse({'res':1}) #正确返回1 else: #return redirect('/login') return JsonResponse({'res':0}) #错误返回0
第3步,app1/ulrs.py配置
1    path('login/',views.login),#登录页
2    path('login_check',views.login_check),#登录检测
效果:http://127.0.0.1:8000/login/
不正确:则在不刷新页面情况下提示错误信息(用于名,密码都还在,不要再次填写), 正确:则跳转到页面 http://127.0.0.1:8000/books 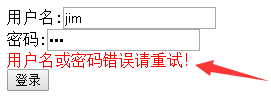
注意:settings.py别忘记设置
设置静态文件的保存目录
1# Static files (CSS, JavaScript, Images)
2# https://docs.djangoproject.com/en/3.0/howto/static-files/
3
4STATIC_URL = '/static/'
5STATICFILES_DIRS = [os.path.join(BASE_DIR, 'static')] # 设置静态文件的保存目录