接SpringBoot 快速入门(Eclipse);
步骤一:视图支持
Springboot的默认视图支持是Thymeleaf,但是Thymeleaf我们不熟悉,我们熟悉的还是jsp。 所以下面是讲解如何让Springboot支持 jsp。
Thymeleaf 是一种Java XML/XHTML/HTML 5 的网站模版系统。(后面文章会介绍)
步骤二:基于前面的springBoot入门小demo
该知识点在《SpringBoot快速入门(Eclipse)》的基础上进行修改的 。
步骤三:修改pom.xml文件,添加对jsp支持
1<project xmlns="http://maven.apache.org/POM/4.0.0" xmlns:xsi="http://www.w3.org/2001/XMLSchema-instance" xsi:schemaLocation="http://maven.apache.org/POM/4.0.0 http://maven.apache.org/xsd/maven-4.0.0.xsd">
2  <modelVersion>4.0.0</modelVersion>
3  <groupId>cn.xdf</groupId>
4  <artifactId>springbootTest</artifactId>
5  <version>0.0.1-SNAPSHOT</version>
6  <name>springboot </name>
7  <description>springboot </description>
8  <packaging>war</packaging>
9
10     <parent>
11        <groupId>org.springframework.boot</groupId>
12        <artifactId>spring-boot-starter-parent</artifactId>
13        <version>1.5.9.RELEASE</version>
14    </parent>
15
16    <dependencies>
17        <dependency>
18            <groupId>org.springframework.boot</groupId>
19            <artifactId>spring-boot-starter-web</artifactId>
20        </dependency>
21        <dependency>
22              <groupId>junit</groupId>
23              <artifactId>junit</artifactId>
24              <scope>test</scope>
25        </dependency>
26        <!-- 部署tomcat,排除冲突-->
27        <dependency>
28                <groupId>org.springframework.boot</groupId>
29             <artifactId>spring-boot-starter-tomcat</artifactId>
30            <scope>provided</scope>
31        </dependency>
32         <!-- servlet依赖 -->
33        <dependency>
34              <groupId>javax.servlet</groupId>
35              <artifactId>javax.servlet-api</artifactId>
36        </dependency>
37        <dependency>
38              <groupId>javax.servlet</groupId>
39              <artifactId>jstl</artifactId>
40        </dependency>
41        <!-- tomcat的支持-->
42        <dependency>
43               <groupId>org.apache.tomcat.embed</groupId>
44               <artifactId>tomcat-embed-jasper</artifactId>
45        </dependency>
46    </dependencies>
47
48    <properties>
49        <java.version>1.8</java.version>
50    </properties>
51
52    <build>
53        <plugins>
54            <plugin>
55                <groupId>org.springframework.boot</groupId>
56                <artifactId>spring-boot-maven-plugin</artifactId>
57            </plugin>
58            <!-- 打jar需要的插件-->
59            <plugin>
60                 <groupId>org.apache.maven.plugins</groupId>
61                    <artifactId>maven-jar-plugin</artifactId>
62             </plugin>
63        </plugins>
64    </build>
65
66</project>
即下面这部分(jsp本身就是一个servlet,运行于服务器端,所以添加以下这两部分依赖和支持):
1<!-- servlet依赖 -->
2        <dependency>
3              <groupId>javax.servlet</groupId>
4              <artifactId>javax.servlet-api</artifactId>
5        </dependency>
6        <dependency>
7              <groupId>javax.servlet</groupId>
8              <artifactId>jstl</artifactId>
9        </dependency>
10        <!-- tomcat的支持-->
11        <dependency>
12               <groupId>org.apache.tomcat.embed</groupId>
13               <artifactId>tomcat-embed-jasper</artifactId>
14        </dependency>
步骤四:添加application.properties配置文件
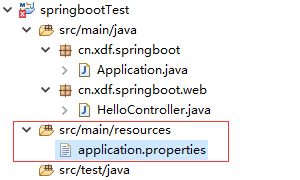
在src目录下增加application.properties文件,用于视图重定向jsp文件的位置。
注意:jsp后面的“/”别忘了 !
1spring.mvc.view.prefix=/WEB-INF/jsp/
2spring.mvc.view.suffix=.jsp
步骤五:修改HelloController类
修改HelloController,把本来的@RestController 改为@Controller。
这时返回"hello"就不再是字符串,而是根据application.properties 中的视图重定向,到/WEB-INF/jsp目录下去寻找hello.jsp文件
1package cn.xdf.springboot.web;
2import java.text.DateFormat;
3import java.util.Date;
4import org.springframework.stereotype.Controller;
5import org.springframework.ui.Model;
6import org.springframework.web.bind.annotation.RequestMapping;
7
8@Controller
9public class HelloController {
10
11    @RequestMapping("/hello")
12    public String hello(Model m){
13        m.addAttribute("now",DateFormat.getDateTimeInstance().format(new Date()));
14        return "hello";  //视图重定向hello.jsp
15    }
16}
步骤六:创建hello.jsp文件
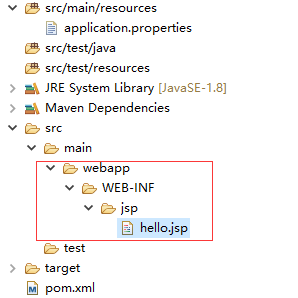
在main目录下,新建--> webapp/WEB-INF/jsp 目录。
随后新建hello.jsp 文件,在其中使用EL 表达式显示放在HelloController的model中的当前时间。
1<%@ page language="java" contentType="text/html; charset=UTF-8"
2    pageEncoding="UTF-8"%>
3<!DOCTYPE html PUBLIC "-//W3C//DTD HTML 4.01 Transitional//EN" "http://www.w3.org/TR/html4/loose.dtd">
4<html>
5<head>
6<meta http-equiv="Content-Type" content="text/html; charset=UTF-8">
7<title>Insert title here</title>
8</head>
9<body>
10    Hi JSP. 现在时间是  ${now}
11    <hr>
12    <!--测试发现更改jsp文件,也需要重启启动类(清缓存也不行!) -->
13</body>
14</html>
步骤七:启动测试
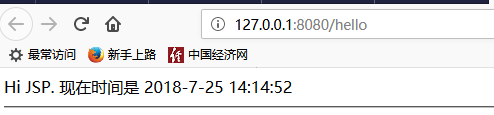
测试地址是:http://127.0.0.1:8080/hello