
一、线程
1、什么是线程
线程(thread)是操作系统能够进行运算调度的最小单位。它被包含在进程之中,是进程中的实际 运作单位。一条线程指的是进程中一个单一顺序的控制流,一个进程中可以并发多个线程,每条线 程并行执行不同的任务。
2、如何创建线程
2.1、JAVA中创建线程
1/**
2 * 继承Thread类,重写run方法
3 */
4class MyThread extends Thread {
5    @Override
6    public void run() {
7        System.out.println("myThread..." + Thread.currentThread().getName());
8} }
9
10/**
11 * 实现Runnable接口,实现run方法
12 */
13class MyRunnable implements Runnable {
14    @Override
15    public void run() {
16        System.out.println("MyRunnable..." + Thread.currentThread().getName());
17} }
18
19/**
20 * 实现Callable接口,指定返回类型,实现call方法
21 */
22class MyCallable implements Callable<String> {
23    @Override
24    public String call() throws Exception {
25        return "MyCallable..." + Thread.currentThread().getName();
26} }
27
2.2、测试一下
1public static void main(String[] args) throws Exception {
2    MyThread thread = new MyThread();
3    thread.run();   //myThread...main
4    thread.start(); //myThread...Thread-0
5
6    MyRunnable myRunnable = new MyRunnable();
7    Thread thread1 = new Thread(myRunnable);
8    myRunnable.run();   //MyRunnable...main
9    thread1.start();    //MyRunnable...Thread-1
10
11    MyCallable myCallable = new MyCallable();
12    FutureTask<String> futureTask = new FutureTask<>(myCallable);
13    Thread thread2 = new Thread(futureTask);
14    thread2.start();
15    System.out.println(myCallable.call());  //MyCallable...main
16    System.out.println(futureTask.get());   //MyCallable...Thread-2
17
18}
19
2.3、问题
既然我们创建了线程,那为何我们直接调用方法和我们调用start()方法的结果不同?new Thread() 是否真实创建了线程?
2.4、问题分析
我们直接调用方法,可以看到是执行的主线程,而调用start()方法就是开启了新线程,那说明new Thread()并没有创建线程,而是在start()中创建了线程。
那我们看下Thread类start()方法:
1class Thread implements Runnable { //Thread类实现了Runnalbe接口,实现了run()方法
2
3    private Runnable target;
4
5    public synchronized void start() {
6        ...
7
8        boolean started = false;
9        try {
10            start0(); //可以看到,start()方法真实的调用时start0()方法
11            started = true;
12        } finally {
13            ...
14        }
15    }
16
17    private native void start0();  //start0()是一个native方法,由JVM调用底层操作系统,开启一个线程,由操作系统过统一调度
18
19    @Override
20    public void run() {
21        if (target != null) {
22             target.run(); //操作系统在执行新开启的线程时,回调Runnable接口的run()方法,执行我们预设的线程任务
23
24        }
25     }
26}
27
2.5、总结
-
JAVA不能直接创建线程执行任务,而是通过创建Thread对象调用操作系统开启线程,在由操作系 统回调Runnable接口的run()方法执行任务;
-
实现Runnable的方式,将线程实际要执行的回调任务单独提出来了,实现线程的启动与回调任务 解耦;
-
实现Callable的方式,通过Future模式不但将线程的启动与回调任务解耦,而且可以在执行完成后 获取到执行的结果;
二、多线程
1、什么是多线程
多线程(multithreading),是指从软件或者硬件上实现多个线程并发执行的技术。同一个线程只 能处理完一个任务在处理下一个任务,有时我们需要多个任务同时处理,这时,我们就需要创建多 个线程来同时处理任务。
2、多线程有什么好处
2.1、串行处理
1public static void main(String[] args) throws Exception {
2    System.out.println("start...");
3    long start = System.currentTimeMillis();
4    for (int i = 0; i < 5; i++) {
5        Thread.sleep(2000);  //每个任务执行2秒
6        System.out.println("task done..."); //处理执行结果
7    }
8    long end = System.currentTimeMillis();
9    System.out.println("end...,time = "  + (end - start));
10}
11//执行结果
12start...
13task done...
14task done...
15task done...
16task done...
17task done... end...,time = 10043
18
2.2、并行处理
1public static void main(String[] args) throws Exception {
2    System.out.println("start...");
3    long start = System.currentTimeMillis();
4    List<Future> list = new ArrayList<>();
5
6    for (int i = 0; i < 5; i++) {
7        Callable<String> callable = new Callable<String>() {
8            @Override
9            public String call() throws Exception {
10                Thread.sleep(2000); //每个任务执行2秒
11                return "task done...";
12            }
13
14        };
15        FutureTask task = new FutureTask(callable);
16        list.add(task);
17        new Thread(task).start();
18
19    }
20
21    list.forEach(future -> {
22        try {
23            System.out.println(future.get()); //处理执行结果 } catch (Exception e) {
24         }
25    });
26
27    long end = System.currentTimeMillis();
28    System.out.println("end...,time = " + (end - start));
29
30}
31//执行结果
32 start...
33 task done...
34 task done...
35 task done...
36 task done...
37 task done... end...,time = 2005
38
2.3、总结
-
多线程可以把一个任务拆分为几个子任务,多个子任务可以并发执行,每一个子任务就是一个线程。
-
多线程是为了同步完成多项任务,不是为了提高运行效率,而是为了提高资源使用效率来提高系统 的效率。
2.4、多线程的问题
上面示例中我们可以看到,如果每来一个任务,我们就创建一个线程,有很多任务的情况下,我们 会创建大量的线程,可能会导致系统资源的耗尽。同时,我们知道线程的执行是需要抢占CPU资源 的,那如果有太多的线程,就会导致大量时间用在线程切换的开销上。
再有,每来一个任务都需要创建一个线程,而创建一个线程需要调用操作系统底层方法,开销较 大,而线程执行完成后就被回收了。在需要大量线程的时候,创建线程的时间就花费不少了。
三、线程池
1、如何设计一个线程池
由于多线程的开发存在上述的一些问题,那我们是否可以设计一个东西来避免这些问题呢?当然可以! 线程池就是为了解决这些问题而生的。那我们该如何设计一个线程池来解决这些问题呢?或者说,一个线程池该具备什么样的功能?
1.1、线程池基本功能
-
多线程会创建大量的线程耗尽资源,那线程池应该对线程数量有所限制,可以保证不会耗尽系统资 源;
-
每次创建新的线程会增加创建时的开销,那线程池应该减少线程的创建,尽量复用已创建好的线 程;
1.2、线程池面临问题
-
我们知道线程在执行完自己的任务后就会被回收,那我们如何复用线程?
-
我们指定了线程的最大数量,当任务数超出线程数时,我们该如何处理?
1.3、创新源于生活
先假设一个场景:假设我们是一个物流公司的管理人员,要配送的货物就是我们的任务,货车就是 我们配送工具,我们当然不能有多少货物就准备多少货车。那当顾客源源不断的将货物交给我们配 送,我们该如何管理才能让公司经营的最好呢?
-
最开始货物来的时候,我们还没有货车,每批要运输的货物我们都要购买一辆车来运输;
-
当货车运输完成后,暂时还没有下一批货物到达,那货车就在仓库停着,等有货物来了立马就可以 运输;
-
当我们有了一定数量的车后,我们认为已经够用了,那后面就不再买车了,这时要是由新的货物来 了,我们就会让货物先放仓库,等有车回来在配送;
-
当618大促来袭,要配送的货物太多,车都在路上,仓库也都放满了,那怎么办呢?我们就选择临 时租一些车来帮忙配送,提高配送的效率;
-
但是货物还是太多,我们增加了临时的货车,依旧配送不过来,那这时我们就没办法了,只能让发 货的客户排队等候或者干脆不接受了;
-
大促圆满完成后,累计的货物已经配送完成了,为了降低成本,我们就将临时租的车都还了;
1.4、技术源于创新
基于上述场景,物流公司就是我们的线程池、货物就是我们的线程任务、货车就是我们的线程。我 们如何设计公司的管理货车的流程,就应该如何设计线程池管理线程的流程。
-
当任务进来我们还没有线程时,我们就该创建线程执行任务;
-
当线程任务执行完成后,线程不释放,等着下一个任务进来后接着执行;
-
当创建的线程数量达到一定量后,新来的任务我们存起来等待空闲线程执行,这就要求线程池有个 存任务的容器;
-
当容器存满后,我们需要增加一些临时的线程来提高处理效率;
-
当增加临时线程后依旧处理不了的任务,那就应该将此任务拒绝;
-
当所有任务执行完成后,就应该将临时的线程释放掉,以免增加不必要的开销;
2、线程池具体分析
上文中,我们讲了该如何设计一个线程池,下面我们看看大神是如何设计的;
2.1、 JAVA中的线程池是如何设计的
2.1.1、 线程池设计
看下线程池中的属性,了解线程池的设计。
1public class ThreadPoolExecutor extends AbstractExecutorService {
2
3    //线程池的打包控制状态,用高3位来表示线程池的运行状态,低29位来表示线程池中工作线程的数量
4    private final AtomicInteger ctl = new AtomicInteger(ctlOf(RUNNING, 0));
5
6    //值为29,用来表示偏移量
7     private static final int COUNT_BITS = Integer.SIZE - 3;
8
9    //线程池的最大容量
10     private static final int CAPACITY = (1 << COUNT_BITS) - 1;
11
12    //线程池的运行状态,总共有5个状态,用高3位来表示
13    private static final int RUNNING = -1 << COUNT_BITS;  //接受新任务并处理阻塞队列中的任务
14
15    private static final int SHUTDOWN = 0 << COUNT_BITS;  //不接受新任务但会处理阻塞队列中的任务
16
17    private static final int STOP = 1 << COUNT_BITS;  //不会接受新任务,也不会处理阻塞队列中的任务,并且中断正在运行的任务
18
19    private static final int TIDYING = 2 << COUNT_BITS;  //所有任务都已终止, 工作线程数量为0,即将要执行terminated()钩子方法
20
21    private static final int TERMINATED =  3 << COUNT_BITS;  // terminated()方法已经执行结束
22
23    //任务缓存队列,用来存放等待执行的任务
24    private final BlockingQueue<Runnable> workQueue;
25
26    //全局锁,对线程池状态等属性修改时需要使用这个锁
27    private final ReentrantLock mainLock = new ReentrantLock();
28
29    //线程池中工作线程的集合,访问和修改需要持有全局锁
30    private final HashSet<Worker> workers = new HashSet<Worker>();
31
32    // 终止条件
33    private final Condition termination = mainLock.newCondition();
34
35    //线程池中曾经出现过的最大线程数
36    private int largestPoolSize;
37
38    //已完成任务的数量
39    private long completedTaskCount;
40
41    //线程工厂
42    private volatile ThreadFactory threadFactory;
43
44    //任务拒绝策略
45    private volatile RejectedExecutionHandler handler;
46
47    //线程存活时间
48    private volatile long keepAliveTime;
49
50    //是否允许核心线程超时
51    private volatile boolean allowCoreThreadTimeOut;
52
53    //核心池大小,若allowCoreThreadTimeOut被设置,核心线程全部空闲超时被回收的情况下会为0
54    private volatile int corePoolSize;
55
56    //最大池大小,不得超过CAPACITY
57    private volatile int maximumPoolSize;
58
59    //默认的任务拒绝策略
60    private static final RejectedExecutionHandler defaultHandler = new AbortPolicy();
61
62    //运行权限相关
63    private static final RuntimePermission shutdownPerm =
64        new RuntimePermission("modifyThread");
65
66    ...
67}
68
小结一下:以上线程池的设计可以看出,线程池的功能还是很完善的。
-
提供了线程创建、数量及存活时间等的管理;
-
提供了线程池状态流转的管理;
-
提供了任务缓存的各种容器;
-
提供了多余任务的处理机制;
-
提供了简单的统计功能;
2.1.2、线程池构造函数
1//构造函数
2 public ThreadPoolExecutor(int corePoolSize, //核心线程数
3                           int maximumPoolSize, //最大允许线程数
4                           long keepAliveTime, //线程存活时间
5                           TimeUnit unit, //存活时间单位
6                           BlockingQueue<Runnable> workQueue, //任务缓存队列
7                           ThreadFactory threadFactory, //线程工厂
8                           RejectedExecutionHandler handler) { //拒绝策略
9    if (corePoolSize < 0 ||
10        maximumPoolSize <= 0 ||
11        maximumPoolSize < corePoolSize ||
12        keepAliveTime < 0)
13        throw new IllegalArgumentException();
14
15    if (workQueue == null || threadFactory == null || handler == null)
16        throw new NullPointerException();
17
18    this.corePoolSize = corePoolSize;
19    this.maximumPoolSize = maximumPoolSize;
20    this.workQueue = workQueue;
21    this.keepAliveTime = unit.toNanos(keepAliveTime);
22    this.threadFactory = threadFactory;
23    this.handler = handler;
24}
25
小结一下:
- 构造函数告诉了我们可以怎样去适用线程池,线程池的哪些特性是我们可以控制的;
2.1.3、线程池执行
2.1.3.1、提交任务方法
• public void execute(Runnable command);
• Future<?> submit(Runnable task);
• Future submit(Runnable task, T result);
• Future submit(Callable task);
1public Future<?> submit(Runnable task) {
2        if (task == null) throw new NullPointerException();
3        RunnableFuture<Void> ftask = newTaskFor(task, null);
4        execute(ftask);
5        return ftask;
6}
7
可以看到submit方法的底层调用的也是execute方法,所以我们这里只分析execute方法;
1    public void execute(Runnable command) {
2        if (command == null)
3            throw new NullPointerException();
4
5        int c = ctl.get();
6        //第一步:创建核心线程
7        if (workerCountOf(c) < corePoolSize) {  //worker数量小于corePoolSize
8            if (addWorker(command, true))       //创建worker
9                return;
10            c = ctl.get();
11        }
12        //第二步:加入缓存队列
13        if (isRunning(c) && workQueue.offer(command)) { //线程池处于RUNNING状态,将任务加入workQueue任务缓存队列
14            int recheck = ctl.get();
15            if (! isRunning(recheck) && remove(command))    //双重检查,若线程池状态关闭了,移除任务
16                reject(command);
17            else if (workerCountOf(recheck) == 0)       //线程池状态正常,但是没有线程了,创建worker
18                addWorker(null, false);
19        }
20        //第三步:创建临时线程
21        else if (!addWorker(command, false))
22            reject(command);
23    }
24
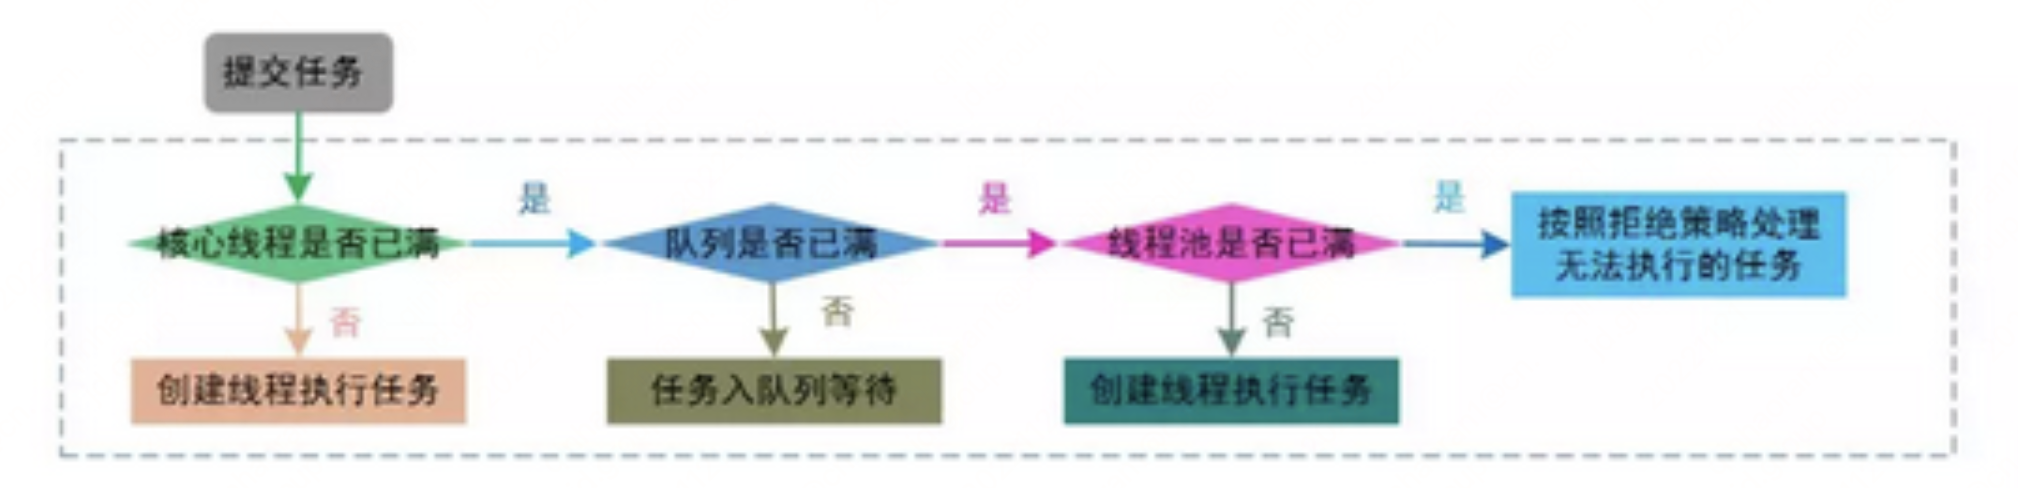
小结一下:execute()方法主要功能:
-
核心线程数量不足就创建核心线程;
-
核心线程满了就加入缓存队列;
-
缓存队列满了就增加非核心线程;
-
非核心线程也满了就拒绝任务;
2.1.3.2、创建线程
1private boolean addWorker(Runnable firstTask, boolean core) { 2 retry: 3 for (;;) { 4 int c = ctl.get(); 5 int rs = runStateOf(c); 6 7 //等价于:rs>=SHUTDOWN && (rs != SHUTDOWN || firstTask != null || workQueue.isEmpty()) 8 //线程池已关闭,并且无需执行缓存队列中的任务,则不创建 9 if (rs >= SHUTDOWN && 10 ! (rs == SHUTDOWN && 11 firstTask == null && 12 ! workQueue.isEmpty())) 13 return false; 14 15 for (;;) { 16 int wc = workerCountOf(c); 17 if (wc >= CAPACITY || 18 wc >= (core ? corePoolSize : maximumPoolSize)) 19 return false; 20 if (compareAndIncrementWorkerCount(c)) //CAS增加线程数 21 break retry; 22 c = ctl.get(); // Re-read ctl 23 if (runStateOf(c) != rs) 24 continue retry; 25 // else CAS failed due to workerCount change; retry inner loop 26 } 27 } 28 29 //上面的流程走完,就可以真实开始创建线程了 30 boolean workerStarted = false; 31 boolean workerAdded = false; 32 Worker w = null; 33 try { 34 w = new Worker(firstTask); //这里创建了线程 35 final Thread t = w.thread; 36 if (t != null) { 37 final ReentrantLock mainLock = this.mainLock; 38 mainLock.lock(); 39 try { 40 // Recheck while holding lock. 41 // Back out on ThreadFactory failure or if 42 // shut down before lock acquired. 43 int rs = runStateOf(ctl.get()); 44 45 if (rs < SHUTDOWN || 46 (rs == SHUTDOWN && firstTask == null)) { 47 if (t.isAlive()) // precheck that t is startable 48 throw new IllegalThreadStateException(); 49 workers.add(w); //这里将线程加入到线程池中 50 int s = workers.size(); 51 if (s > largestPoolSize) 52 largestPoolSize = s; 53 workerAdded = true; 54 } 55 } finally { 56 mainLock.unlock(); 57 } 58 if (workerAdded) { 59 t.start(); //添加成功,启动线程 60 workerStarted = true; 61 } 62 } 63 } finally { 64 if (! workerStarted) 65 addWorkerFailed(w); //添加线程失败操作 66 } 67 return workerStarted; 68 } 69
小结:addWorker()方法主要功能;
-
增加线程数;
-
创建线程Worker实例加入线程池;
-
加入完成开启线程;
-
启动失败则回滚增加流程;
2.1.3.3、工作线程的实现
1 private final class Worker //Worker类是ThreadPoolExecutor的内部类 2 extends AbstractQueuedSynchronizer 3 implements Runnable 4 { 5 6 final Thread thread; //持有实际线程 7 Runnable firstTask; //worker所对应的第一个任务,可能为空 8 volatile long completedTasks; //记录执行任务数 9 10 Worker(Runnable firstTask) { 11 setState(-1); // inhibit interrupts until runWorker 12 this.firstTask = firstTask; 13 this.thread = getThreadFactory().newThread(this); 14 } 15 16 public void run() { 17 runWorker(this); //当前线程调用ThreadPoolExecutor中的runWorker方法,在这里实现的线程复用 18 } 19 20 ...继承AQS,实现了不可重入锁... 21 } 22
小结:工作线程Worker类主要功能;
-
此类持有一个工作线程,不断处理拿到的新任务,持有的线程即为可复用的线程;
-
此类可看作一个适配类,在run()方法中真实调用runWorker()方法不断获取新任务,完成线程复用;
2.1.3.4、线程的复用
1    final void runWorker(Worker w) {    //ThreadPoolExecutor中的runWorker方法,在这里实现的线程复用
2        Thread wt = Thread.currentThread();
3        Runnable task = w.firstTask;
4        w.firstTask = null;
5        w.unlock(); // allow interrupts
6        boolean completedAbruptly = true;   //标识线程是否异常终止
7        try {
8            while (task != null || (task = getTask()) != null) {    //这里会不断从任务队列获取任务并执行
9                w.lock();
10
11                //线程是否需要中断
12                if ((runStateAtLeast(ctl.get(), STOP) ||
13                     (Thread.interrupted() &&
14                      runStateAtLeast(ctl.get(), STOP))) &&
15                    !wt.isInterrupted())
16                    wt.interrupt();
17                try {
18                    beforeExecute(wt, task);    //执行任务前的Hook方法,可自定义
19                    Throwable thrown = null;
20                    try {
21                        task.run();             //执行实际的任务
22                    } catch (RuntimeException x) {
23                        thrown = x; throw x;
24                    } catch (Error x) {
25                        thrown = x; throw x;
26                    } catch (Throwable x) {
27                        thrown = x; throw new Error(x);
28                    } finally {
29                        afterExecute(task, thrown); //执行任务后的Hook方法,可自定义
30                    }
31                } finally {
32                    task = null;    //执行完成后,将当前线程中的任务制空,准备执行下一个任务
33                    w.completedTasks++;
34                    w.unlock();
35                }
36            }
37            completedAbruptly = false;
38        } finally {
39            processWorkerExit(w, completedAbruptly);    //线程执行完成后的清理工作
40        }
41    }
42
小结:runWorker()方法主要功能;
-
循环从缓存队列中获取新的任务,直到没有任务为止;
-
使用worker持有的线程真实执行任务;
-
任务都执行完成后的清理工作;
2.1.3.5、队列中获取待执行任务
1 private Runnable getTask() { 2 boolean timedOut = false; //标识当前线程是否超时未能获取到task对象 3 4 for (;;) { 5 int c = ctl.get(); 6 int rs = runStateOf(c); 7 8 // Check if queue empty only if necessary. 9 if (rs >= SHUTDOWN && (rs >= STOP || workQueue.isEmpty())) { 10 decrementWorkerCount(); 11 return null; 12 } 13 14 int wc = workerCountOf(c); 15 16 // Are workers subject to culling? 17 boolean timed = allowCoreThreadTimeOut || wc > corePoolSize; 18 19 if ((wc > maximumPoolSize || (timed && timedOut)) 20 && (wc > 1 || workQueue.isEmpty())) { 21 if (compareAndDecrementWorkerCount(c)) //若线程存活时间超时,则CAS减去线程数量 22 return null; 23 continue; 24 } 25 26 try { 27 Runnable r = timed ? 28 workQueue.poll(keepAliveTime, TimeUnit.NANOSECONDS) : //允许超时回收则阻塞等待 29 workQueue.take(); //不允许则直接获取,没有就返回null 30 if (r != null) 31 return r; 32 timedOut = true; 33 } catch (InterruptedException retry) { 34 timedOut = false; 35 } 36 } 37 } 38
小结:getTask()方法主要功能;
-
实际在缓存队列中获取待执行的任务;
-
在这里管理线程是否要阻塞等待,控制线程的数量;
2.1.3.6、清理工作
1 private void processWorkerExit(Worker w, boolean completedAbruptly) { 2 if (completedAbruptly) // If abrupt, then workerCount wasn't adjusted 3 decrementWorkerCount(); 4 5 final ReentrantLock mainLock = this.mainLock; 6 mainLock.lock(); 7 try { 8 completedTaskCount += w.completedTasks; 9 workers.remove(w); //移除执行完成的线程 10 } finally { 11 mainLock.unlock(); 12 } 13 14 tryTerminate(); //每次回收完一个线程后都尝试终止线程池 15 16 int c = ctl.get(); 17 if (runStateLessThan(c, STOP)) { //到这里说明线程池没有终止 18 if (!completedAbruptly) { 19 int min = allowCoreThreadTimeOut ? 0 : corePoolSize; 20 if (min == 0 && ! workQueue.isEmpty()) 21 min = 1; 22 if (workerCountOf(c) >= min) 23 return; // replacement not needed 24 } 25 addWorker(null, false); //异常终止线程的话,需要在常见一个线程 26 } 27 } 28
小结:processWorkerExit()方法主要功能;
-
真实完成线程池线程的回收;
-
调用尝试终止线程池;
-
保证线程池正常运行;
2.1.3.7、尝试终止线程池
1 final void tryTerminate() { 2 for (;;) { 3 int c = ctl.get(); 4 5 //若线程池正在执行、线程池已终止、线程池还需要执行缓存队列中的任务时,返回 6 if (isRunning(c) || 7 runStateAtLeast(c, TIDYING) || 8 (runStateOf(c) == SHUTDOWN && ! workQueue.isEmpty())) 9 return; 10 11 //执行到这里,线程池为SHUTDOWN且无待执行任务 或 STOP 状态 12 if (workerCountOf(c) != 0) { 13 interruptIdleWorkers(ONLY_ONE); //只中断一个线程 14 return; 15 } 16 17 //执行到这里,线程池已经没有可用线程了,可以终止了 18 final ReentrantLock mainLock = this.mainLock; 19 mainLock.lock(); 20 try { 21 if (ctl.compareAndSet(c, ctlOf(TIDYING, 0))) { //CAS设置线程池终止 22 try { 23 terminated(); //执行钩子方法 24 } finally { 25 ctl.set(ctlOf(TERMINATED, 0)); //这里将线程池设为终态 26 termination.signalAll(); 27 } 28 return; 29 } 30 } finally { 31 mainLock.unlock(); 32 } 33 // else retry on failed CAS 34 } 35 } 36
小结:tryTerminate()方法主要功能;
-
实际尝试终止线程池;
-
终止成功则调用钩子方法,并且将线程池置为终态。
2.2、JAVA线程池总结
以上通过对JAVA线程池的具体分析我们可以看出,虽然流程看似复杂,但其实有很多内容都是状态重复校验、线程安全的保证等内容,其主要的功能与我们前面所提出的设计功能一致,只是额外增加了一些扩展,下面我们简单整理下线程池的功能;
2.2.1、主要功能
-
线程数量及存活时间的管理;
-
待处理任务的存储功能;
-
线程复用机制功能;
-
任务超量的拒绝功能;
2.2.2、扩展功能
-
简单的执行结果统计功能;
-
提供线程执行异常处理机制;
-
执行前后处理流程自定义;
-
提供线程创建方式的自定义;
2.2.3、流程总结
以上通过对JAVA线程池任务提交流程的分析我们可以看出,线程池执行的简单流程如下图所示;
2.3、JAVA线程池使用
线程池基本使用验证上述流程:
1   public static void main(String[] args) throws Exception {
2
3        //创建线程池
4       ThreadPoolExecutor threadPoolExecutor = new ThreadPoolExecutor(
5               5, 10, 100, TimeUnit.SECONDS, new ArrayBlockingQueue(5));
6
7        //加入4个任务,小于核心线程,应该只有4个核心线程,队列为0
8        for (int i = 0; i < 4; i++) {
9            threadPoolExecutor.submit(new MyRunnable());
10        }
11        System.out.println("worker count = " + threadPoolExecutor.getPoolSize());   //worker count = 4
12        System.out.println("queue size = " + threadPoolExecutor.getQueue().size()); //queue size = 0
13
14        //再加4个任务,超过核心线程,但是没有超过核心线程 + 缓存队列容量,应该5个核心线程,队列为3
15        for (int i = 0; i < 4; i++) {
16            threadPoolExecutor.submit(new MyRunnable());
17        }
18        System.out.println("worker count = " + threadPoolExecutor.getPoolSize());   //worker count = 5
19        System.out.println("queue size = " + threadPoolExecutor.getQueue().size()); //queue size = 3
20
21        //再加4个任务,队列满了,应该5个热核心线程,队列5个,非核心线程2个
22        for (int i = 0; i < 4; i++) {
23            threadPoolExecutor.submit(new MyRunnable());
24        }
25        System.out.println("worker count = " + threadPoolExecutor.getPoolSize());   //worker count = 7
26        System.out.println("queue size = " + threadPoolExecutor.getQueue().size()); //queue size = 5
27
28        //再加4个任务,核心线程满了,应该5个热核心线程,队列5个,非核心线程5个,最后一个拒绝
29        for (int i = 0; i < 4; i++) {
30            try {
31                threadPoolExecutor.submit(new MyRunnable());
32            } catch (Exception e) {
33                e.printStackTrace();    //java.util.concurrent.RejectedExecutionException
34            }
35        }
36        System.out.println("worker count = " + threadPoolExecutor.getPoolSize());   //worker count = 10
37        System.out.println("queue size = " + threadPoolExecutor.getQueue().size()); //queue size = 5
38        System.out.println(threadPoolExecutor.getTaskCount());  //共执行15个任务
39
40        //执行完成,休眠15秒,非核心线程释放,应该5个核心线程,队列为0
41        Thread.sleep(1500);
42        System.out.println("worker count = " + threadPoolExecutor.getPoolSize());   //worker count = 5
43        System.out.println("queue size = " + threadPoolExecutor.getQueue().size()); //queue size = 0
44
45        //关闭线程池
46        threadPoolExecutor.shutdown();
47    }
48
作者:京东零售 秦浩然
来源:京东云开发者社区 转载请注明来源