

前言
我们知道SpringBoot给我们带来了一个全新的开发体验,我们可以直接把web程序达成jar包,直接启动,这就得益于SpringBoot内置了容器,可以直接启动,本文将以Tomcat为例,来看看SpringBoot是如何启动Tomcat的,同时也将展开学习下Tomcat的源码,了解Tomcat的设计。
从 Main 方法说起
用过SpringBoot的人都知道,首先要写一个main方法来启动
1@SpringBootApplication
2public class TomcatdebugApplication {
3
4    public static void main(String[] args) {
5        SpringApplication.run(TomcatdebugApplication.class, args);
6    }
7
8}
我们直接点击run方法的源码,跟踪下来,发下最终 的run方法是调用ConfigurableApplicationContext方法,源码如下:
1public ConfigurableApplicationContext run(String... args) { 2 StopWatch stopWatch = new StopWatch(); 3 stopWatch.start(); 4 ConfigurableApplicationContext context = null; 5 Collection<springbootexceptionreporter> exceptionReporters = new ArrayList<>(); 6 //设置系统属性『java.awt.headless』,为true则启用headless模式支持 7 configureHeadlessProperty(); 8 //通过*SpringFactoriesLoader*检索*META-INF/spring.factories*, 9 //找到声明的所有SpringApplicationRunListener的实现类并将其实例化, 10 //之后逐个调用其started()方法,广播SpringBoot要开始执行了 11 SpringApplicationRunListeners listeners = getRunListeners(args); 12 //发布应用开始启动事件 13 listeners.starting(); 14 try { 15 //初始化参数 16 ApplicationArguments applicationArguments = new DefaultApplicationArguments(args); 17 //创建并配置当前SpringBoot应用将要使用的Environment(包括配置要使用的PropertySource以及Profile), 18 //并遍历调用所有的SpringApplicationRunListener的environmentPrepared()方法,广播Environment准备完毕。 19 ConfigurableEnvironment environment = prepareEnvironment(listeners, applicationArguments); 20 configureIgnoreBeanInfo(environment); 21 //打印banner 22 Banner printedBanner = printBanner(environment); 23 //创建应用上下文 24 context = createApplicationContext(); 25 //通过*SpringFactoriesLoader*检索*META-INF/spring.factories*,获取并实例化异常分析器 26 exceptionReporters = getSpringFactoriesInstances(SpringBootExceptionReporter.class, 27 new Class[] { ConfigurableApplicationContext.class }, context); 28 //为ApplicationContext加载environment,之后逐个执行ApplicationContextInitializer的initialize()方法来进一步封装ApplicationContext, 29 //并调用所有的SpringApplicationRunListener的contextPrepared()方法,【EventPublishingRunListener只提供了一个空的contextPrepared()方法】, 30 //之后初始化IoC容器,并调用SpringApplicationRunListener的contextLoaded()方法,广播ApplicationContext的IoC加载完成, 31 //这里就包括通过**@EnableAutoConfiguration**导入的各种自动配置类。 32 prepareContext(context, environment, listeners, applicationArguments, printedBanner); 33 //刷新上下文 34 refreshContext(context); 35 //再一次刷新上下文,其实是空方法,可能是为了后续扩展。 36 afterRefresh(context, applicationArguments); 37 stopWatch.stop(); 38 if (this.logStartupInfo) { 39 new StartupInfoLogger(this.mainApplicationClass).logStarted(getApplicationLog(), stopWatch); 40 } 41 //发布应用已经启动的事件 42 listeners.started(context); 43 //遍历所有注册的ApplicationRunner和CommandLineRunner,并执行其run()方法。 44 //我们可以实现自己的ApplicationRunner或者CommandLineRunner,来对SpringBoot的启动过程进行扩展。 45 callRunners(context, applicationArguments); 46 } 47 catch (Throwable ex) { 48 handleRunFailure(context, ex, exceptionReporters, listeners); 49 throw new IllegalStateException(ex); 50 } 51 52 try { 53 //应用已经启动完成的监听事件 54 listeners.running(context); 55 } 56 catch (Throwable ex) { 57 handleRunFailure(context, ex, exceptionReporters, null); 58 throw new IllegalStateException(ex); 59 } 60 return context; 61 }
其实这个方法我们可以简单的总结下步骤为 > 1. 配置属性 > 2. 获取监听器,发布应用开始启动事件 > 3. 初始化输入参数 > 4. 配置环境,输出banner > 5. 创建上下文 > 6. 预处理上下文 > 7. 刷新上下文 > 8. 再刷新上下文 > 9. 发布应用已经启动事件 > 10. 发布应用启动完成事件
其实上面这段代码,如果只要分析tomcat内容的话,只需要关注两个内容即可,上下文是如何创建的,上下文是如何刷新的,分别对应的方法就是createApplicationContext() 和refreshContext(context),接下来我们来看看这两个方法做了什么。
1protected ConfigurableApplicationContext createApplicationContext() {
2		Class<!--?--> contextClass = this.applicationContextClass;
3		if (contextClass == null) {
4			try {
5				switch (this.webApplicationType) {
6				case SERVLET:
7					contextClass = Class.forName(DEFAULT_SERVLET_WEB_CONTEXT_CLASS);
8					break;
9				case REACTIVE:
10					contextClass = Class.forName(DEFAULT_REACTIVE_WEB_CONTEXT_CLASS);
11					break;
12				default:
13					contextClass = Class.forName(DEFAULT_CONTEXT_CLASS);
14				}
15			}
16			catch (ClassNotFoundException ex) {
17				throw new IllegalStateException(
18						"Unable create a default ApplicationContext, " + "please specify an ApplicationContextClass",
19						ex);
20			}
21		}
22		return (ConfigurableApplicationContext) BeanUtils.instantiateClass(contextClass);
23	}
这里就是根据我们的webApplicationType 来判断创建哪种类型的Servlet,代码中分别对应着Web类型(SERVLET),响应式Web类型(REACTIVE),非Web类型(default),我们建立的是Web类型,所以肯定实例化 DEFAULT_SERVLET_WEB_CONTEXT_CLASS指定的类,也就是AnnotationConfigServletWebServerApplicationContext类,我们来用图来说明下这个类的关系
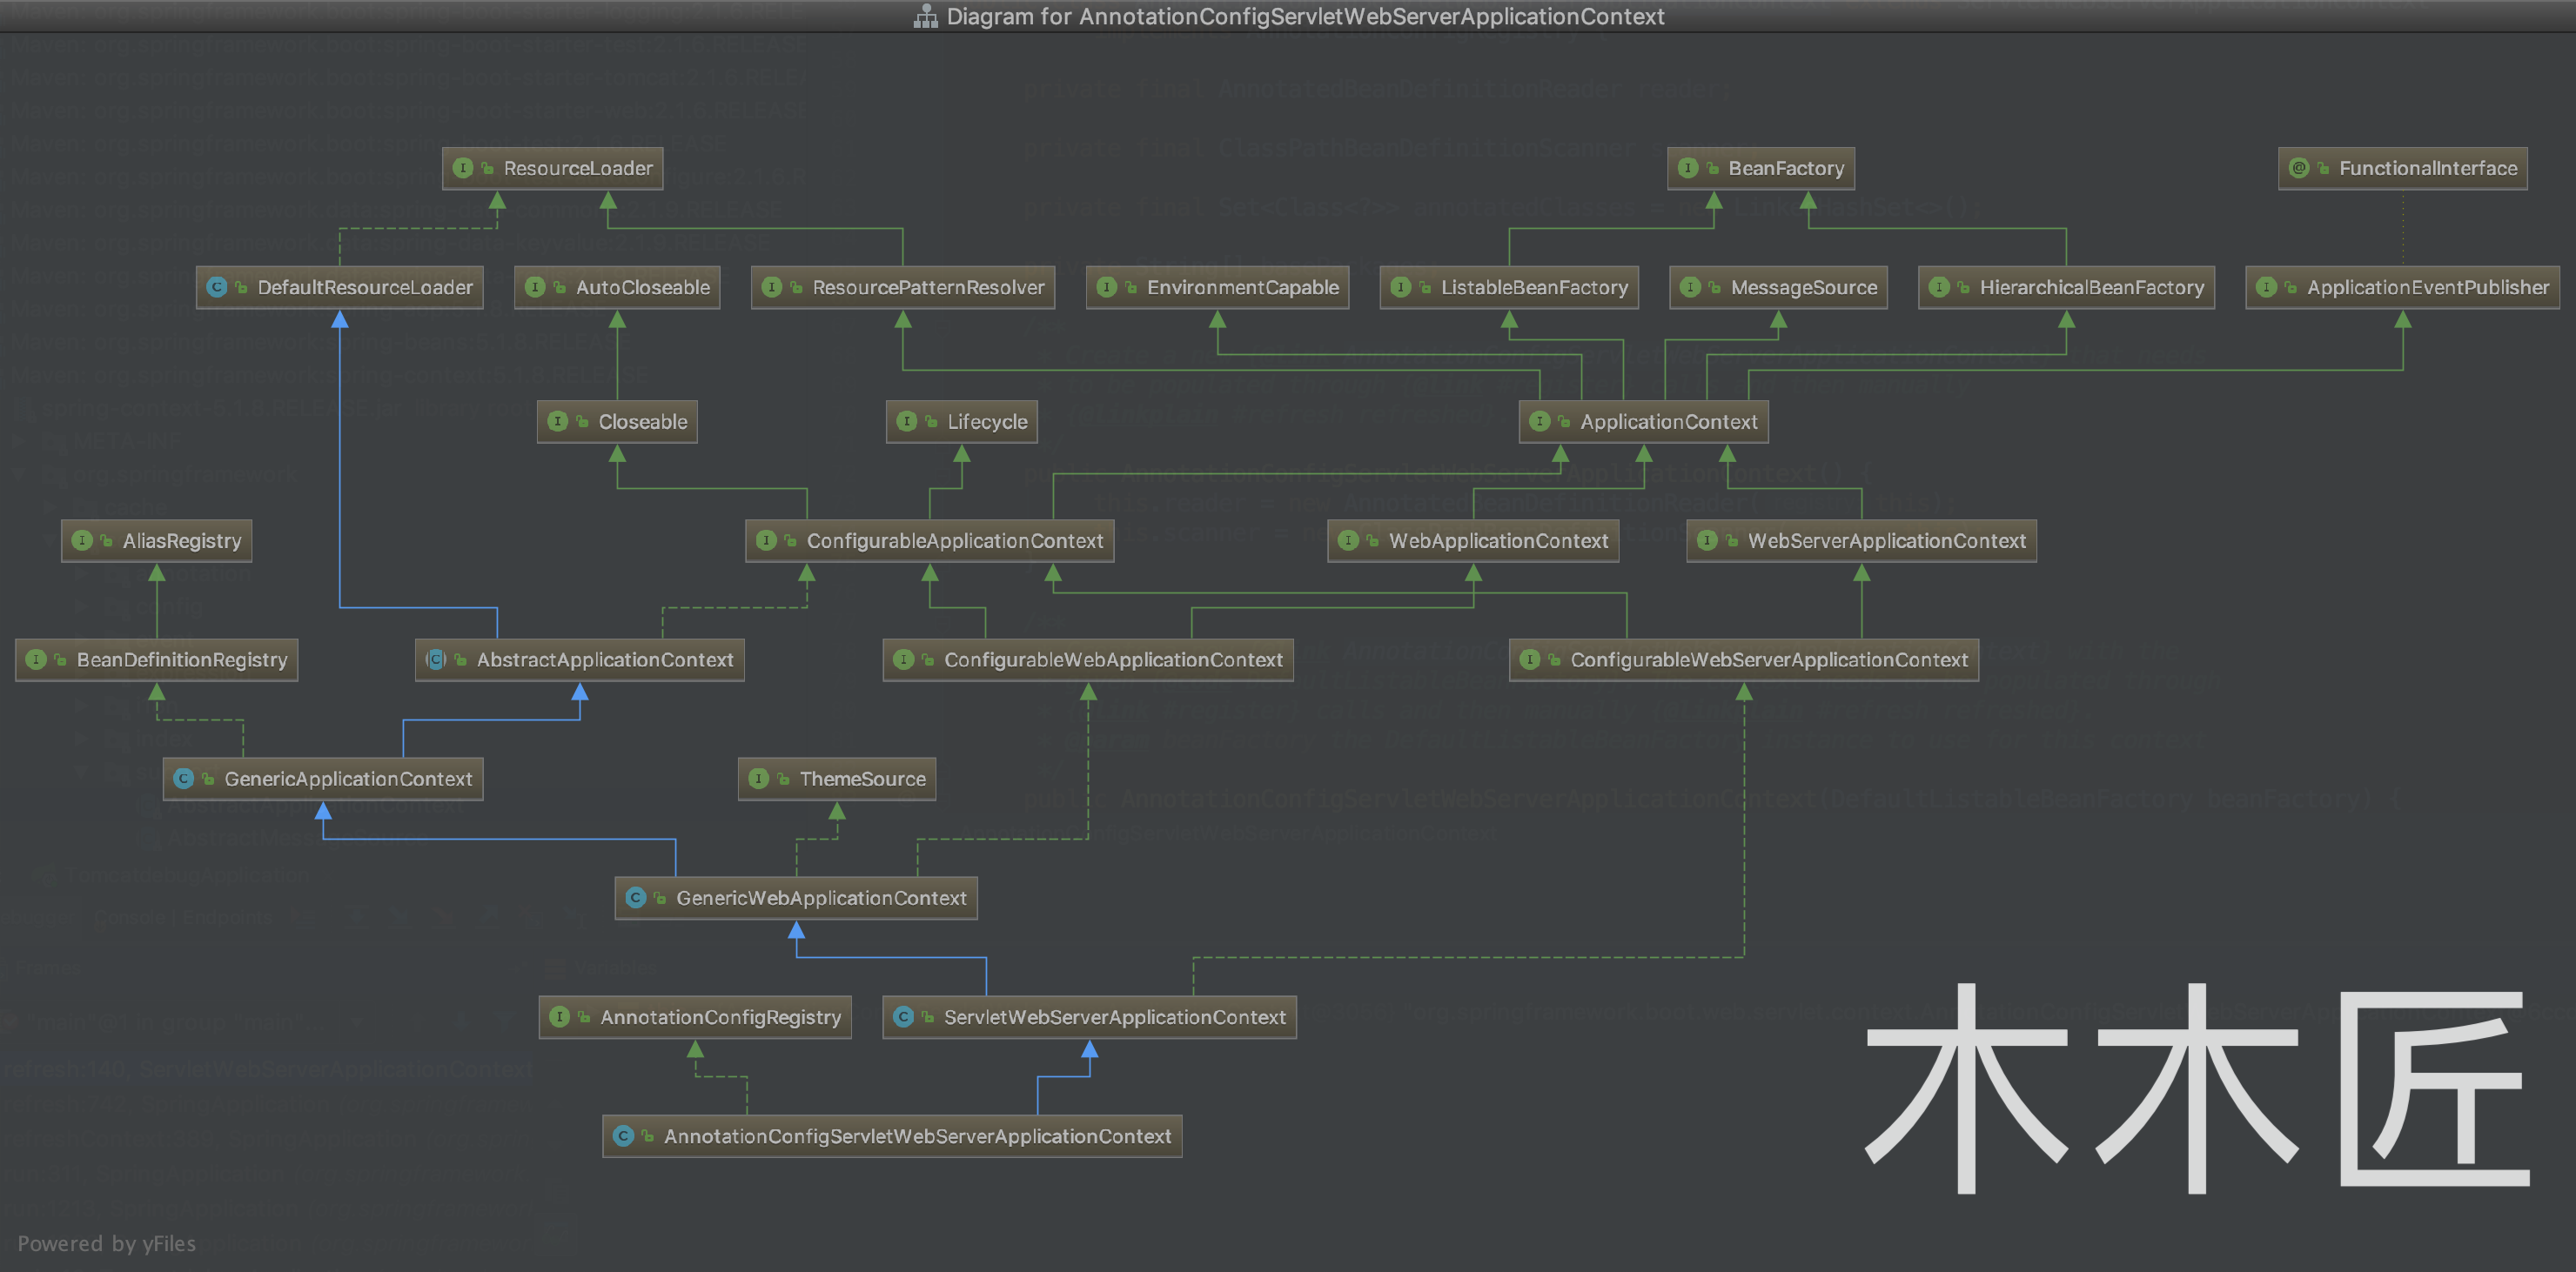
通过这个类图我们可以知道,这个类继承的是ServletWebServerApplicationContext,这就是我们真正的主角,而这个类最终是继承了AbstractApplicationContext,了解完创建上下文的情况后,我们再来看看刷新上下文,相关代码如下:
1//类:SpringApplication.java
2
3private void refreshContext(ConfigurableApplicationContext context) {
4    //直接调用刷新方法
5		refresh(context);
6		if (this.registerShutdownHook) {
7			try {
8				context.registerShutdownHook();
9			}
10			catch (AccessControlException ex) {
11				// Not allowed in some environments.
12			}
13		}
14	}
15//类:SpringApplication.java
16
17protected void refresh(ApplicationContext applicationContext) {
18		Assert.isInstanceOf(AbstractApplicationContext.class, applicationContext);
19		((AbstractApplicationContext) applicationContext).refresh();
20	}
这里还是直接传递调用本类的refresh(context)方法,最后是强转成父类AbstractApplicationContext调用其refresh()方法,该代码如下:
1// 类:AbstractApplicationContext
2public void refresh() throws BeansException, IllegalStateException {
3		synchronized (this.startupShutdownMonitor) {
4			// Prepare this context for refreshing.
5			prepareRefresh();
6
7			// Tell the subclass to refresh the internal bean factory.
8			ConfigurableListableBeanFactory beanFactory = obtainFreshBeanFactory();
9
10			// Prepare the bean factory for use in this context.
11			prepareBeanFactory(beanFactory);
12
13			try {
14				// Allows post-processing of the bean factory in context subclasses.
15				postProcessBeanFactory(beanFactory);
16
17				// Invoke factory processors registered as beans in the context.
18				invokeBeanFactoryPostProcessors(beanFactory);
19
20				// Register bean processors that intercept bean creation.
21				registerBeanPostProcessors(beanFactory);
22
23				// Initialize message source for this context.
24				initMessageSource();
25
26				// Initialize event multicaster for this context.
27				initApplicationEventMulticaster();
28
29				// Initialize other special beans in specific context subclasses.这里的意思就是调用各个子类的onRefresh()
30				onRefresh();
31
32				// Check for listener beans and register them.
33				registerListeners();
34
35				// Instantiate all remaining (non-lazy-init) singletons.
36				finishBeanFactoryInitialization(beanFactory);
37
38				// Last step: publish corresponding event.
39				finishRefresh();
40			}
41
42			catch (BeansException ex) {
43				if (logger.isWarnEnabled()) {
44					logger.warn("Exception encountered during context initialization - " +
45							"cancelling refresh attempt: " + ex);
46				}
47
48				// Destroy already created singletons to avoid dangling resources.
49				destroyBeans();
50
51				// Reset 'active' flag.
52				cancelRefresh(ex);
53
54				// Propagate exception to caller.
55				throw ex;
56			}
57
58			finally {
59				// Reset common introspection caches in Spring's core, since we
60				// might not ever need metadata for singleton beans anymore...
61				resetCommonCaches();
62			}
63		}
64	}
65
这里我们看到onRefresh()方法是调用其子类的实现,根据我们上文的分析,我们这里的子类是ServletWebServerApplicationContext。
1//类:ServletWebServerApplicationContext
2protected void onRefresh() {
3		super.onRefresh();
4		try {
5			createWebServer();
6		}
7		catch (Throwable ex) {
8			throw new ApplicationContextException("Unable to start web server", ex);
9		}
10	}
11
12private void createWebServer() {
13		WebServer webServer = this.webServer;
14		ServletContext servletContext = getServletContext();
15		if (webServer == null && servletContext == null) {
16			ServletWebServerFactory factory = getWebServerFactory();
17			this.webServer = factory.getWebServer(getSelfInitializer());
18		}
19		else if (servletContext != null) {
20			try {
21				getSelfInitializer().onStartup(servletContext);
22			}
23			catch (ServletException ex) {
24				throw new ApplicationContextException("Cannot initialize servlet context", ex);
25			}
26		}
27		initPropertySources();
28	}
29
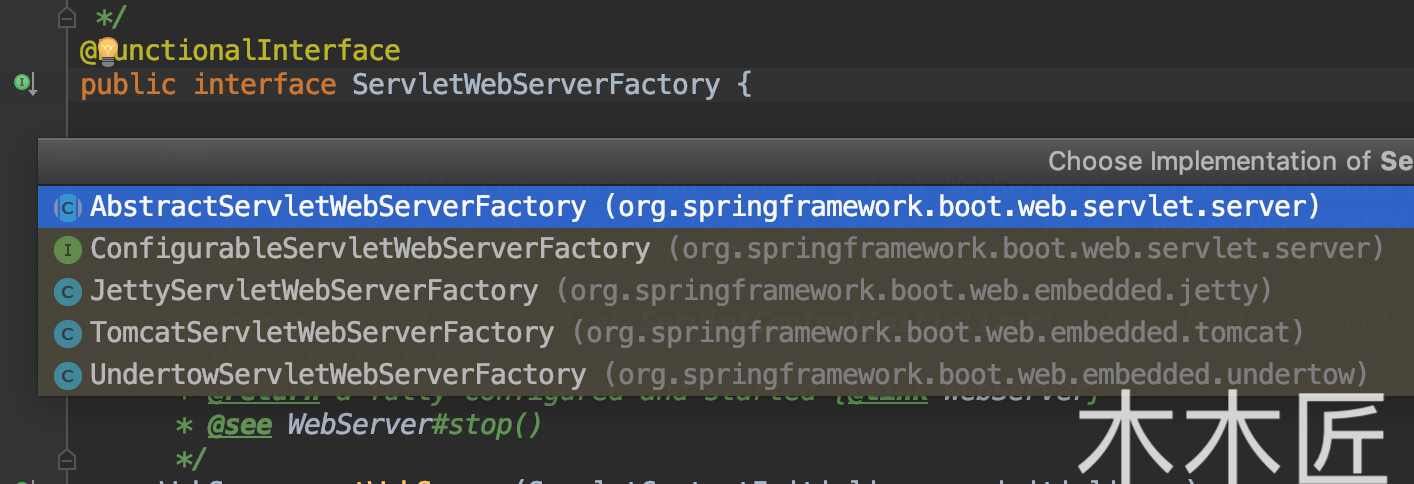
到这里,其实庐山真面目已经出来了,createWebServer()就是启动web服务,但是还没有真正启动Tomcat,既然webServer是通过ServletWebServerFactory来获取的,我们就来看看这个工厂的真面目。
走进Tomcat内部
根据上图我们发现,工厂类是一个接口,各个具体服务的实现是由各个子类来实现的,所以我们就去看看TomcatServletWebServerFactory.getWebServer()的实现。
1	@Override
2	public WebServer getWebServer(ServletContextInitializer... initializers) {
3		Tomcat tomcat = new Tomcat();
4		File baseDir = (this.baseDirectory != null) ? this.baseDirectory : createTempDir("tomcat");
5		tomcat.setBaseDir(baseDir.getAbsolutePath());
6		Connector connector = new Connector(this.protocol);
7		tomcat.getService().addConnector(connector);
8		customizeConnector(connector);
9		tomcat.setConnector(connector);
10		tomcat.getHost().setAutoDeploy(false);
11		configureEngine(tomcat.getEngine());
12		for (Connector additionalConnector : this.additionalTomcatConnectors) {
13			tomcat.getService().addConnector(additionalConnector);
14		}
15		prepareContext(tomcat.getHost(), initializers);
16		return getTomcatWebServer(tomcat);
17	}
根据上面的代码,我们发现其主要做了两件事情,第一件事就是把Connnctor(我们称之为连接器)对象添加到Tomcat中,第二件事就是configureEngine,这连接器我们勉强能理解(不理解后面会述说),那这个Engine是什么呢?我们查看tomcat.getEngine()的源码:
1    public Engine getEngine() {
2        Service service = getServer().findServices()[0];
3        if (service.getContainer() != null) {
4            return service.getContainer();
5        }
6        Engine engine = new StandardEngine();
7        engine.setName( "Tomcat" );
8        engine.setDefaultHost(hostname);
9        engine.setRealm(createDefaultRealm());
10        service.setContainer(engine);
11        return engine;
12    }
根据上面的源码,我们发现,原来这个Engine是容器,我们继续跟踪源码,找到Container接口
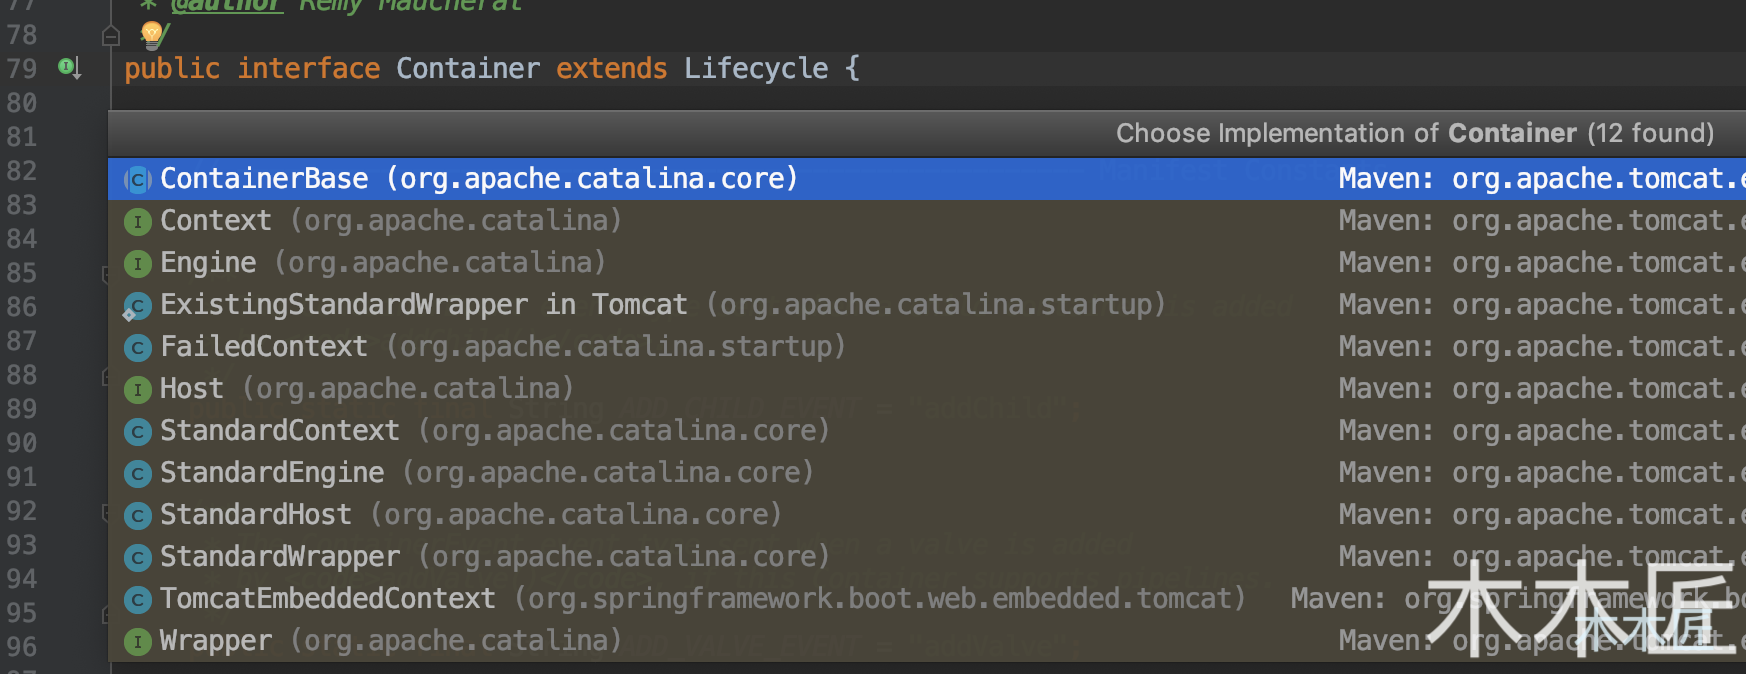
上图中,我们看到了4个子接口,分别是Engine,Host,Context,Wrapper。我们从继承关系上可以知道他们都是容器,那么他们到底有啥区别呢?我看看他们的注释是怎么说的。
1 /**
2 If used, an Engine is always the top level Container in a Catalina
3 * hierarchy. Therefore, the implementation's <code>setParent()</code> method
4 * should throw <code>IllegalArgumentException</code>.
5 *
6 * @author Craig R. McClanahan
7 */
8public interface Engine extends Container {
9    //省略代码
10}
11/**
12 * <p>
13 * The parent Container attached to a Host is generally an Engine, but may
14 * be some other implementation, or may be omitted if it is not necessary.
15 * </p><p>
16 * The child containers attached to a Host are generally implementations
17 * of Context (representing an individual servlet context).
18 *
19 * @author Craig R. McClanahan
20 */
21public interface Host extends Container {
22//省略代码
23
24}
25/*** </p><p>
26 * The parent Container attached to a Context is generally a Host, but may
27 * be some other implementation, or may be omitted if it is not necessary.
28 * </p><p>
29 * The child containers attached to a Context are generally implementations
30 * of Wrapper (representing individual servlet definitions).
31 * </p><p>
32 *
33 * @author Craig R. McClanahan
34 */
35public interface Context extends Container, ContextBind {
36    //省略代码
37}
38/**</p><p>
39 * The parent Container attached to a Wrapper will generally be an
40 * implementation of Context, representing the servlet context (and
41 * therefore the web application) within which this servlet executes.
42 * </p><p>
43 * Child Containers are not allowed on Wrapper implementations, so the
44 * <code>addChild()</code> method should throw an
45 * <code>IllegalArgumentException</code>.
46 *
47 * @author Craig R. McClanahan
48 */
49public interface Wrapper extends Container {
50
51    //省略代码
52}
53
上面的注释翻译过来就是,Engine是最高级别的容器,其子容器是Host,Host的子容器是Context,Wrapper是Context的子容器,所以这4个容器的关系就是父子关系,也就是Engine>Host>Context>Wrapper。 我们再看看Tomcat类的源码:
1//部分源码,其余部分省略。
2public class Tomcat {
3//设置连接器
4     public void setConnector(Connector connector) {
5        Service service = getService();
6        boolean found = false;
7        for (Connector serviceConnector : service.findConnectors()) {
8            if (connector == serviceConnector) {
9                found = true;
10            }
11        }
12        if (!found) {
13            service.addConnector(connector);
14        }
15    }
16    //获取service
17       public Service getService() {
18        return getServer().findServices()[0];
19    }
20    //设置Host容器
21     public void setHost(Host host) {
22        Engine engine = getEngine();
23        boolean found = false;
24        for (Container engineHost : engine.findChildren()) {
25            if (engineHost == host) {
26                found = true;
27            }
28        }
29        if (!found) {
30            engine.addChild(host);
31        }
32    }
33    //获取Engine容器
34     public Engine getEngine() {
35        Service service = getServer().findServices()[0];
36        if (service.getContainer() != null) {
37            return service.getContainer();
38        }
39        Engine engine = new StandardEngine();
40        engine.setName( "Tomcat" );
41        engine.setDefaultHost(hostname);
42        engine.setRealm(createDefaultRealm());
43        service.setContainer(engine);
44        return engine;
45    }
46    //获取server
47       public Server getServer() {
48
49        if (server != null) {
50            return server;
51        }
52
53        System.setProperty("catalina.useNaming", "false");
54
55        server = new StandardServer();
56
57        initBaseDir();
58
59        // Set configuration source
60        ConfigFileLoader.setSource(new CatalinaBaseConfigurationSource(new File(basedir), null));
61
62        server.setPort( -1 );
63
64        Service service = new StandardService();
65        service.setName("Tomcat");
66        server.addService(service);
67        return server;
68    }
69
70    //添加Context容器
71      public Context addContext(Host host, String contextPath, String contextName,
72            String dir) {
73        silence(host, contextName);
74        Context ctx = createContext(host, contextPath);
75        ctx.setName(contextName);
76        ctx.setPath(contextPath);
77        ctx.setDocBase(dir);
78        ctx.addLifecycleListener(new FixContextListener());
79
80        if (host == null) {
81            getHost().addChild(ctx);
82        } else {
83            host.addChild(ctx);
84        }
85
86    //添加Wrapper容器
87         public static Wrapper addServlet(Context ctx,
88                                      String servletName,
89                                      Servlet servlet) {
90        // will do class for name and set init params
91        Wrapper sw = new ExistingStandardWrapper(servlet);
92        sw.setName(servletName);
93        ctx.addChild(sw);
94
95        return sw;
96    }
97
98}
阅读Tomcat的getServer()我们可以知道,Tomcat的最顶层是Server,Server就是Tomcat的实例,一个Tomcat一个Server;通过getEngine()我们可以了解到Server下面是Service,而且是多个,一个Service代表我们部署的一个应用,而且我们还可以知道,Engine容器,一个service只有一个;根据父子关系,我们看setHost()源码可以知道,host容器有多个;同理,我们发现addContext()源码下,Context也是多个;addServlet()表明Wrapper容器也是多个,而且这段代码也暗示了,其实Wrapper和Servlet是一层意思。另外我们根据setConnector源码可以知道,连接器(Connector)是设置在service下的,而且是可以设置多个连接器(Connector)。
根据上面分析,我们可以小结下: Tomcat主要包含了2个核心组件,连接器(Connector)和容器(Container),用图表示如下:
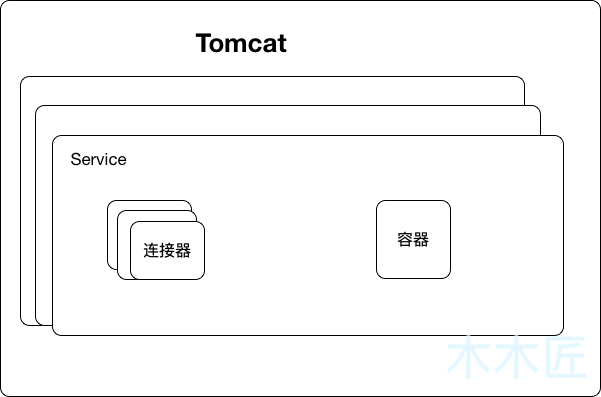
一个Tomcat是一个Server,一个Server下有多个service,也就是我们部署的多个应用,一个应用下有多个连接器(Connector)和一个容器(Container),容器下有多个子容器,关系用图表示如下:
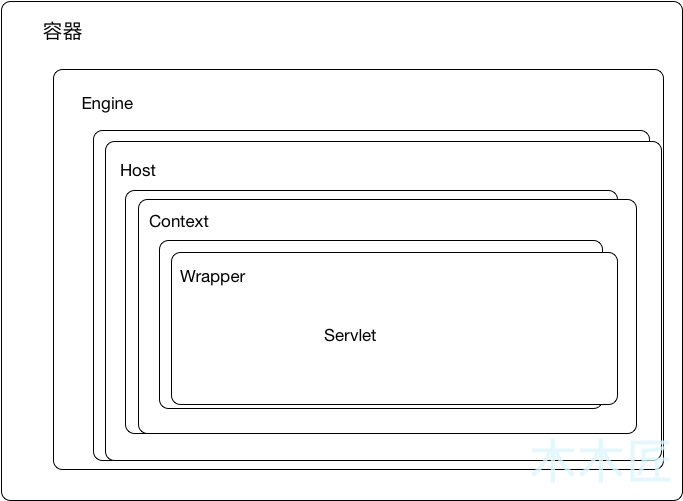
Engine下有多个Host子容器,Host下有多个Context子容器,Context下有多个Wrapper子容器。
总结
SpringBoot的启动是通过new SpringApplication()实例来启动的,启动过程主要做如下几件事情: > 1. 配置属性 > 2. 获取监听器,发布应用开始启动事件 > 3. 初始化输入参数 > 4. 配置环境,输出banner > 5. 创建上下文 > 6. 预处理上下文 > 7. 刷新上下文 > 8. 再刷新上下文 > 9. 发布应用已经启动事件 > 10. 发布应用启动完成事件
而启动Tomcat就是在第7步中“刷新上下文”;Tomcat的启动主要是初始化2个核心组件,连接器(Connector)和容器(Container),一个Tomcat实例就是一个Server,一个Server包含多个Service,也就是多个应用程序,每个Service包含多个连接器(Connetor)和一个容器(Container),而容器下又有多个子容器,按照父子关系分别为:Engine,Host,Context,Wrapper,其中除了Engine外,其余的容器都是可以有多个。
下期展望
本期文章通过SpringBoot的启动来窥探了Tomcat的内部结构,下一期,我们来分析下本次文章中的连接器(Connetor)和容器(Container)的作用,敬请期待。
版权声明:原创文章,转载请注明出处。