通过之前的文章,相信大家已经熟悉了 Serving、Eventing 以及 Tekton。那么在实际使用中,我们往往会遇到一些复杂的场景,这时候就需要各个组件之间进行协作处理。例如我们提交源代码之后是否直接可以部署服务到 K8s 中? 这个场景对于用户来说很有吸引力。那么现在就让我们来看一下,在 Knative 中如何实现从代码到服务?
场景介绍
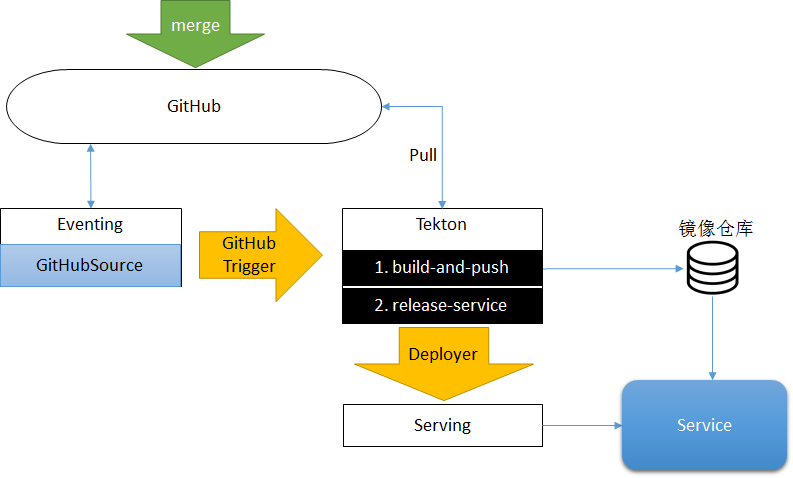
现在的场景是这样的:代码构建->事件驱动->服务部署。那么对应到 Knative 中,需要 Eventing、Tekton 和 Serving 一起协作来实现这个场景。

准备
- 部署 Knative。参考在阿里云容器服务上部署 Knative;
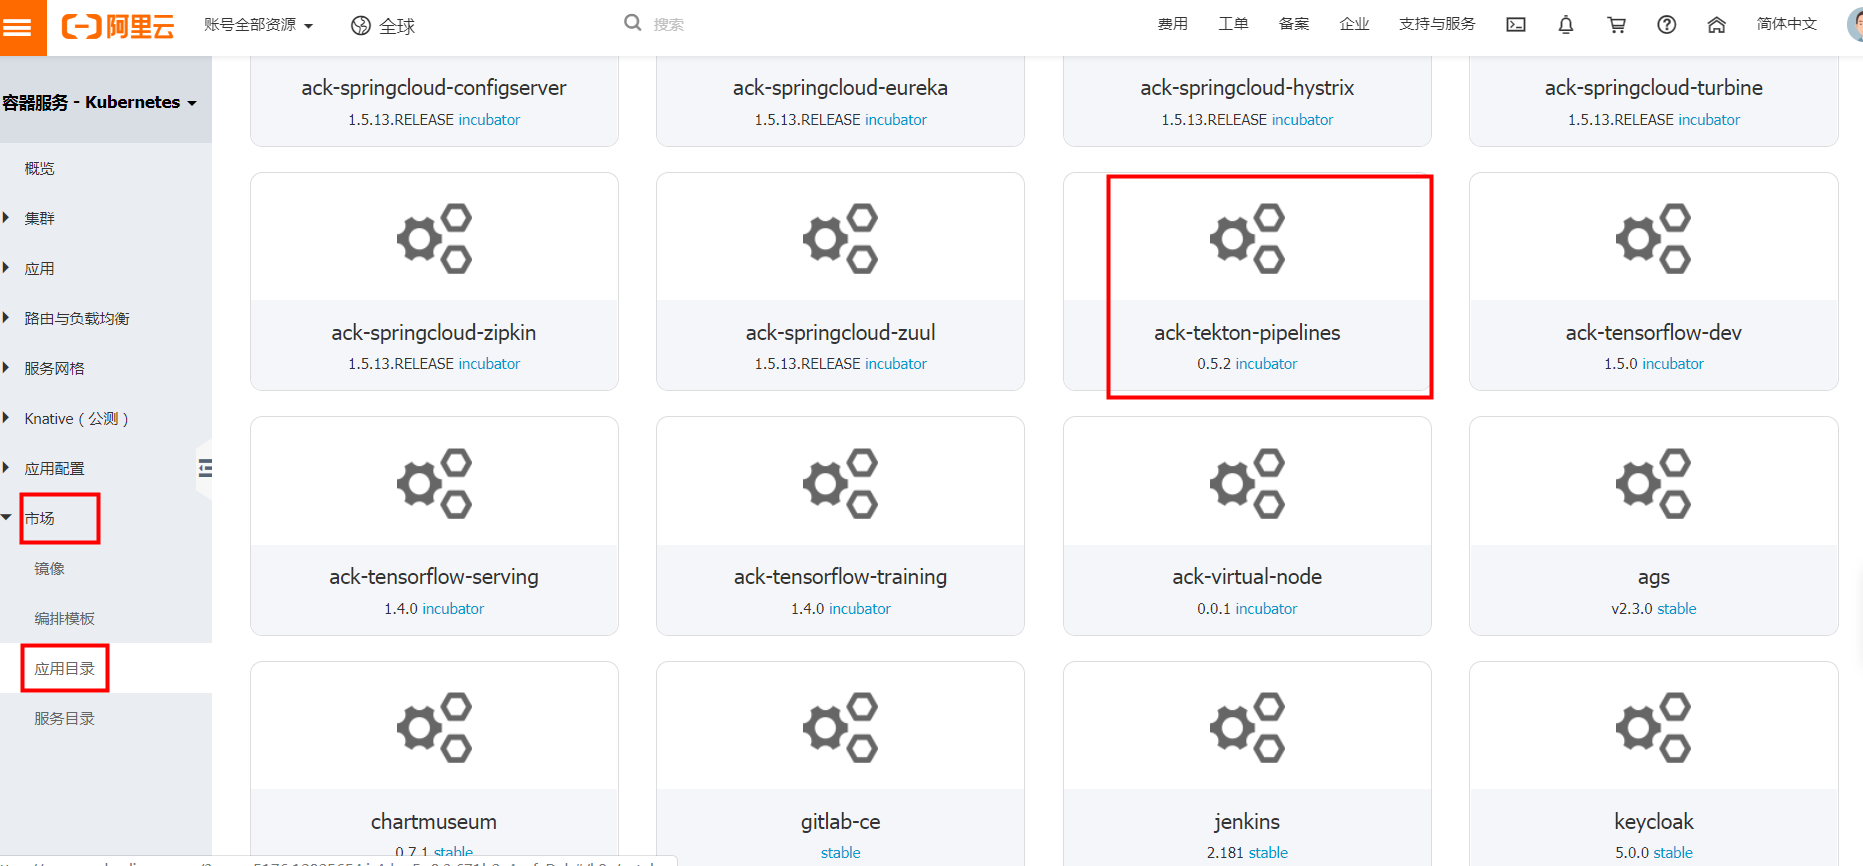
- 部署 Tekton。通过阿里云容器服务控制台,应用目录选择
ack-tekton-pipelines进行安装部署 Tekton;
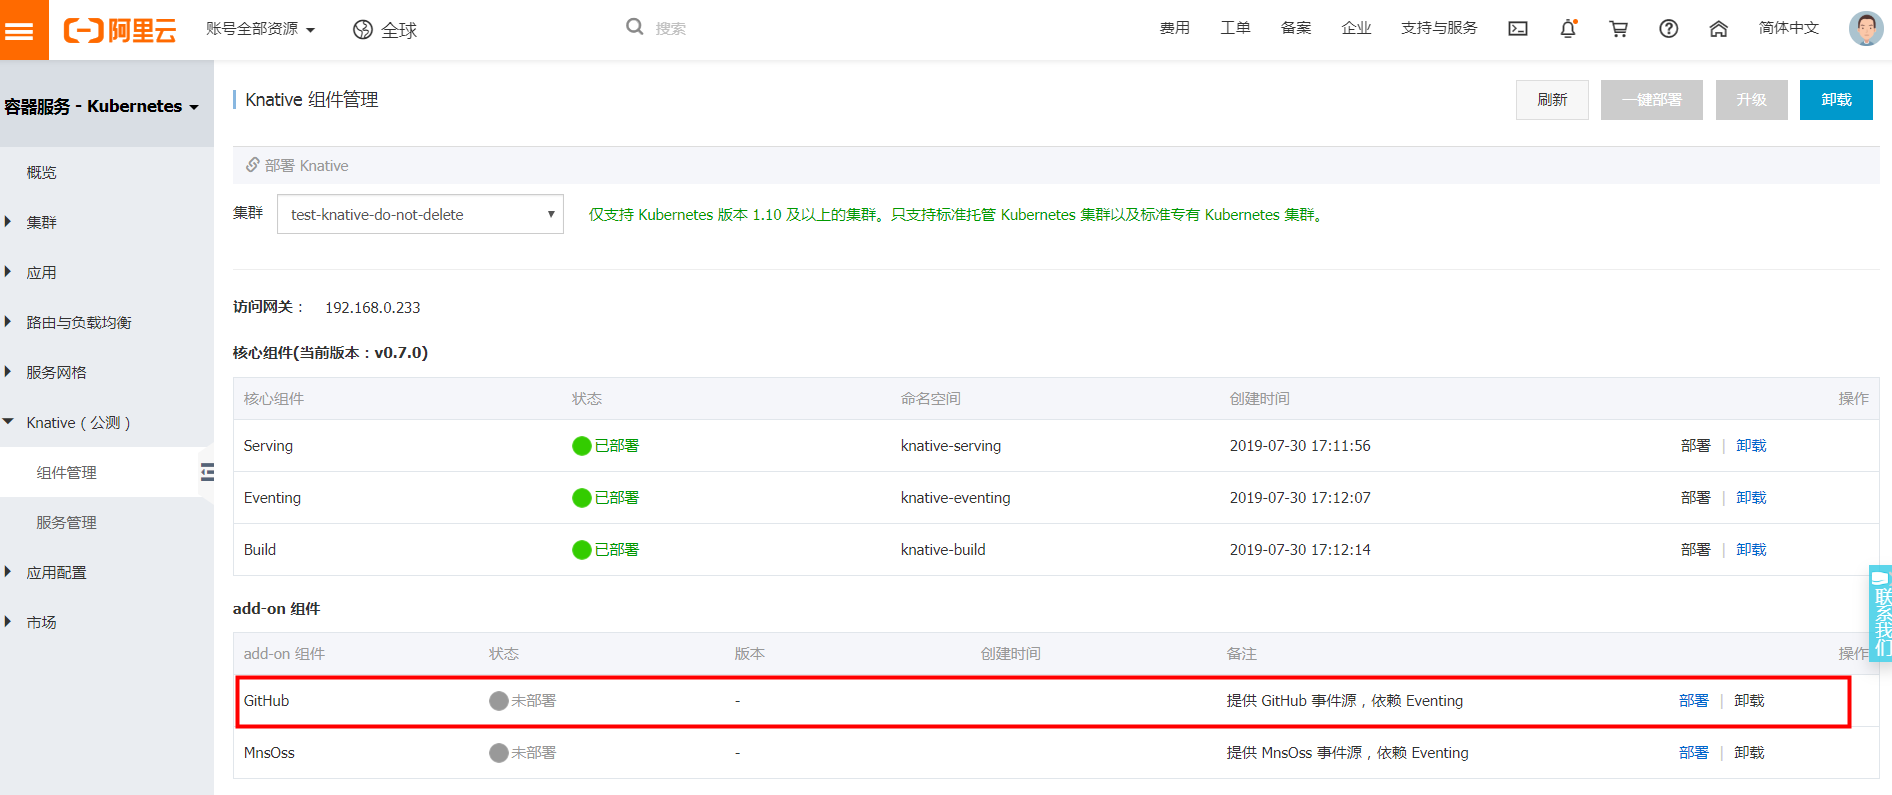
- 部署 GitHub 事件源。阿里云容器服务控制台 Knative 组件管理中选择安装 GitHub 组件,如图所示:
从源代码到服务
-
修改分支代码,提交 merge request 合并到 master 分支;
-
Eventing 监听到 merge 事件,发送给 GitHub Trigger 服务;
-
GitHub Trigger 服务接收事件, 通过 Tekton 执行代码构建和并通过 deployer 执行服务部署。GitHub Trigger 的作用就是解析 GitHub 事件的详细信息,然后转换成 Tekton 资源并且提交到 Kubernetes 中执行 Pipeline。项目地址:https://github.com/knative-sample/tekton-serving。 这个项目中有两个部分: Trigger 和 Deployer,Trigger 的作用是解析 github 事件, 并提交 PipelineRun 定义。Deployer 的作用就是更新 Service 的镜像信息。github source pull_request body 的关键内容如下:
{ "action": "closed", ... ... "merge_commit_sha": "f37cb28b1777a28cd34ea1f8df1b7ebcc6c16397", ... ... "base": { "ref": "master", ... ... }, ... ... }
-
action 表示当前的 pull request 事件细节。创建 pull request 时 action 是 opened ,关闭 pull request 时 action 就是 closed;
-
merge_commit_sha 可以获得 merge commit 的 id;
-
base.ref 可以获得 merge request 发生在哪个分支上。
本文涉及到的代码与资源文件地址:
- GitHubTrigger 和 Deployer:https://github.com/knative-sample/tekton-serving
- 部署示例文件:https://github.com/knative-sample/eventing-tekton-serving
接下来我们开始一步步搞起。
部署 Tekton 服务
我们看一下创建代码构建 Task 和 部署服务Task。
代码构建Task:
1apiVersion: tekton.dev/v1alpha1
2kind: Task
3metadata:
4  name: source-to-image
5spec:
6  inputs:
7    resources:
8      - name: git-source
9        type: git
10    params:
11      - name: pathToContext
12        description: The path to the build context, used by Kaniko - within the workspace
13        default: .
14      - name: pathToDockerFile
15        description: The path to the dockerfile to build (relative to the context)
16        default: Dockerfile
17      - name: imageUrl
18        description: Url of image repository
19      - name: imageTag
20        description: Tag to apply to the built image
21        default: "latest"
22  steps:
23    - name: build-and-push
24      image: registry.cn-hangzhou.aliyuncs.com/knative-sample/kaniko-project-executor:v0.10.0
25      command:
26        - /kaniko/executor
27      args:
28        - --dockerfile=${inputs.params.pathToDockerFile}
29        - --destination=${inputs.params.imageUrl}:${inputs.params.imageTag}
30        - --context=/workspace/git-source/${inputs.params.pathToContext}
31      env:
32      - name: DOCKER_CONFIG
33        value: /builder/home/.docker
这里通过 deployer-deployer 执行服务部署,部署服务Task:
1apiVersion: tekton.dev/v1alpha1
2kind: Task
3metadata:
4  name: image-to-deploy
5spec:
6  inputs:
7    resources:
8      - name: git-source
9        type: git
10    params:
11      - name: pathToYamlFile
12        description: The path to the yaml file to deploy within the git source
13      - name: imageUrl
14        description: Url of image repository
15      - name: imageTag
16        description: Tag of the images to be used.
17        default: "latest"
18  steps:
19    - name: deploy
20      image: "registry.cn-hangzhou.aliyuncs.com/knative-sample/deployer-deployer:7620096e"
21      args:
22        - "--namespace=default"
23        - "--serivce-name=hello-sample"
24        - "--image=${inputs.params.imageUrl}:${inputs.params.imageTag}"
另外需要设置一下镜像仓库的 secret:
1apiVersion: v1
2kind: Secret
3metadata:
4  name: ack-cr-push-secret
5  annotations:
6    tekton.dev/docker-0: https://registry.cn-hangzhou.aliyuncs.com
7type: kubernetes.io/basic-auth
8stringData:
9  username: <cleartext non-encoded>
10  password: <cleartext non-encoded>
执行如下命令:
1# Create Pipeline
2kubectl apply -f tekton/pipeline/build-and-deploy-pipeline.yaml
3
4# Create PipelineResource
5kubectl apply -f tekton/resources/picalc-git.yaml
6
7# Create image secret
8kubectl apply -f tekton/image-secret.yaml
9
10# Create task: soruce to image
11kubectl apply -f tekton/tasks/source-to-image.yaml
12
13# Create task: deploy the image to cluster
14kubectl apply -f tekton/tasks/image-to-deployer.yaml
部署 Knative Serving 服务
先创建 deployer-github-trigger 服务,用于接收 GitHub 事件,并触发 Tekton Pipeline 构建任务。其中 service.yaml 如下:
1apiVersion: serving.knative.dev/v1alpha1
2kind: Service
3metadata:
4  name: deployer-github-trigger
5spec:
6  template:
7    spec:
8      containers:
9      - image: registry.cn-hangzhou.aliyuncs.com/knative-sample/deployer-trigger:tekton-v1_74647e3a-20190806093544
10        args:
11          - --trigger-config=/app/config/deployer-trigger.yaml
12        volumeMounts:
13        - name: config-volume
14          mountPath: /app/config
15      serviceAccountName: tekton
16      volumes:
17        - name: config-volume
18          configMap:
19            name: deployer-trigger-config
20            items:
21              - key: deployer-trigger.yaml
22                path: deployer-trigger.yaml
这里通过 ConfigMap deployer-trigger-config, 设置 PipelineRun。deployer-github-trigger 能根据 github Event 信息获取代码仓库的最新信息但不能自动决定 PipelineRun 的定义,所以需要指定一个 PipelineRun 的模板。Trigger 通过 --trigger-config 参数指定 PipelineRun 的模板, 模板内容如下:
1apiVersion: v1
2kind: ConfigMap
3metadata:
4  name: deployer-trigger-config
5  namespace: default
6data:
7  "deployer-trigger.yaml": |-
8    apiVersion: tekton.dev/v1alpha1
9    kind: PipelineRun
10    metadata:
11      name: tekton-kn-sample
12    spec:
13      pipelineRef:
14        name: build-and-deploy-pipeline
15      resources:
16        - name: git-source
17          resourceRef:
18            name: eventing-tekton-serving-git
19      params:
20        - name: pathToContext
21          value: "src"
22        - name: pathToYamlFile
23          value: ""
24        - name: imageUrl
25          value: "registry.cn-hangzhou.aliyuncs.com/knative-sample/eventing-tekton-serving-helloworld"
26        - name: imageTag
27          value: "1.0"
28      trigger:
29        type: manual
30      serviceAccount: pipeline-account
执行命令如下:
1# Create clusterrole
2kubectl apply -f serving/clusterrole.yaml
3
4# Create clusterrolebinding
5kubectl apply -f serving/clusterrolebinding.yaml
6
7# Create serviceaccount
8kubectl apply -f serving/serviceaccount.yaml
9
10# Create configmap
11kubectl apply -f serving/configmap.yaml
12
13# Create service
14kubectl apply -f serving/service.yaml
配置 Eventing 中 GitHub 事件源
代码 merge request 会触发对应的事件,通过 Knative Eventing 获取到事件之后直接将事件发送给 deployer-github-trigger 服务。
创建 GitHub Token
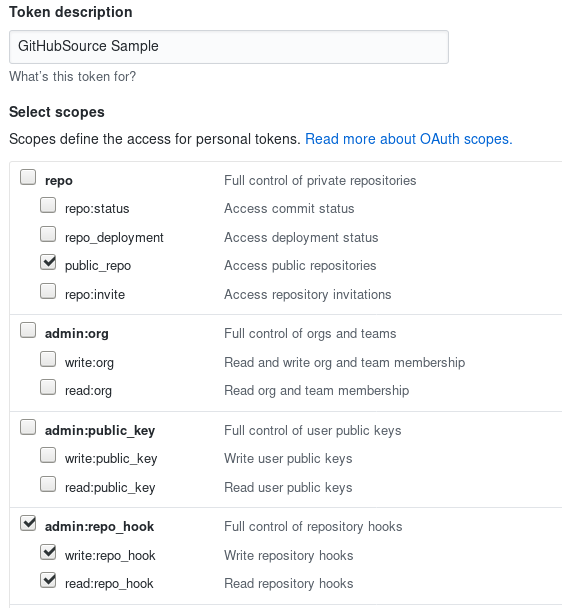
创建 Personal access tokens, 用于访问 GitHub API。另外你的代码将使用它验证来自 github 的传入 webhook(secret token)。token 的名称可以任意设置。Source 需要开启 repo:public_repo 和 admin:repo_hook , 以便通过公共仓库触发 Event 事件,并为这些公共仓库创建 webhooks 。
下面是设置一个 "GitHubSource Sample" token 的示例。
更新 githubsecret.yaml 内容。如果生成的是 personal_access_token_value token, 则需要设置 secretToken 如下:
1apiVersion: v1
2kind: Secret
3metadata:
4  name: githubsecret
5type: Opaque
6stringData:
7  accessToken: personal_access_token_value
8  secretToken: asdfasfdsaf
执行命令使其生效:
kubectl apply -f eventing/githubsecret.yaml
创建 GitHub 事件源
为了接收 GitHub 产生的事件, 需要创建 GitHubSource 用于接收事件。
1apiVersion: sources.eventing.knative.dev/v1alpha1
2kind: GitHubSource
3metadata:
4  name: deployer-github-sources
5spec:
6  eventTypes:
7  - pull_request
8  ownerAndRepository: knative-sample/eventing-tekton-serving
9  accessToken:
10    secretKeyRef:
11      name: githubsecret
12      key: accessToken
13  secretToken:
14    secretKeyRef:
15      name: githubsecret
16      key: secretToken
17  sink:
18    apiVersion: serving.knative.dev/v1alpha1
19    kind: Service
20    name: deployer-github-trigger
关键字段解释:
- 指定 github 仓库:ownerAndRepository: knative-sample/eventing-tekton-serving 表示监听 https://github.com/knative-sample/eventing-tekton-serving 仓库的事件;
- 事件类型:eventTypes 是一个数组,这个数组中可以配置 github 事件列表;
- 认证信息:accessToken 和 secretToken 是通过 secret 引用 github 仓库的认证信息;
- 目标 Service:sink 字段表示接收到的事件需要发送到哪个 Service , 这里是直接发送到前面定义的 deployer-github-trigger 服务。
执行 kubectl 命令:
kubectl apply -f eventing/github-source.yaml
如果集群中开启了 Istio 注入,需要开启 egress 访问:
kubectl apply -f eventing/egress.yaml
deployer-github-sources 提交到 Kubernetes 之后,github source controller 会在 http://github.com/knative-sample/eventing-tekton-serving 下创建一个 webhook,回调地址就是我们的 github_receive_adapter 服务公网地址。
当 http://github.com/knative-sample/eventing-tekton-serving 有 pull request 发生时就会自动触发 deployer-github-trigger 的执行,deployer-github-trigger 首先编译镜像,然后更新 hello-sample service 镜像,从而完成自动化发布。
代码->镜像->服务
下面我们演示一下从代码到服务,自动化构建和部署过程:
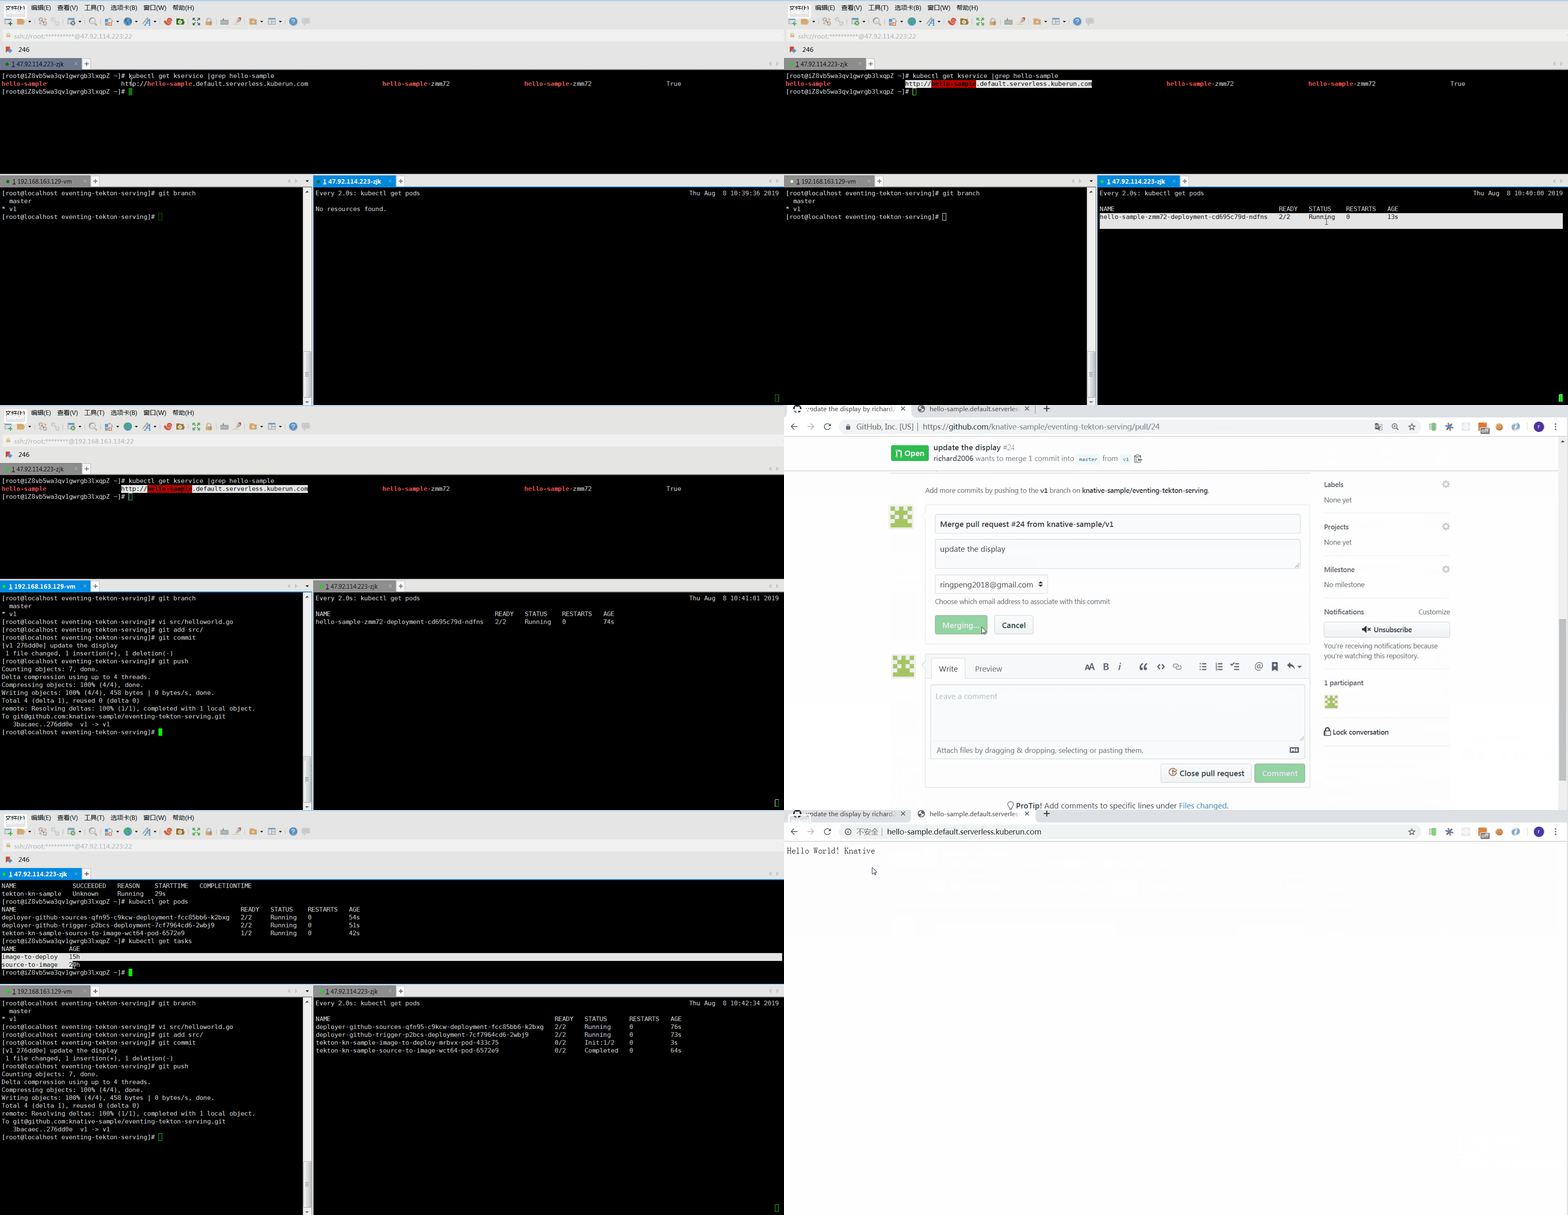
服务访问体验地址:http://hello-sample.default.serverless.kuberun.com
结论
从代码到服务,通过上面的示例,Knative 是否给你带来了不一样的体验?希望通过 Knative 给你带来更轻松的代码构建和服务部署,让你更专注于业务本身。欢迎对 Knative 有兴趣的一起交流。<
欢迎加入 Knative 交流群