
作者:京东物流 方志民
一. 背景
在一次系统opsreview中,发现了一些服务配置了@Cacheable注解。@cacheable 来源于spring cache框架中,作用是使用aop的方式将数据库中的热数据缓存在redis/本地缓存中,代码如下:
1@Cacheable(value = { "per" },  key="#person.getId()"+"_"+"#person.getName()")
2public Person getByIsbn(Person person) {
3    return personMapper.getPerson(person);
4}
那么这个原生spring组件是如何工作的?redis的key是如何产生的?这一过程是否还有优化的空间?带着这些问题我们来开启源码之旅。
二. Spring@Cacheable注解工作原理
就以项目中使用的spring3.2.18版本为例分析,代码中使用了xml+cache标签的形式去启动注解缓存。然而在springboot中使用的是@EnableCaching注解,通过自动配置加载相关组件,两种方式都是殊途同归,这里就不做赘述了,直接上链接。
首先,如果我们想使用这个组件就需要先启用缓存注解,方式与aop功能相类似,aop也会加载internalAutoProxyCreator后置处理器。代码中通过annotation-driven标签加载相关组件。其中proxy-target-class="true" 表示使用CGLIB的方式对bean进行动态代理。
1//
2<!-- 添加缓存注解支持 -->
3<cache:annotation-driven cache-manager="cacheManager" proxy-target-class="true"/>
4
5<!-- 开启aop切面 -->
6<aop:aspectj-autoproxy proxy-target-class="true"/>
代码中cache-manager表示需要依赖一个缓存管理器,它的作用是提供一种机制来缓存数据,以便在后续的访问中可以更快地获取数据。它可以支持caffine,encache,Jcache等多种类型的缓存管理器。文中是使用的自定义管理来支持公司内部的redis客户端。
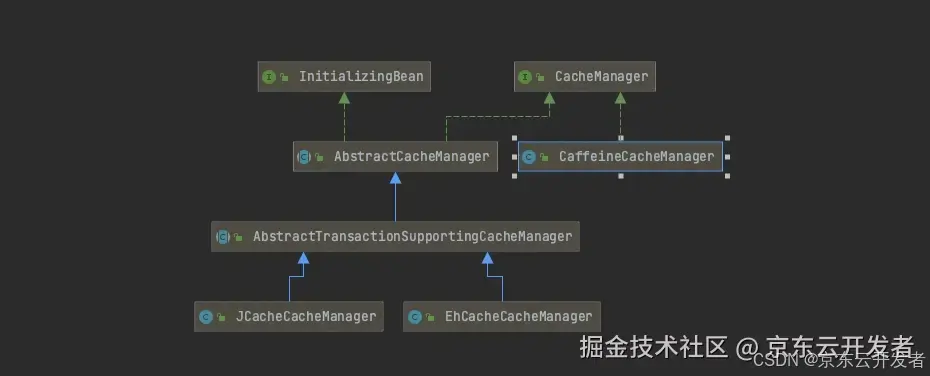
1//redis缓存管理器
2public class RedisCacheManager extends AbstractTransactionSupportingCacheManager {
3
4    private Collection<? extends Cache> caches;
5
6
7    public void setCaches(List<Cache> caches) {
8        this.caches = caches;
9    }
10
11    @Override
12    protected Collection<? extends Cache> loadCaches() {
13        if (caches == null) {
14            return Collections.emptyList();
15        }
16        return caches;
17    }
18
19    @Override
20    public Cache getCache(String name) {
21        Cache cache = super.getCache(name);
22        if (cache == null && (cache = super.getCache("DEFAULT")) == null) {
23            throw new NullPointerException();
24        }
25        return cache;
26    }
27
28}
下面通过bean的方式注入cacheManager管理器,其中MyCache需要实现org.springframework.cache.Cache中定义的方法,以达到手动diy缓存操作的目的。
1
2<bean id="cacheManager" class="com.xx.xx.RedisCacheManager">
3        <property name="transactionAware" value="true"/>
4        <property name="caches">
5            <list>
6                <bean class="com.xx.xx.MyCache"/>
7            </list>
8        </property>
9    </bean>
Cache接口中有get,put,evict等方法,可以按需替换成自己想要的操作。
1public interface Cache {
2    String getName();
3
4    Object getNativeCache();
5
6    Cache.ValueWrapper get(Object var1);
7
8    void put(Object var1, Object var2);
9
10    void evict(Object var1);
11
12    void clear();
13
14    public interface ValueWrapper {
15        Object get();
16    }
17}
配置输出完了,开始切入正题。spring容器启动时候会解析annotation-driven标签,具体的实现在CacheNamespaceHandler中。显然可以发现beanDefinition解析类是AnnotationDrivenCacheBeanDefinitionParser。
1public class CacheNamespaceHandler extends NamespaceHandlerSupport {
2    static final String CACHE_MANAGER_ATTRIBUTE = "cache-manager";
3    static final String DEFAULT_CACHE_MANAGER_BEAN_NAME = "cacheManager";
4
5    public CacheNamespaceHandler() {
6    }
7
8    static String extractCacheManager(Element element) {
9        return element.hasAttribute("cache-manager") ? element.getAttribute("cache-manager") : "cacheManager";
10    }
11
12    static BeanDefinition parseKeyGenerator(Element element, BeanDefinition def) {
13        String name = element.getAttribute("key-generator");
14        if (StringUtils.hasText(name)) {
15            def.getPropertyValues().add("keyGenerator", new RuntimeBeanReference(name.trim()));
16        }
17
18        return def;
19    }
20
21    public void init() {
22        this.registerBeanDefinitionParser("annotation-driven", new AnnotationDrivenCacheBeanDefinitionParser());
23        this.registerBeanDefinitionParser("advice", new CacheAdviceParser());
24    }
25}
AnnotationDrivenCacheBeanDefinitionParser中会先判断生成切面的方式,默认使用spring原生aop,也可以通过mode标签切换成AspectJ。
1public BeanDefinition parse(Element element, ParserContext parserContext) {
2        String mode = element.getAttribute("mode");
3        if ("aspectj".equals(mode)) {
4            this.registerCacheAspect(element, parserContext);
5        } else {
6            AnnotationDrivenCacheBeanDefinitionParser.AopAutoProxyConfigurer.configureAutoProxyCreator(element, parserContext);
7        }
8
9        return null;
10    }
往下走会到达configureAutoProxyCreator方法,configureAutoProxyCreator方法的作用是配置自动代理创建器。代码很多继续往下看~
1public static void configureAutoProxyCreator(Element element, ParserContext parserContext) {
2            AopNamespaceUtils.registerAutoProxyCreatorIfNecessary(parserContext, element);
3            if (!parserContext.getRegistry().containsBeanDefinition("org.springframework.cache.config.internalCacheAdvisor")) {
4                Object eleSource = parserContext.extractSource(element);
5                RootBeanDefinition sourceDef = new RootBeanDefinition("org.springframework.cache.annotation.AnnotationCacheOperationSource");
6                sourceDef.setSource(eleSource);
7                sourceDef.setRole(2);
8                String sourceName = parserContext.getReaderContext().registerWithGeneratedName(sourceDef);
9                RootBeanDefinition interceptorDef = new RootBeanDefinition(CacheInterceptor.class);
10                interceptorDef.setSource(eleSource);
11                interceptorDef.setRole(2);
12                AnnotationDrivenCacheBeanDefinitionParser.parseCacheManagerProperty(element, interceptorDef);
13                CacheNamespaceHandler.parseKeyGenerator(element, interceptorDef);
14                interceptorDef.getPropertyValues().add("cacheOperationSources", new RuntimeBeanReference(sourceName));
15                String interceptorName = parserContext.getReaderContext().registerWithGeneratedName(interceptorDef);
16                RootBeanDefinition advisorDef = new RootBeanDefinition(BeanFactoryCacheOperationSourceAdvisor.class);
17                advisorDef.setSource(eleSource);
18                advisorDef.setRole(2);
19                advisorDef.getPropertyValues().add("cacheOperationSource", new RuntimeBeanReference(sourceName));
20                advisorDef.getPropertyValues().add("adviceBeanName", interceptorName);
21                if (element.hasAttribute("order")) {
22                    advisorDef.getPropertyValues().add("order", element.getAttribute("order"));
23                }
24
25                parserContext.getRegistry().registerBeanDefinition("org.springframework.cache.config.internalCacheAdvisor", advisorDef);
26                CompositeComponentDefinition compositeDef = new CompositeComponentDefinition(element.getTagName(), eleSource);
27                compositeDef.addNestedComponent(new BeanComponentDefinition(sourceDef, sourceName));
28                compositeDef.addNestedComponent(new BeanComponentDefinition(interceptorDef, interceptorName));
29                compositeDef.addNestedComponent(new BeanComponentDefinition(advisorDef, "org.springframework.cache.config.internalCacheAdvisor"));
30                parserContext.registerComponent(compositeDef);
31            }
32
33        }
AopNamespaceUtils.registerAutoProxyCreatorIfNecessary(parserContext, element)作用是注册动态代理创建器。跳转两次到达这个registerOrEscalateApcAsRequired方法,它会检查是否存在org.springframework.aop.config.internalAutoProxyCreator的beanDefinition。
大概意思就是检查此前是否还有其他的代理比如aop代理,它也会加载internalAutoProxyCreator这个后置处理器。如果已经加载过internalAutoProxyCreator,则根据自动代理创建器的优先级判断,使用优先级高者。然后返回internalAutoProxyCreator的beanDefinition。
1private static BeanDefinition registerOrEscalateApcAsRequired(Class cls, BeanDefinitionRegistry registry, Object source) {
2        Assert.notNull(registry, "BeanDefinitionRegistry must not be null");
3        if (registry.containsBeanDefinition("org.springframework.aop.config.internalAutoProxyCreator")) {
4            BeanDefinition apcDefinition = registry.getBeanDefinition("org.springframework.aop.config.internalAutoProxyCreator");
5            if (!cls.getName().equals(apcDefinition.getBeanClassName())) {
6                int currentPriority = findPriorityForClass(apcDefinition.getBeanClassName());
7                int requiredPriority = findPriorityForClass(cls);
8                if (currentPriority < requiredPriority) {
9                    apcDefinition.setBeanClassName(cls.getName());
10                }
11            }
12            return null;
13        } else {
14            RootBeanDefinition beanDefinition = new RootBeanDefinition(cls);
15            beanDefinition.setSource(source);
16            beanDefinition.getPropertyValues().add("order", -2147483648);
17            beanDefinition.setRole(2);
18            registry.registerBeanDefinition("org.springframework.aop.config.internalAutoProxyCreator", beanDefinition);
19            return beanDefinition;
20        }
21    }
书接上文,获取beanDefinition后,会根据配置查看bean代理生成使用哪种模式,上文提到了,这里会根据proxy-target-class属性做判断,如果为true则使用CGLIB。添加属性配置后会调用registerComponentIfNecessary重新注册internalAutoProxyCreator组件。
1    private static void useClassProxyingIfNecessary(BeanDefinitionRegistry registry, Element sourceElement) {
2        if (sourceElement != null) {
3            boolean proxyTargetClass = Boolean.valueOf(sourceElement.getAttribute("proxy-target-class"));
4            if (proxyTargetClass) {
5                AopConfigUtils.forceAutoProxyCreatorToUseClassProxying(registry);
6            }
7
8            boolean exposeProxy = Boolean.valueOf(sourceElement.getAttribute("expose-proxy"));
9            if (exposeProxy) {
10                AopConfigUtils.forceAutoProxyCreatorToExposeProxy(registry);
11            }
12        }
13
14    }
15
16    private static void registerComponentIfNecessary(BeanDefinition beanDefinition, ParserContext parserContext) {
17        if (beanDefinition != null) {
18            BeanComponentDefinition componentDefinition = new BeanComponentDefinition(beanDefinition, "org.springframework.aop.config.internalAutoProxyCreator");
19            parserContext.registerComponent(componentDefinition);
20        }
21
22    }
23
回到主流程中首先判断是否加载过org.springframework.cache.config.internalCacheAdvisor目的是避免重复。校验过后定义了AnnotationCacheOperationSource这个beanDefinition,这个类比较绕,通过上帝视角总结下,它的作用是解析目标方法中包含了哪些缓存操作, 比如Cacheable等注解。后面会作为其他bean的成员变量。
1RootBeanDefinition sourceDef = new RootBeanDefinition("org.springframework.cache.annotation.AnnotationCacheOperationSource");
2                sourceDef.setSource(eleSource);
3                sourceDef.setRole(2);
4                String sourceName = parserContext.getReaderContext().registerWithGeneratedName(sourceDef);
接下来,是CacheInterceptor类的beanDefinition注册。CacheInterceptor实现了aop的MethodInterceptor接口,我们可以叫他代理中的代理。。。
创建beanDefinition后将前文中AnnotationCacheOperationSource解析器作为配置项添加到CacheInterceptor的bean定义中。
1RootBeanDefinition interceptorDef = new RootBeanDefinition(CacheInterceptor.class);
2                interceptorDef.setSource(eleSource);
3                interceptorDef.setRole(2);
4                //这块不特别说明了,目的是为了添加cacheManager ref
5                AnnotationDrivenCacheBeanDefinitionParser.parseCacheManagerProperty(element, interceptorDef);
6                //设置KeyGenerator,不够灵活pass掉了
7                CacheNamespaceHandler.parseKeyGenerator(element, interceptorDef);
8                //
9                interceptorDef.getPropertyValues().add("cacheOperationSources", new RuntimeBeanReference(sourceName));
10
CacheInterceptor实际的作用是为配置@Cacheable注解的目标方法提供切面功能,非常类似于一个定制化的@around。直接上代码。通过上面的解析器获取出缓存操作列表,如果能获取到缓存且不需要更新缓存则直接返回数据。如果需要更新则通过目标方法获取最新数据,在刷新缓存后直接返回。在这里包含了生成rediskey的步骤,后面会有介绍。
1protected Object execute(CacheAspectSupport.Invoker invoker, Object target, Method method, Object[] args) {
2        if (!this.initialized) {
3            return invoker.invoke();
4        } else {
5            Class<?> targetClass = AopProxyUtils.ultimateTargetClass(target);
6            if (targetClass == null && target != null) {
7                targetClass = target.getClass();
8            }
9
10            Collection<CacheOperation> cacheOp = this.getCacheOperationSource().getCacheOperations(method, targetClass);
11            if (!CollectionUtils.isEmpty(cacheOp)) {
12                Map<String, Collection<CacheAspectSupport.CacheOperationContext>> ops = this.createOperationContext(cacheOp, method, args, target, targetClass);
13                this.inspectBeforeCacheEvicts((Collection)ops.get("cacheevict"));
14                CacheAspectSupport.CacheStatus status = this.inspectCacheables((Collection)ops.get("cacheable"));
15                Map<CacheAspectSupport.CacheOperationContext, Object> updates = this.inspectCacheUpdates((Collection)ops.get("cacheupdate"));
16                if (status != null) {
17                    if (!status.updateRequired) {
18                        return status.retVal;
19                    }
20
21                    updates.putAll(status.cacheUpdates);
22                }
23
24                Object retVal = invoker.invoke();
25                this.inspectAfterCacheEvicts((Collection)ops.get("cacheevict"), retVal);
26                if (!updates.isEmpty()) {
27                    this.update(updates, retVal);
28                }
29
30                return retVal;
31            } else {
32                return invoker.invoke();
33            }
34        }
35    }
返回主流程,下面这部分是BeanFactoryCacheOperationSourceAdvisor缓存通知器的beanDefinition。这个类功能是注册aop,声明了切面的连接点(实际上依赖于上文中cacheOperationSource这个bean)与通知(实际上依赖于上文中CacheInterceptor这个bean)。
1RootBeanDefinition advisorDef = new RootBeanDefinition(BeanFactoryCacheOperationSourceAdvisor.class);
2                advisorDef.setSource(eleSource);
3                advisorDef.setRole(2);
4                advisorDef.getPropertyValues().add("cacheOperationSource", new RuntimeBeanReference(sourceName));
5                advisorDef.getPropertyValues().add("adviceBeanName", interceptorName);
6                if (element.hasAttribute("order")) {
7                    advisorDef.getPropertyValues().add("order", element.getAttribute("order"));
8                }
9
10                parserContext.getRegistry().registerBeanDefinition("org.springframework.cache.config.internalCacheAdvisor", advisorDef);
BeanFactoryCacheOperationSourceAdvisor类实现了PointcutAdvisor指定了切面点(实际没用表达式,直接通过match暴力获取注解,能获取到则表示命中aop)
1public class BeanFactoryCacheOperationSourceAdvisor extends AbstractBeanFactoryPointcutAdvisor {
2    private CacheOperationSource cacheOperationSource;
3    private final CacheOperationSourcePointcut pointcut = new CacheOperationSourcePointcut() {
4        protected CacheOperationSource getCacheOperationSource() {
5            return BeanFactoryCacheOperationSourceAdvisor.this.cacheOperationSource;
6        }
7    };
8
9    public BeanFactoryCacheOperationSourceAdvisor() {
10    }
11
12    public void setCacheOperationSource(CacheOperationSource cacheOperationSource) {
13        this.cacheOperationSource = cacheOperationSource;
14    }
15
16    public void setClassFilter(ClassFilter classFilter) {
17        this.pointcut.setClassFilter(classFilter);
18    }
19
20    public Pointcut getPointcut() {
21        return this.pointcut;
22    }
23}
24
25//其中切面点matchs方法
26public boolean matches(Method method, Class<?> targetClass) {
27        CacheOperationSource cas = this.getCacheOperationSource();
28        return cas != null && !CollectionUtils.isEmpty(cas.getCacheOperations(method, targetClass));
29    }
最后,注册复合组件,并将其注册到解析器上下文中。熟悉aop源码就可以知道,在bean实例化阶段,后置处理器会检查bean命中了哪个aop,再根据自动代理生成器中的配置,来决定使用哪种代理方式生成代理类,同时织入对应的advice。实际上是代理到CacheInterceptor上面,CacheInterceptor中间商内部再调用target目标类,就是这么简单~
1                CompositeComponentDefinition compositeDef = new CompositeComponentDefinition(element.getTagName(), eleSource);
2                compositeDef.addNestedComponent(new BeanComponentDefinition(sourceDef, sourceName));
3                compositeDef.addNestedComponent(new BeanComponentDefinition(interceptorDef, interceptorName));
4                compositeDef.addNestedComponent(new BeanComponentDefinition(advisorDef, "org.springframework.cache.config.internalCacheAdvisor"));
5                parserContext.registerComponent(compositeDef);
三. 缓存key生成原理
然而key是如何产生的?通过上问的阐述,就知道要找这个中间商CacheInterceptor,上代码。
1protected Object execute(CacheAspectSupport.Invoker invoker, Object target, Method method, Object[] args) {
2        if (!this.initialized) {
3            return invoker.invoke();
4        } else {
5            Class<?> targetClass = AopProxyUtils.ultimateTargetClass(target);
6            if (targetClass == null && target != null) {
7                targetClass = target.getClass();
8            }
9
10            Collection<CacheOperation> cacheOp = this.getCacheOperationSource().getCacheOperations(method, targetClass);
11            if (!CollectionUtils.isEmpty(cacheOp)) {
12                Map<String, Collection<CacheAspectSupport.CacheOperationContext>> ops = this.createOperationContext(cacheOp, method, args, target, targetClass);
13                this.inspectBeforeCacheEvicts((Collection)ops.get("cacheevict"));
14                CacheAspectSupport.CacheStatus status = this.inspectCacheables((Collection)ops.get("cacheable"));
15                Map<CacheAspectSupport.CacheOperationContext, Object> updates = this.inspectCacheUpdates((Collection)ops.get("cacheupdate"));
16                if (status != null) {
17                    if (!status.updateRequired) {
18                        return status.retVal;
19                    }
20
21                    updates.putAll(status.cacheUpdates);
22                }
23
24                Object retVal = invoker.invoke();
25                this.inspectAfterCacheEvicts((Collection)ops.get("cacheevict"), retVal);
26                if (!updates.isEmpty()) {
27                    this.update(updates, retVal);
28                }
29
30                return retVal;
31            } else {
32                return invoker.invoke();
33            }
34        }
35    }
倒车回到这里,最直观的嫌疑人是return status.retVal;这句继续跟进status。
1private CacheAspectSupport.CacheStatus inspectCacheables(Collection<CacheAspectSupport.CacheOperationContext> cacheables) {
2        Map<CacheAspectSupport.CacheOperationContext, Object> cacheUpdates = new LinkedHashMap(cacheables.size());
3        boolean cacheHit = false;
4        Object retVal = null;
5        if (!cacheables.isEmpty()) {
6            boolean log = this.logger.isTraceEnabled();
7            boolean atLeastOnePassed = false;
8            Iterator i$ = cacheables.iterator();
9
10            while(true) {
11                while(true) {
12                    CacheAspectSupport.CacheOperationContext context;
13                    Object key;
14                    label48:
15                    do {
16                        while(i$.hasNext()) {
17                            context = (CacheAspectSupport.CacheOperationContext)i$.next();
18                            if (context.isConditionPassing()) {
19                                atLeastOnePassed = true;
20                                key = context.generateKey();
21                                if (log) {
22                                    this.logger.trace("Computed cache key " + key + " for operation " + context.operation);
23                                }
24
25                                if (key == null) {
26                                    throw new IllegalArgumentException("Null key returned for cache operation (maybe you are using named params on classes without debug info?) " + context.operation);
27                                }
28
29                                cacheUpdates.put(context, key);
30                                continue label48;
31                            }
32
33                            if (log) {
34                                this.logger.trace("Cache condition failed on method " + context.method + " for operation " + context.operation);
35                            }
36                        }
37
38                        if (atLeastOnePassed) {
39                            return new CacheAspectSupport.CacheStatus(cacheUpdates, !cacheHit, retVal);
40                        }
41
42                        return null;
43                    } while(cacheHit);
44
45                    Iterator i$ = context.getCaches().iterator();
46
47                    while(i$.hasNext()) {
48                        Cache cache = (Cache)i$.next();
49                        ValueWrapper wrapper = cache.get(key);
50                        if (wrapper != null) {
51                            retVal = wrapper.get();
52                            cacheHit = true;
53                            break;
54                        }
55                    }
56                }
57            }
58        } else {
59            return null;
60        }
61    }
key = context.generateKey(); 再跳转。
1protected Object generateKey() {
2            if (StringUtils.hasText(this.operation.getKey())) {
3                EvaluationContext evaluationContext = this.createEvaluationContext(ExpressionEvaluator.NO_RESULT);
4                return CacheAspectSupport.this.evaluator.key(this.operation.getKey(), this.method, evaluationContext);
5            } else {
6                return CacheAspectSupport.this.keyGenerator.generate(this.target, this.method, this.args);
7            }
8        }
到达getExpression方法,由于key在注解上面配置了,所以不为空,在继续跳转。
1public Object key(String keyExpression, Method method, EvaluationContext evalContext) {
2        return this.getExpression(this.keyCache, keyExpression, method).getValue(evalContext);
3    }
4
5
6private Expression getExpression(Map<String, Expression> cache, String expression, Method method) {
7        String key = this.toString(method, expression);
8        Expression rtn = (Expression)cache.get(key);
9        if (rtn == null) {
10            rtn = this.parser.parseExpression(expression);
11            cache.put(key, rtn);
12        }
13
14        return rtn;
15    }
最终来到了parser.parseExpression;
根据代码可以看到解析器用的是 private final SpelExpressionParser parser = new SpelExpressionParser();
可以得出结论就是Spel表达式这个东东吧。对于实体类+方法的表达式可能会实时去反射得到结果。那我们能不能再生产key的上层再加一层缓存呢?答案是肯定的。
四. 代码优化
我们可以通过javaPoet方式动态生成class的形式,将生成的类加载到内存中。通过它的实例来生成key。
javaPoet类似于javasis是一个用于动态生成代码的开源项目,通过这个类库下面的api我们来进行简易diy尝试。
上代码,忽略不重要部分,切面简写直接展示生成key的部分。
1
2
3@Aspect
4@Component
5public class CacheAspect {
6
7    @Around("@annotation(myCache)")
8    public Object around(ProceedingJoinPoint pjp, MyCache myCache) throws Throwable {
9        long currentTime = System.currentTimeMillis();
10        Object value = null;
11        try {
12            if(!myCache.useCache()){
13                return pjp.proceed();
14            }
15            Object[] args = pjp.getArgs();
16            if(args == null || args[0] == null){
17                return pjp.proceed();
18            }
19            Object obj = args[0];
20            String key = MyCacheCacheKeyGenerator.generatorCacheKey(myCache,obj.getClass().getDeclaredFields(),obj);
21            ......
22
23        } catch (Throwable throwable) {
24            log.error("cache throwable",throwable);
25        }
26        return pjp.proceed();
27    }
28
29
30}
缓存key生成接口。
1
2
3public interface MyCacheKeyGenerator {
4
5    /**
6     * 生成key
7     *
8     */
9    String generateKey(Method method, Object[] args, Object target, String key);
10
11}
具体实现,其中wrapper是一个包装类,只是一个搬运工。通过key来动态产生key生成器。
1public class DyCacheKeyGenerator implements MyCacheKeyGenerator {
2
3    private final ConcurrentMap<String, Wrapper> cacheMap = new ConcurrentHashMap<String, Wrapper>();
4
5    /**
6     * 生成key
7     *
8     * @param method 调用的方法名字
9     * @param args   参数列表
10     * @param target 目标值
11     * @param key    key的格式
12     * @return
13     */
14    @Override
15    public String generateKey(Method method, Object[] args, Object target, String key) {
16        Wrapper wrapper = cacheMap.computeIfAbsent(key, k -> new Wrapper());
17        getMykeyGenerator(method, key, wrapper);
18        return ((MyCacheKeyGenerator) wrapper.getData()).generate(args);
19    }
20
21    private void getMykeyGenerator(Method method, String key, Wrapper wrapper) {
22        if (wrapper.getData() != null) {
23            return;
24        }
25
26        synchronized (wrapper) {
27            if (wrapper.getData() == null) {
28                MyCacheKeyGenerator keyGenerator = MyCacheKeyGenerator.initMyKeyGenerator(method, key);
29                wrapper.setData(keyGenerator);
30            }
31        }
32
33    }
34
35}
那么我们首先根据key获取表达式的集合,如果是反射则会生成DynamicExpression表达式,连接符会生成静态的StaticExpression表达式。表达式持有了key中字符串的片段。
1public static MyCacheKeyGenerator initMyKeyGenerator(Method method, String key) {
2
3        Set<Class> importHashSet = new HashSet();
4        //根据key中的配置的方法生成表达式列表
5        List<Expression> expressionList = new LinkedList<Expression>();
6        generateExpression(key, expressionList);
7
8        for (Expression expression : expressionList) {
9            if (expression instanceof DynamicExpression) {
10                String expressionStr = expression.execute();
11                //判断格式合法性
12                String[] items = expressionStr.split("\.");
13
14                String indexValue = items[0].replace("args", "");
15                int index = Integer.parseInt(indexValue);
16                Class clx = method.getParameterTypes()[index];
17                importHashSet.add(clx);
18                //获取对应属性的方法
19                String filedName = items[1];
20                String keyValue = Character.toUpperCase(filedName.charAt(0)) + filedName.substring(1);
21
22                try {
23                    keyValue = "get" + keyValue;
24                    Method felidMethod = clx.getMethod(keyValue);
25                    expression.setExpression(String.format("String.valueOf(((%s)args[%s]).%s())", clx.getName(), index, felidMethod.getName()));
26                } catch (NoSuchMethodException e) {
27                }
28
29            }
30        }
31
32        // 定义接口类型
33        ClassName interfaceName = ClassName.get("com.xxx.xxx", "MyKeyGenerator");
34
35        // 定义类名和包名
36        ClassName className = ClassName.get("com.xxx.xxx",  "DyMyKeyGeneratorImpl" + classIndex.incrementAndGet());
37
38        // 创建类构造器
39        TypeSpec.Builder classBuilder = TypeSpec.classBuilder(className.simpleName())
40                .addModifiers(Modifier.PUBLIC)
41                .addSuperinterface(interfaceName);
42
43        StringBuilder stringBuilder = new StringBuilder("stringBuilder");
44        for (Expression expression : expressionList) {
45            stringBuilder.append(".append(").append(expression.execute()).append(")");
46        }
47
48        MethodSpec generateMethod = MethodSpec.methodBuilder("generate")
49                .addModifiers(Modifier.PUBLIC)
50                .returns(String.class)
51                .addParameter(Object[].class, "args")
52                .addStatement("$T stringBuilder = new StringBuilder()", StringBuilder.class)
53                .addStatement(stringBuilder.toString())
54                .addStatement("return $S", "stringBuilder.toString();")
55                .build();
56
57        classBuilder.addMethod(generateMethod);
58
59        JavaFile javaFile = JavaFile.builder(className.packageName(), classBuilder.build())
60                .build();
61
62
63        StringBuilder sb = new StringBuilder();
64        try {
65            javaFile.writeTo(sb);
66        } catch (IOException e) {
67            logger.error("写入StringBuilder失败", e);
68        }
69
70
71        try {
72            System.out.println(sb.toString());
73            Map<String, byte[]> results = compiler.compile(className + ".java", sb.toString());
74            Class<?> clazz = compiler.loadClass("com.xxx.xxx." + className, results);
75            return (KeyGenerator) clazz.newInstance();
76        } catch (Exception e) {
77            logger.error("编译失败,编译内容:{}", sb.toString(), e);
78            throw new RuntimeException("内存class编译失败");
79        }
80  }
81
82
83  public static void generateExpression(String key, List<Expression> expressionList) {
84        if (StringUtils.isEmpty(key)) {
85            return;
86        }
87        int index = key.indexOf(paramsPrefix);
88        if (index < 0) {
89            expressionList.add(new StaticExpression(key));
90            return;
91        }else{
92            expressionList.add(new DynamicExpression(key.substring(0, index)));
93        }
94        generateExpression(key.substring(index + paramsPrefix.length()), expressionList);
95    }
生成表达式列表后开始遍历,最终得到key中每个arg形参与对应的方法片段(key格式类似于@Cacheable 注解的用法。比如文章开始时候提到的我们可以改成这样使用,代码如下:)
1@MyCache(key="#args0.getId()"+"_"+"#args0.getName()")
2public Person getByIsbn(Person person) {
3    return personMapper.getPerson(person);
4}
将静态与动态片段重新拼接放入表达式中。然后我们使用JavaPoet的接口动态创建class,实现其中的generateKey方法,并且解析表达式填充到方法的实现中。最终将class加载到内存中,再生产一个实例,并将这个实例缓存到内存中。这样下次调用就可以使用动态生成的实例丝滑的拼接key啦!!
五. 总结
JavaPoet用法还有很多,而且@Cacheable还有很多灵活玩法,由于篇幅太长就不一一呈现了。respect!