
作者:京东物流 江兆晶
一 背景
缓存是我们日常开发常被使用的技术栈,一般用来降低数据库读取压力,提升系统查询性能。使用缓存的数据一般为不常变化且使用率很高的数据,比如:配置信息、商品信息、用户信息等。我们一般的做法:第一次从数据库中读取数据,然后放到缓存中并设置缓存超期时间,缓存超期之后再从数据库从新读取,如果涉及到更新和删除数据也要同步缓存,这样才能解决缓存数据一致性问题,但我们常规的做法一般是使用缓存的put、get等命令把写入和读取缓存的代码写在方法体内部,这样缓存相关的操作代码就会耦合在业务代码里。
能不能加个缓存注解就能把缓存的的问题给解决了呢?常规的做法是自己定义一个缓存注解,使用AOP的机制来实现缓存读写和同步,但实际上我们做这一步是多余的,因为Spring本身就提供了强大的缓存注解功能,我们何必再重复造轮子呢。下面将简单介绍下Spring的几个关键缓存注解及如何使用它们来实现缓存读写、更新和删除。
二 Spring几个关键缓存注解介绍
下面简单介绍几个Spring提供的核心缓存注解:@EnableCaching,@Cacheable,@CachePut,@CacheEvict ,如下:
| 注解名称 | 简介 |
|---|---|
| @EnableCaching | 该注解用来开启缓存功能,配置类中需要加上这个注解,Spring才知道你需要缓存功能,另外其他和缓存相关的注解才会生效,Spring缓存注解也是通过AOP实现的,通过AOP来拦截需要使用缓存的方法,实现缓存功能。 |
| @Cacheable | 该注解用来赋予缓存功能,它可以标记在一个方法上,也可以标记在一个类上。当标记在一个方法上时表示该方法是支持缓存的,当标记在一个类上时则表示该类所有的方法都是支持缓存的。对于一个支持缓存的方法,Spring会在其被调用后将其返回值缓存起来,以保证下次利用同样的参数访问该方法可以直接从缓存中获取结果,而不需要再次执行该方法。@Cacheable可以指定三个属性:value、key和condition。 value: value和cacheNames属性作用一样,必须指定其中一个,表示当前方法的返回值是会被缓存在哪个Cache上的,对应Cache的名称。 key: 缓存以key->value的形式存储,key属性指定缓存内容对应的key,key属性支持SpEL表达式;当我们没有指定该属性时,Spring将使用默认策略生成key。 condition: 用来控制缓存的使用条件,condition属性默认为true,其值是通过SpEL表达式来指定的,当为true时表示先尝试从缓存中获取;若缓存中不存在则执行方法并将方法返回值存入缓存;当为false时不走缓存直接执行方法,并且返回结果也不会存入缓存。 |
| @CachePut | 该注解用来将结果放入缓存,该注解的用法跟@Cacheable类似,区别如下: @CachePut:这个注释可以确保方法被执行,同时方法的返回值也被记录到缓存中。 @Cacheable:当重复使用相同参数调用方法的时候,方法本身不会被调用执行,即方法本身被略过了,取而代之的是方法的结果直接从缓存中找到并返回了。 所以,@CachePut一般被用于缓存的更新同步,确保缓存数据一致性。 |
| @CacheEvict | 该注解用来清除缓存,如果标注在方法上则目标方法被调用时会清除指定的缓存,@CacheEvict一般用于数据删除时同时删除缓存,确保缓存数据一致性。 |
三 工程实践
3.1 引入依赖
要在springboot中使用缓存,重点要引入依赖:spring-boot-starter-data-redis
1<project xmlns="http://maven.apache.org/POM/4.0.0" xmlns:xsi="http://www.w3.org/2001/XMLSchema-instance"
2 xsi:schemaLocation="http://maven.apache.org/POM/4.0.0 http://maven.apache.org/xsd/maven-4.0.0.xsd">
3 <modelVersion>4.0.0</modelVersion>
4
5 <groupId>org.example</groupId>
6 <artifactId>spring-cache</artifactId>
7 <version>1.0-SNAPSHOT</version>
8 <packaging>jar</packaging>
9
10 <name>spring-cache</name>
11 <url>http://maven.apache.org</url>
12
13 <properties>
14 <project.build.sourceEncoding>UTF-8</project.build.sourceEncoding>
15 <spring.boot.version>2.3.8.RELEASE</spring.boot.version>
16 <slf4j-api.version>1.7.29</slf4j-api.version>
17 <log4j-api.version>2.3</log4j-api.version>
18 </properties>
19
20 <dependencies>
21 <dependency>
22 <groupId>org.springframework.boot</groupId>
23 <artifactId>spring-boot-starter-data-redis</artifactId>
24 <version>${spring.boot.version}</version>
25 </dependency>
26 <dependency>
27 <groupId>org.springframework.boot</groupId>
28 <artifactId>spring-boot-starter-test</artifactId>
29 <version>${spring.boot.version}</version>
30 <scope>test</scope>
31 </dependency>
32 <dependency>
33 <groupId>org.slf4j</groupId>
34 <artifactId>slf4j-api</artifactId>
35 <version>${slf4j-api.version}</version>
36 <scope>provided</scope>
37 </dependency>
38 <dependency>
39 <groupId>org.apache.logging.log4j</groupId>
40 <artifactId>log4j-api</artifactId>
41 <version>${log4j-api.version}</version>
42 <scope>provided</scope>
43 </dependency>
44 </dependencies>
45</project>
3.2 核心代码
首先,要创建缓存配置类,配置类中需要定义一个bean:缓存管理器,类型为CacheManager;另外两个配置:cacheEnable为true开启缓存,false为关闭缓存,cacheTtl为统一的缓存超时时间。
1package com.java.demo.config;
2
3import org.springframework.beans.factory.annotation.Autowired;
4import org.springframework.beans.factory.annotation.Value;
5import org.springframework.cache.CacheManager;
6import org.springframework.cache.annotation.EnableCaching;
7import org.springframework.cache.support.NoOpCacheManager;
8import org.springframework.context.annotation.Bean;
9import org.springframework.context.annotation.Configuration;
10import org.springframework.data.redis.cache.RedisCacheConfiguration;
11import org.springframework.data.redis.cache.RedisCacheManager;
12import org.springframework.data.redis.connection.RedisConnectionFactory;
13import org.springframework.data.redis.core.StringRedisTemplate;
14
15import java.time.Duration;
16
17/**
18 * redis缓存配置类
19 *
20 * @author jiangzhaojing
21 * @date 2024-11-29 15:01:12
22 */
23@Configuration
24@EnableCaching
25public class RedisCacheConfig {
26
27@Value("${cache.enable:false}")
28private Boolean cacheEnable;
29 @Value("${cache.ttl:120}")
30private Long cacheTtl;
31
32 @Autowired
33 private StringRedisTemplate redisTemplate;
34
35 /**
36 * 缓存管理bean注入
37 *
38 * @param redisConnectionFactory
39 * @return
40 */
41 @Bean
42 public CacheManager cacheManager(RedisConnectionFactory redisConnectionFactory) {
43if (cacheEnable) {
44            RedisCacheConfiguration config = instanceConfig();
45 return RedisCacheManager.builder(redisConnectionFactory)
46                    .cacheDefaults(config)
47                    .transactionAware()
48                    .build();
49 }
50return new NoOpCacheManager();
51 }
52
53/**
54 * 实例配置
55 *
56 * @return
57 */
58 private RedisCacheConfiguration instanceConfig() {
59return RedisCacheConfiguration.defaultCacheConfig()
60                .entryTtl(Duration.ofSeconds(cacheTtl))
61                .disableCachingNullValues();
62 }
63
64
65}
其次,创建测试需要实体类,需要注意是,该实体类必须实现Serializable,否则会出现序列化异常。
1package com.java.demo.model;
2
3import java.io.Serializable;
4
5/**
6 * 用户实体类
7 *
8 * @author jiangzhaojing
9 * @date 2024-11-29 15:01:12
10 * 用户相关属性
11 */
12public class User implements Serializable {
13private String userId;
14 private String userName;
15
16 public User() {
17    }
18
19public User(String userId, String userName) {
20this.userId = userId;
21 this.userName = userName;
22 }
23
24@Override
25 public String toString() {
26return String.format("[userId:%s,userName:%s]", userId, userName);
27 }
28
29public String getUserId() {
30return userId;
31 }
32
33public void setUserId(String userId) {
34this.userId = userId;
35 }
36
37public String getUserName() {
38return userName;
39 }
40
41public void setUserName(String userName) {
42this.userName = userName;
43 }
44}
然后,创建接口服务及实现类,并在实现类方法上增加缓存注解,如下:
<!---->1package com.java.demo.service; 2 3import com.java.demo.model.User; 4 5/** 6 * 用户相关服务 7 * 8 * @author jiangzhaojing 9 * @date 2024-11-29 15:01:12 10 */ 11public interface UserService { 12 13/** 14 * 根据用户ID获取用户 15 * 16 * @param userId 17 * @return 18 */ 19 User getUserById(String userId); 20 21 /** 22 * 更新用户 23 * 24 * @param user 25 * @return 26 */ 27 User updateUser(User user); 28 29 /** 30 * 删除用户 31 * 32 * @param userId 33 */ 34 void deleteUser(String userId); 35}
1package com.java.demo.service.impl;
2
3import com.java.demo.model.User;
4import com.java.demo.service.UserService;
5import org.slf4j.Logger;
6import org.slf4j.LoggerFactory;
7import org.springframework.cache.annotation.CacheEvict;
8import org.springframework.cache.annotation.CachePut;
9import org.springframework.cache.annotation.Cacheable;
10import org.springframework.stereotype.Component;
11
12/**
13 * 用户相关服务实现
14 *
15 * @author jiangzhaojing
16 * @date 2024-11-29 15:01:12
17 */
18@Component
19public class UserServiceImpl implements UserService {
20private final static Logger logger = LoggerFactory.getLogger(UserServiceImpl.class);
21
22 /**
23 * 根据用户ID获取用户
24 *
25 * @param userId
26 * @return
27 */
28 @Override
29 @Cacheable(cacheNames = "users", key = "#userId")
30public User getUserById(String userId) {
31logger.info("调用了方法[getUserById],入参:{}", userId);
32 //正常下面应该从数据库中读取
33 return new User("123", "li lei");
34 }
35
36/**
37 * 更新用户
38 *
39 * @param user
40 * @return
41 */
42 @Override
43 @CachePut(cacheNames = "users", key = "#user.userId")
44public User updateUser(User user) {
45logger.info("调用了方法[updateUser],入参:{}", user);
46 return user;
47 }
48
49/**
50 * 更新用户
51 *
52 * @param userId
53 * @return
54 */
55 @Override
56 @CacheEvict(cacheNames = "users", key = "#userId")
57public void deleteUser(String userId) {
58logger.info("调用了方法[deleteUser],入参:{}", userId);
59 }
60
61
62}
然后,写一个应用的启动类
1package com.java.demo;
2
3import org.springframework.boot.SpringApplication;
4import org.springframework.boot.autoconfigure.SpringBootApplication;
5import org.springframework.context.annotation.ComponentScan;
6
7@SpringBootApplication
8@ComponentScan("com.java.demo")
9public class Application {
10public static void main(String[] args) {
11        SpringApplication.run(Application.class);
12 }
13
14}
最后,配置文件配置缓存相关配置项,其中spring.redis.host,spring.redis.password,spring.redis.port三项根据实际配置填写
1spring.redis.host=//redis地址
2spring.redis.database=0
3spring.redis.port=//redis端口
4spring.redis.password=//redis密码
5
6spring.redis.timeout=5000
7spring.redis.jedis.pool.max-idle=8
8spring.redis.jedis.pool.min-idle=1
9spring.redis.jedis.pool.max-active=8
10spring.redis.jedis.pool.max-wait=3000
11
12cache.enable=true
13cache.ttl=300
3.3 测试用例
1package com.java.demo;
2
3
4import com.java.demo.model.User;
5import com.java.demo.service.UserService;
6import org.junit.Test;
7import org.junit.runner.RunWith;
8import org.slf4j.Logger;
9import org.slf4j.LoggerFactory;
10import org.springframework.beans.factory.annotation.Autowired;
11import org.springframework.boot.test.context.SpringBootTest;
12import org.springframework.test.context.junit4.SpringRunner;
13
14/**
15 * 用户相关服务
16 *
17 * @author jiangzhaojing
18 * @date 2024-11-29 15:01:12
19 */
20@RunWith(SpringRunner.class)
21@SpringBootTest
22public class CacheTest {
23private final static Logger logger = LoggerFactory.getLogger(CacheTest.class);
24
25 @Autowired
26 private UserService userService;
27
28 @Test
29 public void testCache() {
30//第一次读取缓存为空
31 logger.info("1.user:{}", userService.getUserById("123"));
32
33 //第二次直接从缓存读取
34 logger.info("2.user:{}", userService.getUserById("123"));
35
36 //更新缓存
37 userService.updateUser(new User("123", "zhang hua"));
38
39 //第三次直接从缓存读取
40 logger.info("3.user:{}", userService.getUserById("123"));
41
42 //删除缓存
43 userService.deleteUser("123");
44
45 logger.info("test finish!");
46 }
47
48
49}
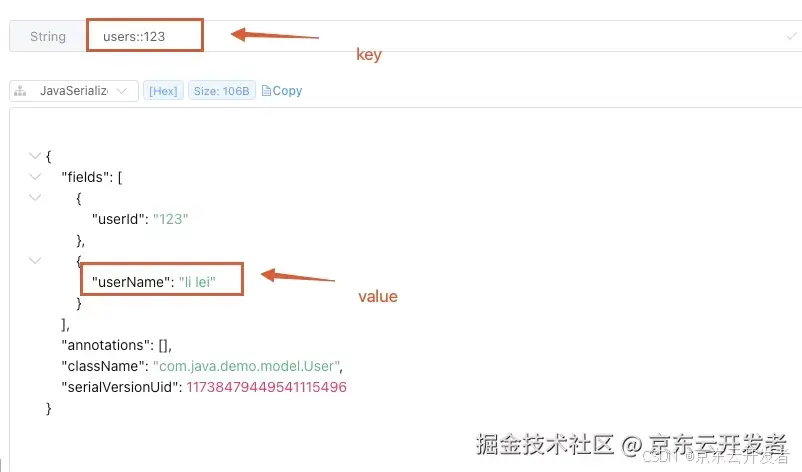
第一次读取,缓存还没有则直接进入方法体并写入缓存,如下图:
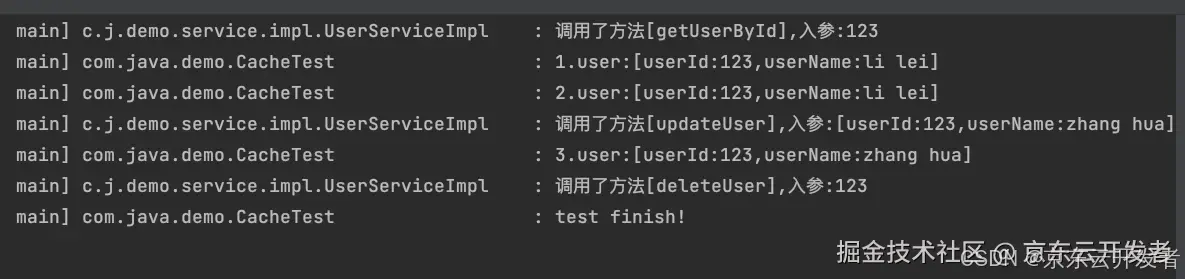
第二次读取,因缓存存在则跳过方法直接从缓存中读取,从第三行日志可以看出来,如下:
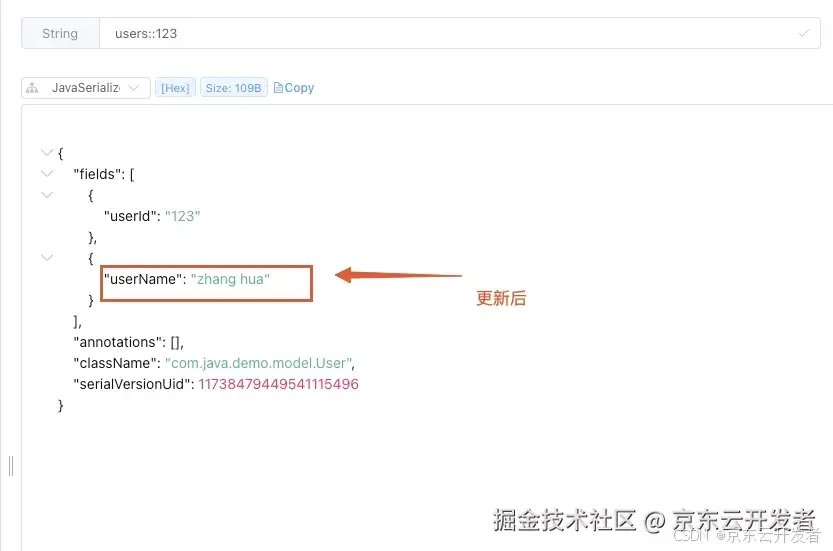
更新数据时,使用@CachePut更新缓存,同步缓存数据:
删除数据时,及时使用 @CacheEvict清理缓存,确保缓存数据与数据库数据一致。
四 总结
从上面的解析和实践中可以看到使用Spring提供的@EnableCaching注解可以方便进行缓存的处理,避免缓存处理逻辑与业务代码耦合,让代码更优雅,从一定程度上提升了开发效率。但细心的同学会发现一个问题:@EnableCaching注解并未提供缓存超期的属性,所以我们无法通过@EnableCaching设置缓存超时时间,只能通过CacheManager设置一个统一的缓存超期时间。通过@EnableCaching源码我们也能发现并无缓存超期属性,如下:
1package org.springframework.cache.annotation;
2
3import java.lang.annotation.Documented;
4import java.lang.annotation.ElementType;
5import java.lang.annotation.Inherited;
6import java.lang.annotation.Retention;
7import java.lang.annotation.RetentionPolicy;
8import java.lang.annotation.Target;
9import org.springframework.core.annotation.AliasFor;
10
11@Target({ElementType.TYPE, ElementType.METHOD})
12@Retention(RetentionPolicy.RUNTIME)
13@Inherited
14@Documented
15public @interface Cacheable {
16@AliasFor("cacheNames")
17    String[] value() default {};
18
19 @AliasFor("value")
20    String[] cacheNames() default {};
21
22 String key() default "";
23
24 String keyGenerator() default "";
25
26 String cacheManager() default "";
27
28 String cacheResolver() default "";
29
30 String condition() default "";
31
32 String unless() default "";
33
34 boolean sync() default false;
35}
至于Spring不提供这个属性原因,可能是基于框架的扩展性和通用性方面的考虑,不过Spring的强大之处就在于它是可以扩展的,预留了很多扩展点等待我们去实现,本文因篇幅有限不在本篇讨论如何扩展实现缓存超时时间的问题,留在后面的文章继续探讨。以上的分析讨论及代码难免有错误之处,敬请同学们指正!
五 源码
Spring缓存注解工程实践相关源码: https://3.cn/10h-Vk1KT