
本篇关键知识点:
Maven的assembly插件实现自定义打包部署(包含依赖jar包)
目前springboot项目的几种常见的部署方式。
1. 使用docker容器去部署,将springboot的应用构建成一个docker image,然后通过容器去启动镜像 ,这种方式在需要部署大规模的应用和应用扩展时是非常方便的,属于目前工业级的部署方案,但是需要掌握docker的生态圈技术。
2. 使用fatjar直接部署启动,这是很多初学者或者极小规模情况下的一个简单应用部署方式。
maven-shade-plugin,用来打可执行JAR包,也就是所谓的fat JAR包;
3. 使用maven-assembly-plugin插件打包,也是目前运维部署最多的一种方式,因为大数据项目中往往有很多shell脚本、SQL脚本、.properties及.xml配置项等,采用assembly插件可以让输出的结构清晰而标准化。
那么直接进入主题吧
配置
pom.xml
1<build>
2        <plugins>
3            <plugin>
4                <groupId>org.apache.maven.plugins</groupId>
5                <artifactId>maven-jar-plugin</artifactId>
6                <configuration>
7                    <archive>
8                        <!-- 添加index则不从mainfest中读取classpath,而是从Index.list中读取 -->
9                        <!--<index>true</index> -->
10                        <manifest>
11                            <!--启动类main方法-->
12                            <mainClass>com.xl.xxx.XXXApplication</mainClass>
13                            <!-- 是否指定classthpath-->
14                            <addClasspath>true</addClasspath>
15                            <!--为下面的的<Class-Path>添加前缀,默认为空,'./'为当前目录-->
16                            <classpathPrefix>./</classpathPrefix>
17                        </manifest>
18                        <manifestEntries>
19                            <Class-Path>../conf/</Class-Path>
20                        </manifestEntries>
21                    </archive>
22                    <excludes>
23                        <exclude>*</exclude>
24                        <exclude>*/*</exclude>
25                        <exclude>*/static</exclude>
26                    </excludes>
27                </configuration>
28            </plugin>
29            <plugin>
30                <artifactId>maven-assembly-plugin</artifactId>
31                <executions>
32                    <execution>
33                        <id>make-dir</id>
34                        <!-- 绑定到package生命周期阶段上 -->
35                        <phase>package</phase>
36                        <goals>
37                            <!-- 绑定到package生命周期阶段上 -->
38                            <goal>single</goal>
39                        </goals>
40                        <configuration>
41                            <finalName>${project.artifactId}</finalName>
42                            <!--配置描述文件路径-->
43                            <descriptors> <!--描述文件路径-->
44                                <descriptor>${project.basedir}/assembly/assembly.xml</descriptor>
45                            </descriptors>
46                        </configuration>
47                    </execution>
48                </executions>
49            </plugin>
50
51            <plugin>
52                <groupId>org.apache.maven.plugins</groupId>
53                <artifactId>maven-surefire-plugin</artifactId>
54                <configuration>
55                    <skipTests>true</skipTests>
56                </configuration>
57            </plugin>
58        </plugins>
59    </build>
上面配置中, 有maven-jar-plugin 默认打包插件, skipTest 打包跳过测试, 主要配置在
maven-assembly-plugin
插件中
assmbly 配置
结构目录
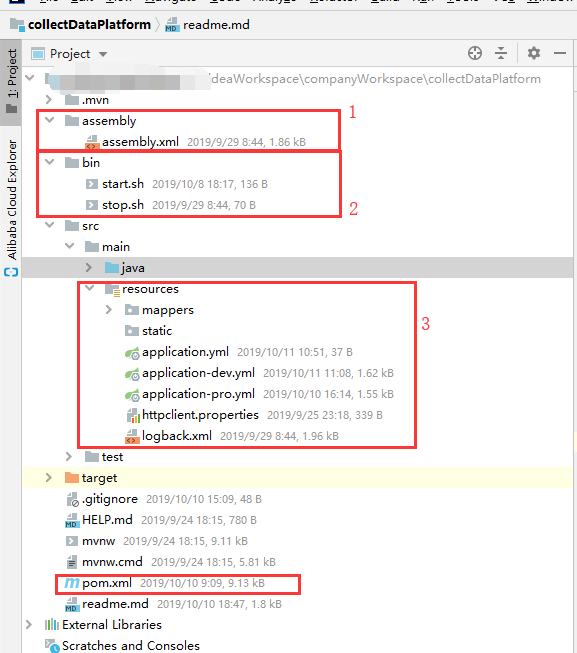
xml配置
1<assembly xmlns="http://maven.apache.org/plugins/maven-assembly-plugin/assembly/1.1.2"
2          xmlns:xsi="http://www.w3.org/2001/XMLSchema-instance"
3          xsi:schemaLocation="http://maven.apache.org/plugins/maven-assembly-plugin/assembly/1.1.2 http://maven.apache.org/xsd/assembly-1.1.2.xsd
4http://maven.apache.org/plugins/maven-assembly-plugin/assembly/1.1.2 ">
5    <id>${project.version}</id><!--id 标识符,添加到生成文件名称的后缀符。可以不指定-->
6
7    <formats>
8        <!--打包方式,支持写多个包括(zip、tar、tar.gz (or tgz)、tar.bz2 (or tbz2)、jar、dir、war)-->
9        <format>tar.gz</format>
10    </formats>
11    <includeBaseDirectory>true</includeBaseDirectory>
12    <fileSets>
13        <!-- fileSet用于指定项目路径和打包后的相对路径的映射关系-->
14
15        <!--将所有resources文件下的文件打包在conf目录下-->
16        <fileSet>
17            <directory>${project.basedir}/src/main/resources</directory>
18            <outputDirectory>conf</outputDirectory>
19        </fileSet>
20        <!--将启动脚本打包在bin目录下-->
21        <fileSet>
22            <directory>${project.basedir}/bin</directory>
23            <outputDirectory>bin</outputDirectory>
24        </fileSet>
25        <!--你还可以将初始化sql文件等打包在init目录下-->
26        <fileSet>
27            <directory>${project.basedir}/sql</directory>
28            <outputDirectory>init</outputDirectory>
29        </fileSet>
30
31    </fileSets>
32
33    <dependencySets>
34        <dependencySet>
35            <useProjectArtifact>true</useProjectArtifact>
36            <outputDirectory>lib</outputDirectory>
37            <!-- 将scope为runtime的依赖包打包到lib目录下。 -->
38            <scope>runtime</scope>
39        </dependencySet>
40    </dependencySets>
41
42
43</assembly>
bin脚本命令
start.sh
1#!/bin/sh
2nohup java -jar ../lib/demo-0.1.0-SNAPSHOT.jar >/dev/null 2>&1 &
3echo $! > /var/run/demo.pid
stop.sh
1#!/bin/sh
2PID=$(cat /var/run/demo.pid)
3kill -9 $PID
打包成功
打包成功后, 我们可以直接上传tag包至linux 服务器
部署流程
上传tag包 >