
最近有个项目要搭建测试环境在云平台上,加上又刚参加完oracle组织的oracle 19c的升级培训,所以准备在测试环境里面直接安装oracle19c,提前熟悉一下。并将安装过程记录分享给大家,这里主要介绍两种安装方式,一种是普通的图形界面安装,一种是静默安装。oracle19c还可以通过rpm包在线自动安装,这里不进行介绍。
oracle官方说法是Oracle Database 19c会作为Oracle长期支持的稳定版本,官方也建议大家选择19c这个版本的数据库。
一、安装准备
1、下载安装包
目前在官网下载19c时,详细的版本是 19.3,下载地址https://www.oracle.com/database/technologies/oracle19c-linux-downloads.html。大家可以选择对应的操作系统版本下载。
2、服务器环境
| 事项 | 详情 |
|---|---|
| 操作系统 | Centos 7.3 |
| 数据库版本 | 19.3.0 |
| CPU | inter 16核 2.30GHz |
| 内存 | 64GB |
| swap | 20GB |
云平台统一的操作系统版本较低,我这边是7.3,问题应该不大,oracle官方建议是7.4版本以上。硬件配置是测试环境不是很高。
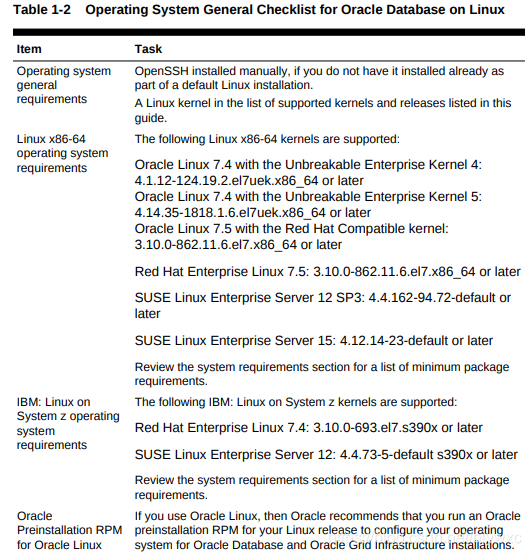
3、准备安装环境
3.1、服务器环境检查
1[root@host-173-16-87-178 /]# grep MemTotal /proc/meminfo
2MemTotal:       65806316 kB
3[root@host-173-16-87-178 /]#  grep SwapTotal /proc/meminfo
4SwapTotal:      20971516 kB
5[root@host-173-16-87-178 /]#  df -h /tmp
6Filesystem           Size  Used Avail Use% Mounted on
7/dev/mapper/cl-root   79G   13G   62G  18% /
8[root@host-173-16-87-178 /]# df -h /dev/shm
9Filesystem      Size  Used Avail Use% Mounted on
10tmpfs            32G   28K   32G   1% /dev/shm
11[root@host-173-16-87-178 /]# free -g
12              total        used        free      shared  buff/cache   available
13Mem:             62           0          61           0           0          61
14Swap:            19           0          19
15[root@host-173-16-87-178 /]#  uname -m
16x86_64
17[root@host-173-16-87-178 /]#
18
3.2、安装系统依赖包
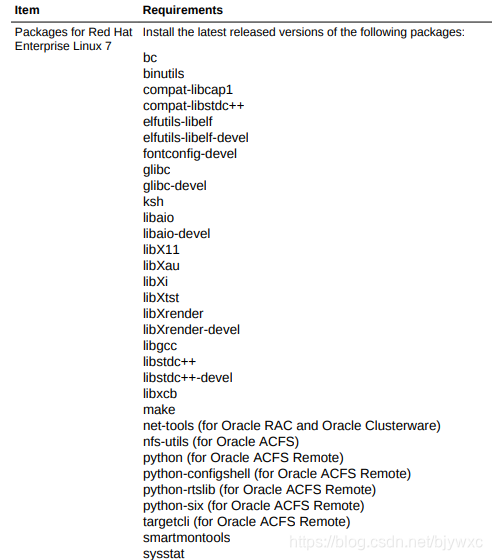
有以上依赖包要进行安装
1、检查少了哪些依赖包
1[root@host-173-16-87-178 ~]# rpm --query --queryformat "%{NAME}-%{VERSION}.%{RELEASE} (%{ARCH})\n" bc binutils compat-libcap1 compat-libstdc++-33 gcc gcc-c++ glibc glibc-devel ksh libaio libaio-devel libgcc libstdc++ libstdc++-devel make sysstat elfutils-libelf elfutils-libelf-devel fontconfig-devel libxcb smartmontools libX11 libXau libXtst libXrender libXrender-devel
2bc-1.06.95.13.el7 (x86_64)
3binutils-2.25.1.22.base.el7 (x86_64)
4package compat-libcap1 is not installed
5package compat-libstdc++-33 is not installed
6gcc-4.8.5.36.el7_6.2 (x86_64)
7package gcc-c++ is not installed
8glibc-2.17.292.el7 (x86_64)
9glibc-2.17.292.el7 (i686)
10glibc-devel-2.17.292.el7 (x86_64)
11package ksh is not installed
12libaio-0.3.109.13.el7 (x86_64)
13package libaio-devel is not installed
14libgcc-4.8.5.39.el7 (x86_64)
15libgcc-4.8.5.39.el7 (i686)
16libstdc++-4.8.5.39.el7 (x86_64)
17libstdc++-4.8.5.39.el7 (i686)
18package libstdc++-devel is not installed
19make-3.82.23.el7 (x86_64)
20sysstat-10.1.5.18.el7 (x86_64)
21elfutils-libelf-0.176.2.el7 (x86_64)
22elfutils-libelf-0.176.2.el7 (i686)
23package elfutils-libelf-devel is not installed
24package fontconfig-devel is not installed
25libxcb-1.13.1.el7 (x86_64)
26smartmontools-7.0.1.el7_7.1 (x86_64)
27libX11-1.6.5.2.el7 (x86_64)
28libXau-1.0.8.2.1.el7 (x86_64)
29libXtst-1.2.3.1.el7 (x86_64)
30libXrender-0.9.10.1.el7 (x86_64)
31package libXrender-devel is not installed
32[root@host-173-16-87-178 ~]#
33
2、使用yum进行安装
1[root@host-173-16-87-178 ~]# yum install -y compat-libcap1 compat-libstdc++-33 gcc-c++ ksh libaio-devel libstdc++-devel elfutils-libelf-devel fontconfig-devel libXrender-devel 2Loaded plugins: fastestmirror, langpacks, product-id, search-disabled-repos, subscription-manager 3This system is not registered with an entitlement server. You can use subscription-manager to register. 4Loading mirror speeds from cached hostfile 5Resolving Dependencies 6--> Running transaction check 7---> Package compat-libcap1.x86_64 0:1.10-7.el7 will be installed 8---> Package compat-libstdc++-33.x86_64 0:3.2.3-72.el7 will be installed 9---> Package elfutils-libelf-devel.x86_64 0:0.176-2.el7 will be installed 10---> Package fontconfig-devel.x86_64 0:2.13.0-4.3.el7 will be installed 11--> Processing Dependency: pkgconfig(freetype2) >= 20.0.14 for package: fontconfig-devel-2.13.0-4.3.el7.x86_64 12--> Processing Dependency: freetype-devel >= 2.8-7 for package: fontconfig-devel-2.13.0-4.3.el7.x86_64 13--> Processing Dependency: pkgconfig(uuid) for package: fontconfig-devel-2.13.0-4.3.el7.x86_64 14--> Processing Dependency: pkgconfig(expat) for package: fontconfig-devel-2.13.0-4.3.el7.x86_64 15---> Package gcc-c++.x86_64 0:4.8.5-39.el7 will be installed 16--> Processing Dependency: gcc = 4.8.5-39.el7 for package: gcc-c++-4.8.5-39.el7.x86_64 17---> Package ksh.x86_64 0:20120801-139.el7 will be installed 18---> Package libXrender-devel.x86_64 0:0.9.10-1.el7 will be installed 19--> Processing Dependency: pkgconfig(renderproto) >= 0.9 for package: libXrender-devel-0.9.10-1.el7.x86_64 20--> Processing Dependency: pkgconfig(xproto) for package: libXrender-devel-0.9.10-1.el7.x86_64 21--> Processing Dependency: pkgconfig(x11) for package: libXrender-devel-0.9.10-1.el7.x86_64 22---> Package libaio-devel.x86_64 0:0.3.109-13.el7 will be installed 23---> Package libstdc++-devel.x86_64 0:4.8.5-39.el7 will be installed 24--> Running transaction check 25---> Package expat-devel.x86_64 0:2.1.0-10.el7_3 will be installed 26--> Processing Dependency: expat = 2.1.0-10.el7_3 for package: expat-devel-2.1.0-10.el7_3.x86_64 27---> Package freetype-devel.x86_64 0:2.8-14.el7 will be installed 28--> Processing Dependency: freetype = 2.8-14.el7 for package: freetype-devel-2.8-14.el7.x86_64 29--> Processing Dependency: pkgconfig(libpng) for package: freetype-devel-2.8-14.el7.x86_64 30---> Package gcc.x86_64 0:4.8.5-36.el7_6.2 will be updated 31---> Package gcc.x86_64 0:4.8.5-39.el7 will be an update 32--> Processing Dependency: libgomp = 4.8.5-39.el7 for package: gcc-4.8.5-39.el7.x86_64 33--> Processing Dependency: cpp = 4.8.5-39.el7 for package: gcc-4.8.5-39.el7.x86_64 34---> Package libX11-devel.x86_64 0:1.6.7-2.el7 will be installed 35--> Processing Dependency: libX11 = 1.6.7-2.el7 for package: libX11-devel-1.6.7-2.el7.x86_64 36--> Processing Dependency: pkgconfig(xcb) >= 1.11.1 for package: libX11-devel-1.6.7-2.el7.x86_64 37--> Processing Dependency: pkgconfig(xcb) for package: libX11-devel-1.6.7-2.el7.x86_64 38---> Package libuuid-devel.x86_64 0:2.23.2-61.el7_7.1 will be installed 39--> Processing Dependency: libuuid = 2.23.2-61.el7_7.1 for package: libuuid-devel-2.23.2-61.el7_7.1.x86_64 40---> Package xorg-x11-proto-devel.noarch 0:2018.4-1.el7 will be installed 41--> Running transaction check 42---> Package cpp.x86_64 0:4.8.5-36.el7_6.2 will be updated 43---> Package cpp.x86_64 0:4.8.5-39.el7 will be an update 44---> Package expat.x86_64 0:2.1.0-8.el7 will be updated 45---> Package expat.x86_64 0:2.1.0-10.el7_3 will be an update 46---> Package freetype.x86_64 0:2.8-12.el7_6.1 will be updated 47---> Package freetype.x86_64 0:2.8-14.el7 will be an update 48---> Package libX11.x86_64 0:1.6.5-2.el7 will be updated 49---> Package libX11.x86_64 0:1.6.7-2.el7 will be an update 50--> Processing Dependency: libX11-common >= 1.6.7-2.el7 for package: libX11-1.6.7-2.el7.x86_64 51---> Package libgomp.x86_64 0:4.8.5-36.el7_6.2 will be updated 52---> Package libgomp.x86_64 0:4.8.5-39.el7 will be an update 53---> Package libpng-devel.x86_64 2:1.5.13-7.el7_2 will be installed 54---> Package libuuid.x86_64 0:2.23.2-33.el7 will be updated 55--> Processing Dependency: libuuid = 2.23.2-33.el7 for package: libblkid-2.23.2-33.el7.x86_64 56--> Processing Dependency: libuuid = 2.23.2-33.el7 for package: libmount-2.23.2-33.el7.x86_64 57--> Processing Dependency: libuuid = 2.23.2-33.el7 for package: util-linux-2.23.2-33.el7.x86_64 58---> Package libuuid.x86_64 0:2.23.2-61.el7_7.1 will be an update 59---> Package libxcb-devel.x86_64 0:1.13-1.el7 will be installed 60--> Processing Dependency: pkgconfig(xau) >= 0.99.2 for package: libxcb-devel-1.13-1.el7.x86_64 61--> Running transaction check 62---> Package libX11-common.noarch 0:1.6.5-2.el7 will be updated 63---> Package libX11-common.noarch 0:1.6.7-2.el7 will be an update 64---> Package libXau-devel.x86_64 0:1.0.8-2.1.el7 will be installed 65---> Package libblkid.x86_64 0:2.23.2-33.el7 will be updated 66---> Package libblkid.x86_64 0:2.23.2-61.el7_7.1 will be an update 67---> Package libmount.x86_64 0:2.23.2-33.el7 will be updated 68---> Package libmount.x86_64 0:2.23.2-61.el7_7.1 will be an update 69---> Package util-linux.x86_64 0:2.23.2-33.el7 will be updated 70---> Package util-linux.x86_64 0:2.23.2-61.el7_7.1 will be an update 71--> Processing Dependency: libsmartcols = 2.23.2-61.el7_7.1 for package: util-linux-2.23.2-61.el7_7.1.x86_64 72--> Processing Dependency: libsmartcols.so.1(SMARTCOLS_2.25)(64bit) for package: util-linux-2.23.2-61.el7_7.1.x86_64 73--> Processing Dependency: libsmartcols.so.1()(64bit) for package: util-linux-2.23.2-61.el7_7.1.x86_64 74--> Running transaction check 75---> Package libsmartcols.x86_64 0:2.23.2-61.el7_7.1 will be installed 76--> Finished Dependency Resolution 77 78Dependencies Resolved 79 80==================================================================================================================================================================== 81 Package Arch Version Repository Size 82==================================================================================================================================================================== 83Installing: 84 compat-libcap1 x86_64 1.10-7.el7 CentOS7.3 19 k 85 compat-libstdc++-33 x86_64 3.2.3-72.el7 CentOS7.3 191 k 86 elfutils-libelf-devel x86_64 0.176-2.el7 CentOS7.3 39 k 87 fontconfig-devel x86_64 2.13.0-4.3.el7 CentOS7.3 138 k 88 gcc-c++ x86_64 4.8.5-39.el7 CentOS7.3 7.2 M 89 ksh x86_64 20120801-139.el7 CentOS7.3 885 k 90 libXrender-devel x86_64 0.9.10-1.el7 CentOS7.3 17 k 91 libaio-devel x86_64 0.3.109-13.el7 CentOS7.3 13 k 92 libstdc++-devel x86_64 4.8.5-39.el7 CentOS7.3 1.5 M 93Installing for dependencies: 94 expat-devel x86_64 2.1.0-10.el7_3 CentOS7.3 57 k 95 freetype-devel x86_64 2.8-14.el7 CentOS7.3 447 k 96 libX11-devel x86_64 1.6.7-2.el7 CentOS7.3 981 k 97 libXau-devel x86_64 1.0.8-2.1.el7 CentOS7.3 14 k 98 libpng-devel x86_64 2:1.5.13-7.el7_2 CentOS7.3 122 k 99 libsmartcols x86_64 2.23.2-61.el7_7.1 CentOS7.3 141 k 100 libuuid-devel x86_64 2.23.2-61.el7_7.1 CentOS7.3 92 k 101 libxcb-devel x86_64 1.13-1.el7 CentOS7.3 1.1 M 102 xorg-x11-proto-devel noarch 2018.4-1.el7 CentOS7.3 280 k 103Updating for dependencies: 104 cpp x86_64 4.8.5-39.el7 CentOS7.3 5.9 M 105 expat x86_64 2.1.0-10.el7_3 CentOS7.3 81 k 106 freetype x86_64 2.8-14.el7 CentOS7.3 380 k 107 gcc x86_64 4.8.5-39.el7 CentOS7.3 16 M 108 libX11 x86_64 1.6.7-2.el7 CentOS7.3 607 k 109 libX11-common noarch 1.6.7-2.el7 CentOS7.3 164 k 110 libblkid x86_64 2.23.2-61.el7_7.1 CentOS7.3 181 k 111 libgomp x86_64 4.8.5-39.el7 CentOS7.3 158 k 112 libmount x86_64 2.23.2-61.el7_7.1 CentOS7.3 183 k 113 libuuid x86_64 2.23.2-61.el7_7.1 CentOS7.3 83 k 114 util-linux x86_64 2.23.2-61.el7_7.1 CentOS7.3 2.0 M 115 116Transaction Summary 117==================================================================================================================================================================== 118Install 9 Packages (+ 9 Dependent packages) 119Upgrade ( 11 Dependent packages) 120 121Total download size: 39 M 122Downloading packages: 123No Presto metadata available for CentOS7.3 124(1/29): compat-libcap1-1.10-7.el7.x86_64.rpm | 19 kB 00:00:00 125(2/29): cpp-4.8.5-39.el7.x86_64.rpm | 5.9 MB 00:00:00 126(3/29): compat-libstdc++-33-3.2.3-72.el7.x86_64.rpm | 191 kB 00:00:00 127(4/29): elfutils-libelf-devel-0.176-2.el7.x86_64.rpm | 39 kB 00:00:00 128(5/29): expat-2.1.0-10.el7_3.x86_64.rpm | 81 kB 00:00:00 129(6/29): fontconfig-devel-2.13.0-4.3.el7.x86_64.rpm | 138 kB 00:00:00 130(7/29): freetype-2.8-14.el7.x86_64.rpm | 380 kB 00:00:00 131(8/29): expat-devel-2.1.0-10.el7_3.x86_64.rpm | 57 kB 00:00:00 132(9/29): freetype-devel-2.8-14.el7.x86_64.rpm | 447 kB 00:00:00 133(10/29): gcc-c++-4.8.5-39.el7.x86_64.rpm | 7.2 MB 00:00:00 134(11/29): ksh-20120801-139.el7.x86_64.rpm | 885 kB 00:00:00 135(12/29): libX11-1.6.7-2.el7.x86_64.rpm | 607 kB 00:00:00 136(13/29): libX11-common-1.6.7-2.el7.noarch.rpm | 164 kB 00:00:00 137(14/29): gcc-4.8.5-39.el7.x86_64.rpm | 16 MB 00:00:02 138(15/29): libXau-devel-1.0.8-2.1.el7.x86_64.rpm | 14 kB 00:00:00 139(16/29): libXrender-devel-0.9.10-1.el7.x86_64.rpm | 17 kB 00:00:00 140(17/29): libaio-devel-0.3.109-13.el7.x86_64.rpm | 13 kB 00:00:00 141(18/29): libblkid-2.23.2-61.el7_7.1.x86_64.rpm | 181 kB 00:00:00 142(19/29): libgomp-4.8.5-39.el7.x86_64.rpm | 158 kB 00:00:00 143(20/29): libmount-2.23.2-61.el7_7.1.x86_64.rpm | 183 kB 00:00:00 144(21/29): libpng-devel-1.5.13-7.el7_2.x86_64.rpm | 122 kB 00:00:00 145(22/29): libsmartcols-2.23.2-61.el7_7.1.x86_64.rpm | 141 kB 00:00:00 146(23/29): libX11-devel-1.6.7-2.el7.x86_64.rpm | 981 kB 00:00:00 147(24/29): libuuid-2.23.2-61.el7_7.1.x86_64.rpm | 83 kB 00:00:00 148(25/29): libstdc++-devel-4.8.5-39.el7.x86_64.rpm | 1.5 MB 00:00:00 149(26/29): libuuid-devel-2.23.2-61.el7_7.1.x86_64.rpm | 92 kB 00:00:00 150(27/29): libxcb-devel-1.13-1.el7.x86_64.rpm | 1.1 MB 00:00:00 151(28/29): xorg-x11-proto-devel-2018.4-1.el7.noarch.rpm | 280 kB 00:00:00 152(29/29): util-linux-2.23.2-61.el7_7.1.x86_64.rpm | 2.0 MB 00:00:00 153-------------------------------------------------------------------------------------------------------------------------------------------------------------------- 154Total 13 MB/s | 39 MB 00:00:02 155Running transaction check 156Running transaction test 157Transaction test succeeded 158Running transaction 159 Updating : libuuid-2.23.2-61.el7_7.1.x86_64 1/40 160 Installing : xorg-x11-proto-devel-2018.4-1.el7.noarch 2/40 161 Updating : libblkid-2.23.2-61.el7_7.1.x86_64 3/40 162 Updating : libmount-2.23.2-61.el7_7.1.x86_64 4/40 163 Installing : libXau-devel-1.0.8-2.1.el7.x86_64 5/40 164 Installing : libxcb-devel-1.13-1.el7.x86_64 6/40 165 Installing : libuuid-devel-2.23.2-61.el7_7.1.x86_64 7/40 166 Updating : expat-2.1.0-10.el7_3.x86_64 8/40 167 Installing : expat-devel-2.1.0-10.el7_3.x86_64 9/40 168 Installing : libsmartcols-2.23.2-61.el7_7.1.x86_64 10/40 169 Updating : libX11-common-1.6.7-2.el7.noarch 11/40 170 Updating : libX11-1.6.7-2.el7.x86_64 12/40 171 Installing : libX11-devel-1.6.7-2.el7.x86_64 13/40 172 Installing : libstdc++-devel-4.8.5-39.el7.x86_64 14/40 173 Updating : libgomp-4.8.5-39.el7.x86_64 15/40 174 Updating : cpp-4.8.5-39.el7.x86_64 16/40 175 Updating : gcc-4.8.5-39.el7.x86_64 17/40 176 Updating : freetype-2.8-14.el7.x86_64 18/40 177 Installing : 2:libpng-devel-1.5.13-7.el7_2.x86_64 19/40 178 Installing : freetype-devel-2.8-14.el7.x86_64 20/40 179 Installing : fontconfig-devel-2.13.0-4.3.el7.x86_64 21/40 180 Installing : gcc-c++-4.8.5-39.el7.x86_64 22/40 181 Installing : libXrender-devel-0.9.10-1.el7.x86_64 23/40 182 Updating : util-linux-2.23.2-61.el7_7.1.x86_64 24/40 183 Installing : compat-libstdc++-33-3.2.3-72.el7.x86_64 25/40 184 Installing : libaio-devel-0.3.109-13.el7.x86_64 26/40 185 Installing : compat-libcap1-1.10-7.el7.x86_64 27/40 186 Installing : elfutils-libelf-devel-0.176-2.el7.x86_64 28/40 187 Installing : ksh-20120801-139.el7.x86_64 29/40 188 Cleanup : util-linux-2.23.2-33.el7.x86_64 30/40 189 Cleanup : libmount-2.23.2-33.el7.x86_64 31/40 190 Cleanup : gcc-4.8.5-36.el7_6.2.x86_64 32/40 191 Cleanup : libblkid-2.23.2-33.el7.x86_64 33/40 192 Cleanup : libX11-1.6.5-2.el7.x86_64 34/40 193 Cleanup : libX11-common-1.6.5-2.el7.noarch 35/40 194 Cleanup : libuuid-2.23.2-33.el7.x86_64 36/40 195 Cleanup : cpp-4.8.5-36.el7_6.2.x86_64 37/40 196 Cleanup : libgomp-4.8.5-36.el7_6.2.x86_64 38/40 197 Cleanup : expat-2.1.0-8.el7.x86_64 39/40 198 Cleanup : freetype-2.8-12.el7_6.1.x86_64 40/40 199 Verifying : util-linux-2.23.2-61.el7_7.1.x86_64 1/40 200 Verifying : 2:libpng-devel-1.5.13-7.el7_2.x86_64 2/40 201 Verifying : xorg-x11-proto-devel-2018.4-1.el7.noarch 3/40 202 Verifying : gcc-4.8.5-39.el7.x86_64 4/40 203 Verifying : freetype-2.8-14.el7.x86_64 5/40 204 Verifying : expat-devel-2.1.0-10.el7_3.x86_64 6/40 205 Verifying : fontconfig-devel-2.13.0-4.3.el7.x86_64 7/40 206 Verifying : cpp-4.8.5-39.el7.x86_64 8/40 207 Verifying : libuuid-2.23.2-61.el7_7.1.x86_64 9/40 208 Verifying : libgomp-4.8.5-39.el7.x86_64 10/40 209 Verifying : freetype-devel-2.8-14.el7.x86_64 11/40 210 Verifying : libX11-1.6.7-2.el7.x86_64 12/40 211 Verifying : libstdc++-devel-4.8.5-39.el7.x86_64 13/40 212 Verifying : libX11-common-1.6.7-2.el7.noarch 14/40 213 Verifying : libXrender-devel-0.9.10-1.el7.x86_64 15/40 214 Verifying : ksh-20120801-139.el7.x86_64 16/40 215 Verifying : libmount-2.23.2-61.el7_7.1.x86_64 17/40 216 Verifying : gcc-c++-4.8.5-39.el7.x86_64 18/40 217 Verifying : elfutils-libelf-devel-0.176-2.el7.x86_64 19/40 218 Verifying : compat-libcap1-1.10-7.el7.x86_64 20/40 219 Verifying : libaio-devel-0.3.109-13.el7.x86_64 21/40 220 Verifying : libuuid-devel-2.23.2-61.el7_7.1.x86_64 22/40 221 Verifying : libxcb-devel-1.13-1.el7.x86_64 23/40 222 Verifying : libsmartcols-2.23.2-61.el7_7.1.x86_64 24/40 223 Verifying : libX11-devel-1.6.7-2.el7.x86_64 25/40 224 Verifying : compat-libstdc++-33-3.2.3-72.el7.x86_64 26/40 225 Verifying : libblkid-2.23.2-61.el7_7.1.x86_64 27/40 226 Verifying : expat-2.1.0-10.el7_3.x86_64 28/40 227 Verifying : libXau-devel-1.0.8-2.1.el7.x86_64 29/40 228 Verifying : libblkid-2.23.2-33.el7.x86_64 30/40 229 Verifying : libX11-common-1.6.5-2.el7.noarch 31/40 230 Verifying : expat-2.1.0-8.el7.x86_64 32/40 231 Verifying : libgomp-4.8.5-36.el7_6.2.x86_64 33/40 232 Verifying : libuuid-2.23.2-33.el7.x86_64 34/40 233 Verifying : libX11-1.6.5-2.el7.x86_64 35/40 234 Verifying : libmount-2.23.2-33.el7.x86_64 36/40 235 Verifying : gcc-4.8.5-36.el7_6.2.x86_64 37/40 236 Verifying : freetype-2.8-12.el7_6.1.x86_64 38/40 237 Verifying : util-linux-2.23.2-33.el7.x86_64 39/40 238 Verifying : cpp-4.8.5-36.el7_6.2.x86_64 40/40 239file:///mnt/repodata/bc7372b8befa9b51b26a8a998ca89b5be3e5636e30546b1e3f11d198d7bed64d-productid.gz: [Errno 14] curl#37 - "Couldn't open file /mnt/repodata/bc7372b8befa9b51b26a8a998ca89b5be3e5636e30546b1e3f11d198d7bed64d-productid.gz" 240Trying other mirror. 241 242Installed: 243 compat-libcap1.x86_64 0:1.10-7.el7 compat-libstdc++-33.x86_64 0:3.2.3-72.el7 elfutils-libelf-devel.x86_64 0:0.176-2.el7 244 fontconfig-devel.x86_64 0:2.13.0-4.3.el7 gcc-c++.x86_64 0:4.8.5-39.el7 ksh.x86_64 0:20120801-139.el7 245 libXrender-devel.x86_64 0:0.9.10-1.el7 libaio-devel.x86_64 0:0.3.109-13.el7 libstdc++-devel.x86_64 0:4.8.5-39.el7 246 247Dependency Installed: 248 expat-devel.x86_64 0:2.1.0-10.el7_3 freetype-devel.x86_64 0:2.8-14.el7 libX11-devel.x86_64 0:1.6.7-2.el7 libXau-devel.x86_64 0:1.0.8-2.1.el7 249 libpng-devel.x86_64 2:1.5.13-7.el7_2 libsmartcols.x86_64 0:2.23.2-61.el7_7.1 libuuid-devel.x86_64 0:2.23.2-61.el7_7.1 libxcb-devel.x86_64 0:1.13-1.el7 250 xorg-x11-proto-devel.noarch 0:2018.4-1.el7 251 252Dependency Updated: 253 cpp.x86_64 0:4.8.5-39.el7 expat.x86_64 0:2.1.0-10.el7_3 freetype.x86_64 0:2.8-14.el7 gcc.x86_64 0:4.8.5-39.el7 254 libX11.x86_64 0:1.6.7-2.el7 libX11-common.noarch 0:1.6.7-2.el7 libblkid.x86_64 0:2.23.2-61.el7_7.1 libgomp.x86_64 0:4.8.5-39.el7 255 libmount.x86_64 0:2.23.2-61.el7_7.1 libuuid.x86_64 0:2.23.2-61.el7_7.1 util-linux.x86_64 0:2.23.2-61.el7_7.1 256 257Complete! 258[root@host-173-16-87-178 ~]# 259
3.3、创建oracle用户组
1[root@ywxtdb ~]# groupadd oinstall
2[root@ywxtdb ~]# groupadd dba
3[root@ywxtdb ~]# groupadd asmdba
4[root@ywxtdb ~]# groupadd backupdba
5[root@ywxtdb ~]# groupadd dgdba
6[root@ywxtdb ~]# groupadd kmdba
7[root@ywxtdb ~]# groupadd racdba
8[root@ywxtdb ~]# groupadd oper
9[root@ywxtdb ~]#
10[root@ywxtdb ~]# useradd -g oinstall -G dba,asmdba,backupdba,dgdba,kmdba,racdba,oper -m oracle
11
3.4、配置域名解析文件
配置/etc/hosts文件
1[root@host-173-16-87-178 ~]# vi /etc/hosts
2127.0.0.1   localhost localhost.localdomain localhost4 localhost4.localdomain4
3::1         localhost localhost.localdomain localhost6 localhost6.localdomain6
4173.16.87.178   ywxtdb
5
3.5、配置系统内核参数


通过修改配置文件进行调整参数
1[root@host-173-16-87-178 ~]# vi /etc/sysctl.conf
2# sysctl settings are defined through files in
3# /usr/lib/sysctl.d/, /run/sysctl.d/, and /etc/sysctl.d/.
4#
5# Vendors settings live in /usr/lib/sysctl.d/.
6# To override a whole file, create a new file with the same in
7# /etc/sysctl.d/ and put new settings there. To override
8# only specific settings, add a file with a lexically later
9# name in /etc/sysctl.d/ and put new settings there.
10#
11# For more information, see sysctl.conf(5) and sysctl.d(5).
12fs.aio-max-nr = 1048576
13fs.file-max = 6815744
14kernel.shmall = 16451328
15kernel.shmmax = 33692319744
16kernel.shmmni = 4096
17kernel.sem = 250 32000 100 128
18net.ipv4.ip_local_port_range = 9000 65500
19net.core.rmem_default = 262144
20net.core.rmem_max = 4194304
21net.core.wmem_default = 262144
22net.core.wmem_max = 1048576
23
24#输入sysctl -P使配置生效
25[root@host-173-16-87-178 ~]# /sbin/sysctl -p
26net.ipv4.ip_no_pmtu_disc = 1
27net.ipv4.conf.all.accept_redirects = 0
28net.ipv4.conf.default.accept_redirects = 0
29net.ipv4.conf.all.send_redirects = 0
30net.ipv4.conf.all.secure_redirects = 0
31net.ipv4.tcp_max_syn_backlog = 4096
32net.ipv4.tcp_keepalive_time = 150
33net.ipv4.tcp_keepalive_probes = 5
34net.ipv4.tcp_keepalive_intvl = 6
35fs.aio-max-nr = 1048576
36fs.file-max = 6815744
37kernel.shmall = 16451328
38kernel.shmmax = 33692319744
39kernel.shmmni = 4096
40kernel.sem = 250 32000 100 128
41net.ipv4.ip_local_port_range = 9000 65500
42net.core.rmem_default = 262144
43net.core.rmem_max = 4194304
44net.core.wmem_default = 262144
45net.core.wmem_max = 1048576
46[root@host-173-16-87-178 ~]#
47
3.6、关闭selinux和防火墙
1[root@host-173-16-87-178 ~]# cat /etc/selinux/config
2
3# This file controls the state of SELinux on the system.
4# SELINUX= can take one of these three values:
5#     enforcing - SELinux security policy is enforced.
6#     permissive - SELinux prints warnings instead of enforcing.
7#     disabled - No SELinux policy is loaded.
8SELINUX=disabled
9# SELINUXTYPE= can take one of three two values:
10#     targeted - Targeted processes are protected,
11#     minimum - Modification of targeted policy. Only selected processes are protected.
12#     mls - Multi Level Security protection.
13SELINUXTYPE=targeted
14
15[root@host-173-16-87-178 ~]# systemctl status firewalld
16● firewalld.service - firewalld - dynamic firewall daemon
17   Loaded: loaded (/usr/lib/systemd/system/firewalld.service; disabled; vendor preset: enabled)
18   Active: inactive (dead)
19     Docs: man:firewalld(1)
20You have mail in /var/spool/mail/root
21[root@host-173-16-87-178 ~]#
22
3.7、配置用户环境
1、oracle用户环境变量
1[root@host-173-16-87-178 ~]# su - oracle
2[oracle@ywxtdb ~]$ vi .bash_profile
3# .bash_profile
4
5# Get the aliases and functions
6if [ -f ~/.bashrc ]; then
7        . ~/.bashrc
8fi
9
10# User specific environment and startup programs
11
12PATH=$PATH:$HOME/.local/bin:$HOME/bin
13
14export PATH
15
16export ORACLE_BASE=/u01/app/oracle
17export ORACLE_HOME=/u01/app/oracle/product/19.3.0
18export PATH=$PATH:$ORACLE_HOME/bin:/usr/local/bin
19export ORACLE_HOSTNAME=ywxtdb
20export ORACLE_SID=ywxtdb
21export LD_LIBRARY_PATH=$ORACLE_HOME/lib:$ORACLE_HOME/rdbms/lib:$ORACLE_HOME/network/lib:/lib:/usr/lib
22export CLASSPATH=$ORACLE_HOME/jlib:$ORACLE_HOME/rdbms/jlib:$ORACLE_HOME/network/jlib
23[root@host-173-16-87-178 ~]#
24
25
26
2、修改用户的Shell限制
1[root@host-173-16-87-178 ~]# vi /etc/security/limits.conf
2# /etc/security/limits.conf
3#
4#This file sets the resource limits for the users logged in via PAM.
5#It does not affect resource limits of the system services.
6#
7#Also note that configuration files in /etc/security/limits.d directory,
8#which are read in alphabetical order, override the settings in this
9#file in case the domain is the same or more specific.
10#That means for example that setting a limit for wildcard domain here
11#can be overriden with a wildcard setting in a config file in the
12#subdirectory, but a user specific setting here can be overriden only
13#with a user specific setting in the subdirectory.
14#
15#Each line describes a limit for a user in the form:
16#
17#<domain>        <type>  <item>  <value>
18#
19#Where:
20#<domain> can be:
21#        - a user name
22#        - a group name, with @group syntax
23#        - the wildcard *, for default entry
24#        - the wildcard %, can be also used with %group syntax,
25#                 for maxlogin limit
26#
27#<type> can have the two values:
28#        - "soft" for enforcing the soft limits
29#        - "hard" for enforcing hard limits
30#
31#<item> can be one of the following:
32#        - core - limits the core file size (KB)
33#        - data - max data size (KB)
34#        - fsize - maximum filesize (KB)
35#        - memlock - max locked-in-memory address space (KB)
36#        - nofile - max number of open file descriptors
37"/etc/security/limits.conf" 67L, 2542C
38#        - fsize - maximum filesize (KB)
39#        - memlock - max locked-in-memory address space (KB)
40#        - nofile - max number of open file descriptors
41#        - rss - max resident set size (KB)
42#        - stack - max stack size (KB)
43#        - cpu - max CPU time (MIN)
44#        - nproc - max number of processes
45#        - as - address space limit (KB)
46#        - maxlogins - max number of logins for this user
47#        - maxsyslogins - max number of logins on the system
48#        - priority - the priority to run user process with
49#        - locks - max number of file locks the user can hold
50#        - sigpending - max number of pending signals
51#        - msgqueue - max memory used by POSIX message queues (bytes)
52#        - nice - max nice priority allowed to raise to values: [-20, 19]
53#        - rtprio - max realtime priority
54#
55#<domain>      <type>  <item>         <value>
56#
57
58#*               soft    core            0
59#*               hard    rss             10000
60#@student        hard    nproc           20
61#@faculty        soft    nproc           20
62#@faculty        hard    nproc           50
63#ftp             hard    nproc           0
64#@student        -       maxlogins       4
65
66# End of file
67# Set Oracle Database Server
68@oinstall soft nofile 2048
69@oinstall hard nofile 65536
70@oinstall soft nproc 16384
71@oinstall soft stack 10240
72"/etc/security/limits.conf" 73L, 2681C written
73[root@host-173-16-87-178 ~]#
74
二、安装
1、解压安装包
1[root@ywxtdb soft]# mkdir -p /u01/app/oracle/product/19.3.0
2[root@ywxtdb soft]# mkdir -p /u01/app/oraInventory
3[root@ywxtdb soft]# unzip LINUX.X64_193000_db_home.zip -d /u01/app/oracle/product/19.3.0
4[root@ywxtdb soft]# chown -R oracle:oinstall /u01
5
2、方式一:图形界面
通过vnc工具连接到linux图形界面
1[root@ywxtdb ~]# chown -R oracle:oinstall /soft/database/
2[root@ywxtdb ~]# exit
3logout
4[oracle@ywxtdb database]$ ./runInstaller
5
1)下一步
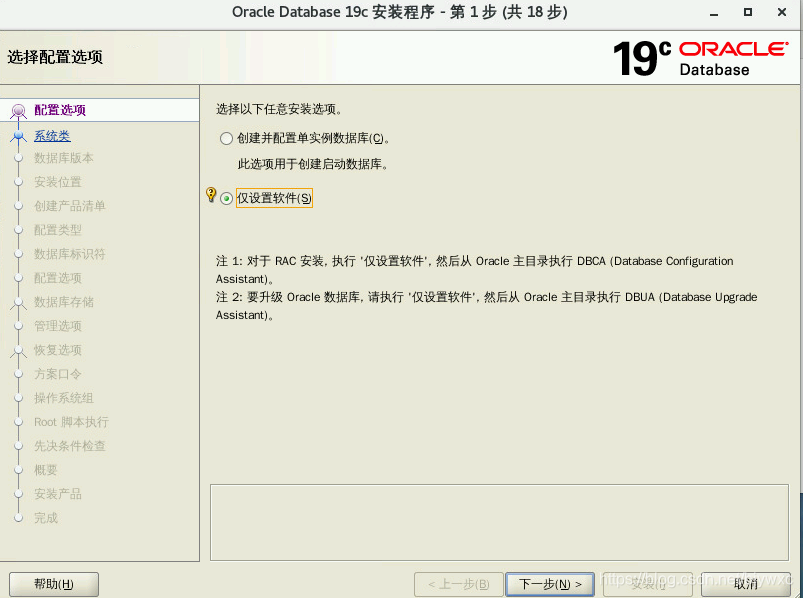
2)单实例数据库安装,下一步

3)企业版,下一步
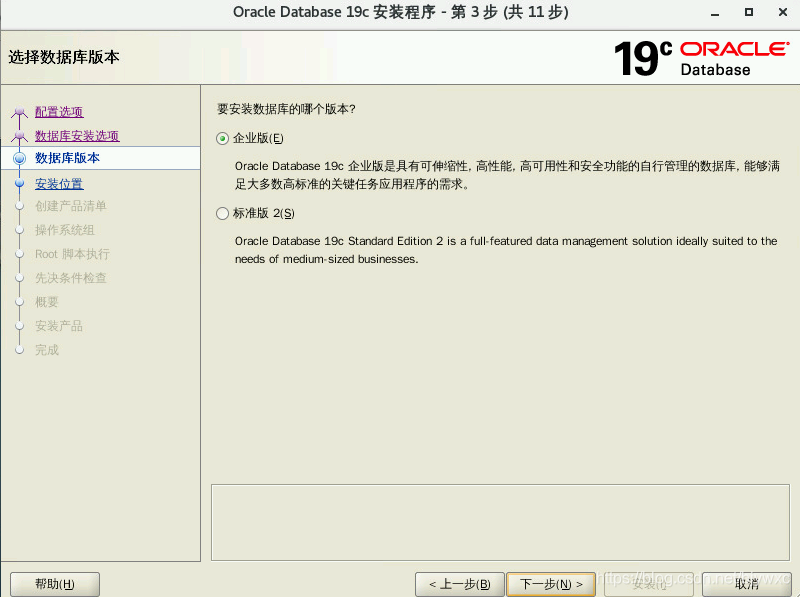
4)下一步

5)下一步
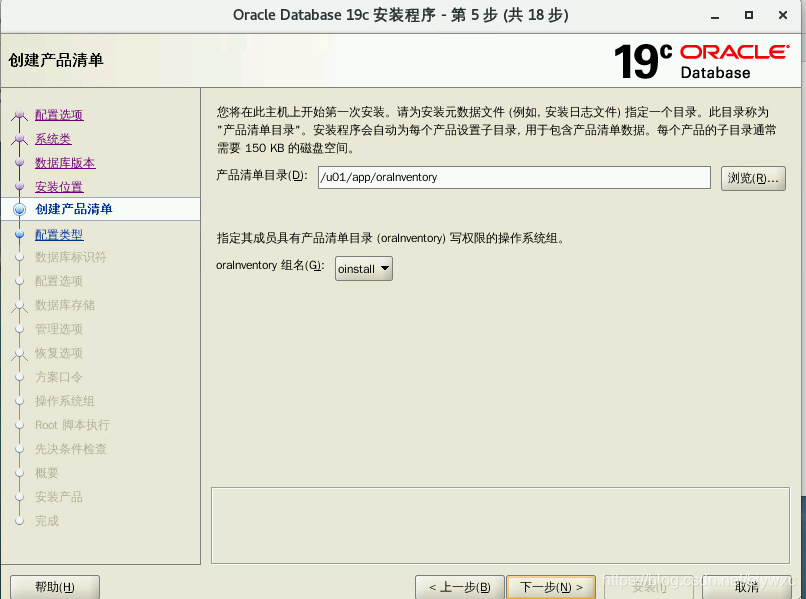
6)下一步

7)下一步


8)执行先决条件检查

yum执行安装kmod
1[root@ywxtdb ~]# yum install kmod kmod-libs
2Loaded plugins: fastestmirror, langpacks, product-id, search-disabled-repos, subscription-manager
3This system is not registered with an entitlement server. You can use subscription-manager to register.
4file:///mnt/repodata/repomd.xml: [Errno 14] curl#37 - "Couldn't open file /mnt/repodata/repomd.xml"
5Trying other mirror.
6Loading mirror speeds from cached hostfile
7Resolving Dependencies
8--> Running transaction check
9---> Package kmod.x86_64 0:20-9.el7 will be updated
10---> Package kmod.x86_64 0:20-25.el7 will be an update
11---> Package kmod-libs.x86_64 0:20-9.el7 will be updated
12---> Package kmod-libs.x86_64 0:20-25.el7 will be an update
13--> Finished Dependency Resolution
14
15Dependencies Resolved
16
17====================================================================================================================================================================
18 Package                                 Arch                                 Version                                 Repository                               Size
19====================================================================================================================================================================
20Updating:
21 kmod                                    x86_64                               20-25.el7                               CentOS7.3                               122 k
22 kmod-libs                               x86_64                               20-25.el7                               CentOS7.3                                51 k
23
24Transaction Summary
25====================================================================================================================================================================
26Upgrade  2 Packages
27
28Total size: 173 k
29Is this ok [y/d/N]: y
30Downloading packages:
31Running transaction check
32Running transaction test
33Transaction test succeeded
34Running transaction
35  Updating   : kmod-libs-20-25.el7.x86_64                                                                                                                       1/4
36  Updating   : kmod-20-25.el7.x86_64                                                                                                                            2/4
37  Cleanup    : kmod-libs-20-9.el7.x86_64                                                                                                                        3/4
38  Cleanup    : kmod-20-9.el7.x86_64                                                                                                                             4/4
39  Verifying  : kmod-20-25.el7.x86_64                                                                                                                            1/4
40  Verifying  : kmod-libs-20-25.el7.x86_64                                                                                                                       2/4
41  Verifying  : kmod-20-9.el7.x86_64                                                                                                                             3/4
42  Verifying  : kmod-libs-20-9.el7.x86_64                                                                                                                        4/4
43file:///mnt/repodata/bc7372b8befa9b51b26a8a998ca89b5be3e5636e30546b1e3f11d198d7bed64d-productid.gz: [Errno 14] curl#37 - "Couldn't open file /mnt/repodata/bc7372b8befa9b51b26a8a998ca89b5be3e5636e30546b1e3f11d198d7bed64d-productid.gz"
44Trying other mirror.
45
46Updated:
47  kmod.x86_64 0:20-25.el7                                                        kmod-libs.x86_64 0:20-25.el7
48
49Complete!
50[root@ywxtdb ~]#
51
重新检查后,勾选全部忽略,然后下一步,选择是。


9)执行安装


10)中间会让我们使用root用户执行两个脚本。
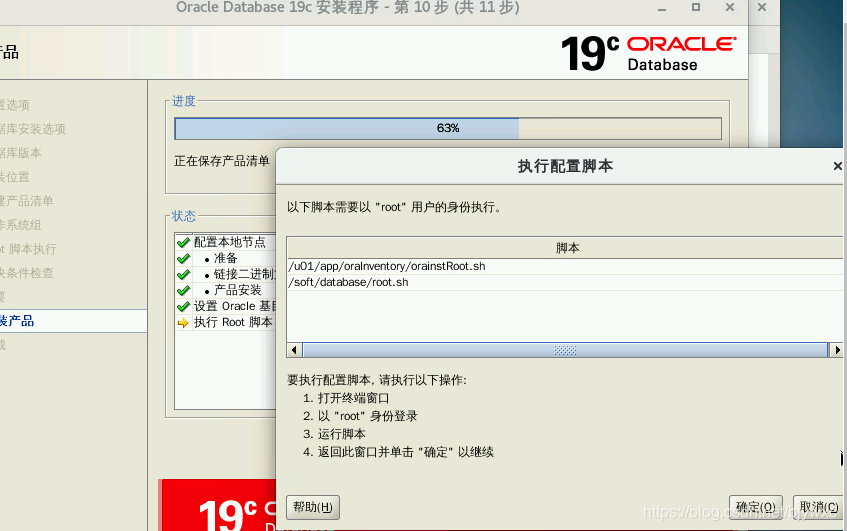
另外打开一个shell窗口,执行命令,执行完成之后返回图形界面点击确定。
1[root@ywxtdb ~]# /u01/app/oraInventory/orainstRoot.sh
2更改权限/u01/app/oraInventory.
3添加组的读取和写入权限。
4删除全局的读取, 写入和执行权限。
5
6更改组名/u01/app/oraInventory 到 oinstall.
7脚本的执行已完成。
8[root@ywxtdb ~]# /u01/app/oracle/product/19.5.0/root.sh
9Performing root user operation.
10
11The following environment variables are set as:
12    ORACLE_OWNER= oracle
13    ORACLE_HOME=  /soft/database
14
15Enter the full pathname of the local bin directory: [/usr/local/bin]:
16   Copying dbhome to /usr/local/bin ...
17   Copying oraenv to /usr/local/bin ...
18   Copying coraenv to /usr/local/bin ...
19
20
21Creating /etc/oratab file...
22Entries will be added to the /etc/oratab file as needed by
23Database Configuration Assistant when a database is created
24Finished running generic part of root script.
25Now product-specific root actions will be performed.
26Oracle Trace File Analyzer (TFA - Standalone Mode) is available at :
27    /soft/database/bin/tfactl
28
29Note :
301. tfactl will use TFA Service if that service is running and user has been granted access
312. tfactl will configure TFA Standalone Mode only if user has no access to TFA Service or TFA is not installed
32
33[root@ywxtdb ~]#
34

11、至此oracle软件安装完成。
3、方式二:命令行静默安装
3.1配置响应文件
1#备份
2[oracle@zbglxtdb response]$ cd $ORACLE_HOME/install/response
3[oracle@zbglxtdb response]$ cp db_install.rsp db_install.rsp.bak
4
5#编辑db_install.rsp
6[oracle@zbglxtdb response]$ vi db_install.rsp
7主要是修改以下参数
8oracle.install.option=INSTALL_DB_SWONLY
9UNIX_GROUP_NAME=oinstall
10INVENTORY_LOCATION=/u01/app/oraInventory
11ORACLE_HOME=/u01/app/oracle/product/19.3.0
12ORACLE_BASE=/u01/app/oracle
13oracle.install.db.InstallEdition=EE
14oracle.install.db.OSDBA_GROUP=dba
15oracle.install.db.OSOPER_GROUP=oper
16oracle.install.db.OSBACKUPDBA_GROUP=backupdba
17oracle.install.db.OSDGDBA_GROUP=dgdba
18oracle.install.db.OSKMDBA_GROUP=kmdba
19oracle.install.db.OSRACDBA_GROUP=racdba
20oracle.install.db.rootconfig.executeRootScript=false
21
3.2执行安装
1[oracle@zbglxtdb 19.3.0]$ ./runInstaller -silent -responseFile /u01/app/oracle/product/19.3.0/install/response/db_install.rsp
2Launching Oracle Database Setup Wizard...
3
4[FATAL] [INS-13013] Target environment does not meet some mandatory requirements.
5   CAUSE: Some of the mandatory prerequisites are not met. See logs for details. /tmp/InstallActions2020-03-07_11-40-55AM/installActions2020-03-07_11-40-55AM.log
6   ACTION: Identify the list of failed prerequisite checks from the log: /tmp/InstallActions2020-03-07_11-40-55AM/installActions2020-03-07_11-40-55AM.log. Then either from the log file or from installation manual find the appropriate configuration to meet the prerequisites and fix it manually.
7Moved the install session logs to:
8 /u01/app/oraInventory/logs/InstallActions2020-03-07_11-40-55AM
9[oracle@zbglxtdb 19.3.0]$
10
发现安装报错,通过查看日志搜索/failed发现报错是权限问题,更改systemctl的权限之后重新执行安装成功。
1查看报错日志
2[root@zbglxtdb ~]#
3[root@zbglxtdb ~]# more /tmp/InstallActions2020-03-07_11-40-55AM/installActions2020-03-07_11-40-55AM.log
4/failed
5...skipping
6INFO:  [Mar 7, 2020 11:41:04 AM] FINE: [VerificationCommand.execute:387]
7Output: '<CV_VRES>126</CV_VRES><CV_ERES>0</CV_ERES><INITCMD>/tmp/InstallActions2020-03-07_11-40-55AM/CVU_19.0.0.0.0_oracle/exectask -getrunlevel </INITCMD><HOST>zbg
8lxtdb</HOST><ERROR_LOG><ERR_DESC><ENTITY>GLOBAL</ENTITY><ERR_CMD><CMD>/bin/systemctl get-default</CMD><OUT>sh: /bin/systemctl: Permission denied
9</OUT><STAT>126</STAT><ERR_LOC>CVU00367</ERR_LOC></ERR_CMD></ERR_DESC></ERROR_LOG><INFO_LOG><INFO>Exectask: Run level retrieval failed</INFO></INFO_LOG>'
10INFO:  [Mar 7, 2020 11:41:04 AM] ERROR: [Result.addErrorDescription:760]  PRVG-2043 : Command "/bin/systemctl get-default" failed on node "zbglxtdb" and produced th
11e following output:
12sh: /bin/systemctl: Permission denied
13
14INFO:  [Mar 7, 2020 11:41:04 AM] ERROR: [Result.addErrorDescription:771]  PRVG-2043 : Command "/bin/systemctl get-default" failed on node "zbglxtdb" and produced th
15e following output:
16sh: /bin/systemctl: Permission denied
17
18INFO:  [Mar 7, 2020 11:41:04 AM] INFO: [Task.perform:768]
19TaskArchitecture:Architecture[CHECK_ARCHITECTURE]:TASK_START
20INFO:  [Mar 7, 2020 11:41:04 AM] INFO: [Task.perform:789]
21m_nodeList='zbglxtdb'
22INFO:  [Mar 7, 2020 11:41:04 AM] FINE: [VerificationCommand.execute:387]
23[root@zbglxtdb ~]#
24[root@zbglxtdb ~]#
25
26#根据报错提示是systemctl没有权限,查看系统该文件的权限发现确实其它用户没有权限,重新授权后再执行没有报错。
27
28[root@zbglxtdb ~]# ls -l  /bin/systemctl
29-rwxr--r--. 1 root root 637680 Nov  7  2016 /bin/systemctl
30[root@zbglxtdb ~]# chmod 755 /bin/systemctl
31[oracle@zbglxtdb 19.3.0]$ ./runInstaller -silent -responseFile /u01/app/oracle/product/19.5.0/install/response/db_install.rsp
32Launching Oracle Database Setup Wizard...
33
34[WARNING] [INS-32047] The location (/u01/app/oraInventory) specified for the central inventory is not empty.
35   ACTION: It is recommended to provide an empty location for the inventory.
36The response file for this session can be found at:
37 /u01/app/oracle/product/19.3.0/install/response/db_2020-03-07_12-56-18PM.rsp
38
39You can find the log of this install session at:
40 /tmp/InstallActions2020-03-07_12-56-18PM/installActions2020-03-07_12-56-18PM.log
41
42As a root user, execute the following script(s):
43        1. /u01/app/oraInventory/orainstRoot.sh
44        2. /u01/app/oracle/product/19.3.0/root.sh
45
46Execute /u01/app/oraInventory/orainstRoot.sh on the following nodes:
47[zbglxtdb]
48Execute /u01/app/oracle/product/19.3.0/root.sh on the following nodes:
49[zbglxtdb]
50
51
52Successfully Setup Software.
53Moved the install session logs to:
54 /u01/app/oraInventory/logs/InstallActions2020-03-07_12-56-18PM
55[oracle@zbglxtdb 19.3.0]$
56
3.3根据提示使用root用户执行脚本完成安装
1[root@zbglxtdb ~]# /u01/app/oraInventory/orainstRoot.sh
2Changing permissions of /u01/app/oraInventory.
3Adding read,write permissions for group.
4Removing read,write,execute permissions for world.
5
6Changing groupname of /u01/app/oraInventory to oinstall.
7The execution of the script is complete.
8[root@zbglxtdb ~]# /u01/app/oracle/product/19.3.0/root.sh
9Check /u01/app/oracle/product/19.3.0/install/root_zbglxtdb_2020-03-07_12-57-48-400665768.log for the output of root script
10[root@zbglxtdb ~]#
11
查看相关日志如果没有错误,oracle软件安装就已经完成了,之后参下考面的静默方式完成建库操作。
三、创建数据库实例
1、方式一:图形界面创建
1)配置监听
oracle用户执行
[oracle@ywxtdb ~]$ netca

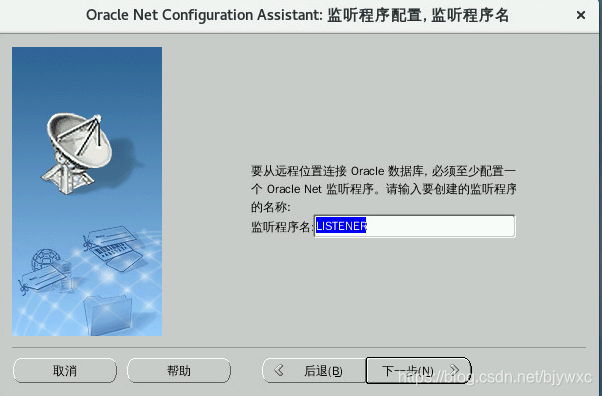

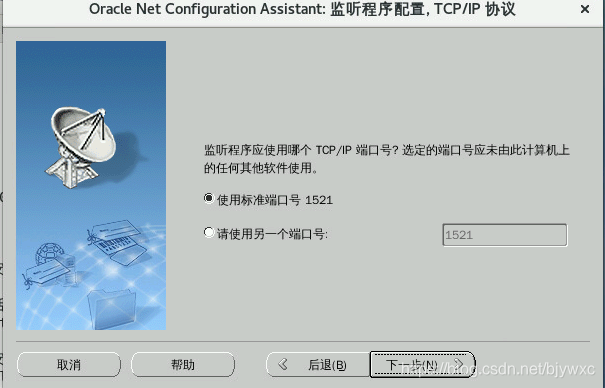

2)创建数据库
以oracle用户运行dbca
[oracle@ywxtdb ~]$ dbca

高级配置

下一步
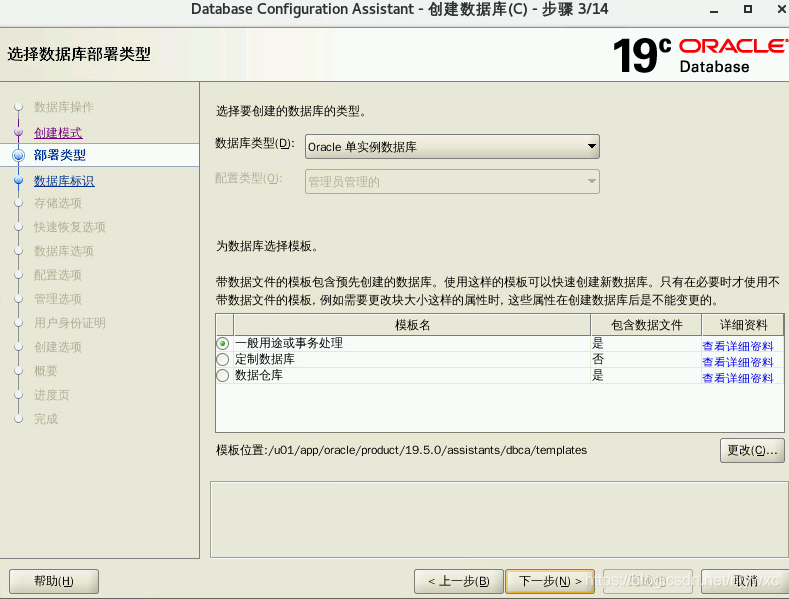
配置oracle实例名称,根据自己的需要选择是否创建成容器数据库。不需要的话就取消

下一步

根据实际需要开启归档和闪回区
下一步


设置内存大小

设置字符集


至此oracle安装和建库已经完成,可以使用数据库了
2、方式二:命令行静默创建
相应模板存放位置
1软件/u01/app/oracle/product/19.3.0/install/response/db_install.rsp
2监听/u01/app/oracle/product/19.3.0/assistants/netca/netca.rsp
3建库/u01/app/oracle/product/19.3.0/assistants/dbca/dbca.rsp
4
1)配置监听
执行以下命令通过netca.rsp文件创建监听
1[oracle@zbglxtdb netca]$ netca /silent /responseFile /u01/app/oracle/product/19.3.0/assistants/netca/netca.rsp
2
3Parsing command line arguments:
4    Parameter "silent" = true
5    Parameter "responsefile" = /u01/app/oracle/product/19.3.0/assistants/netca/netca.rsp
6Done parsing command line arguments.
7Oracle Net Services Configuration:
8Profile configuration complete.
9Oracle Net Listener Startup:
10    Running Listener Control:
11      /u01/app/oracle/product/19.5.0/bin/lsnrctl start LISTENER
12    Listener Control complete.
13    Listener started successfully.
14Listener configuration complete.
15Oracle Net Services configuration successful. The exit code is 0
16[oracle@zbglxtdb netca]$ lsnrctl status
17
18LSNRCTL for Linux: Version 19.0.0.0.0 - Production on 07-3月 -2020 14:29:27
19
20Copyright (c) 1991, 2019, Oracle.  All rights reserved.
21
22正在连接到 (DESCRIPTION=(ADDRESS=(PROTOCOL=TCP)(HOST=zbglxtdb)(PORT=1521)))
23LISTENER 的 STATUS
24------------------------
25别名                      LISTENER
26版本                      TNSLSNR for Linux: Version 19.0.0.0.0 - Production
27启动日期                  07-3月 -2020 14:29:20
28正常运行时间              0 天 0 小时 0 分 6 秒
29跟踪级别                  off
30安全性                    ON: Local OS Authentication
31SNMP                      OFF
32监听程序参数文件          /u01/app/oracle/product/19.3.0/network/admin/listener.ora
33监听程序日志文件          /u01/app/oracle/diag/tnslsnr/zbglxtdb/listener/alert/log.xml
34监听端点概要...
35  (DESCRIPTION=(ADDRESS=(PROTOCOL=tcp)(HOST=zbglxtdb)(PORT=1521)))
36  (DESCRIPTION=(ADDRESS=(PROTOCOL=ipc)(KEY=EXTPROC1521)))
37监听程序不支持服务
38命令执行成功
39[oracle@zbglxtdb netca]$
40
1)创建数据库
编辑响应文件
1[oracle@zbglxtdb ~]$ /u01/app/oracle/product/19.3.0/assistants/dbca
2[oracle@zbglxtdb dbca]$ cp dbca.rsp dbca.rsp.bak
3[oracle@zbglxtdb dbca]$ vi dbca.rsp
4#主要修改以下参数
5gdbName=zbglxtdb
6sid=zbglxtdb
7databaseConfigType=SI
8templateName=General_Purpose.dbc
9sysPassword=“password”
10systemPassword=“passowrd”
11emConfiguration=DBEXPRESS
12dbsnmpPassword=“password”
13datafileDestination=/u01/app/oracle/oradata
14characterSet=AL32UTF8
15totalMemory=8192
16
执行安装
1[oracle@zbglxtdb dbca]$ dbca -silent -createDatabase -responseFile /u01/app/oracle/product/19.3.0/assistants/dbca/dbca.rsp
2Prepare for db operation
310% complete
4Copying database files
540% complete
6Creating and starting Oracle instance
742% complete
846% complete
950% complete
1054% complete
1160% complete
12Completing Database Creation
1366% complete
1469% complete
1570% complete
16Executing Post Configuration Actions
17100% complete
18Database creation complete. For details check the logfiles at:
19 /u01/app/oracle/cfgtoollogs/dbca/zbglxtdb.
20Database Information:
21Global Database Name:zbglxtdb
22System Identifier(SID):zbglxtdb
23Look at the log file "/u01/app/oracle/cfgtoollogs/dbca/zbglxtdb/zbglxtdb.log" for further details.
24[oracle@zbglxtdb dbca]$
25
安装完成。
3、检查
1[oracle@ywxtdb ~]$ sqlplus / as sysdba
2
3SQL*Plus: Release 19.0.0.0.0 - Production on Fri Mar 6 21:53:54 2020
4Version 19.3.0.0.0
5
6Copyright (c) 1982, 2019, Oracle.  All rights reserved.
7
8
9???:
10Oracle Database 19c Enterprise Edition Release 19.0.0.0.0 - Production
11Version 19.3.0.0.0
12
13SQL>
14
发现有乱码,需要修改客户端的字符集
1[oracle@ywxtdb ~]$vi .bash_profile            #添加下面这行后重新应用生效即可。
2export NLS_LANG="SIMPLIFIED CHINESE_CHINA.AL32UTF8"
3
4".bash_profile" 21L, 623C written
5[oracle@ywxtdb ~]$ source .bash_profile
6[oracle@ywxtdb ~]$ sqlplus / as sysdba
7
8SQL*Plus: Release 19.0.0.0.0 - Production on 星期五 3月 6 21:56:33 2020
9Version 19.3.0.0.0
10
11Copyright (c) 1982, 2019, Oracle.  All rights reserved.
12
13
14连接到:
15Oracle Database 19c Enterprise Edition Release 19.0.0.0.0 - Production
16Version 19.3.0.0.0
17
18SQL>
19SQL> select instance_name,status from v$instance;
20
21INSTANCE_NAME    STATUS
22---------------- ------------
23ywxtdb           OPEN
24
25SQL> exit
26从 Oracle Database 19c Enterprise Edition Release 19.0.0.0.0 - Production
27Version 19.3.0.0.0 断开
28[oracle@ywxtdb ~]$
29
备注:在安装过程中出现DBT-11218错误,继续往下的话会报ORA-27104错误,这是因为内核参数设置错误,建议将以下两个参数进行调整。
kernel.shmall:控制共享内存页数,该参数大小为物理内存除以pagesize
kernel.shmmax:设置为实际物理内存的2/3或者物理内存的一半
其它内核参数说明:
shmmax=物理内存*80%*80%,单位是字节
kernel.shmmax:表示单个共享内存段的最大值,以字节为单位,此值一般为物理内存的一半,不过大一点也没关系,这里设定的为4GB,即“4294967295/1024/1024/1024=4G”。
kernel.shmmin:表示单个共享内存段的最小值,默认为1byte
kernel.shmall:表示整个系统范围内可用共享内存页的总量,单位是页(page),在32位系统上一页等于4kB,也就是4096字节。计算公式是:shmmax/PAGE_SIZE
kernel.shmmni:表示整个系统范围内内存段的最大数量,一般为4096.
ip_local_port_range :表示端口的范围。在监听器帮助客户端进程和服务器进程建立连接时,会用到指定范围内的端口。
kernel.sem :表示设置的信号量,这4个参数内容大小固定。
net.core.rmem_default :表示接收套接字缓冲区大小的缺省值(以字节为单位)。
net.core.rmem_max :表示接收套接字缓冲区大小的最大值(以字节为单位)
net.core.wmem_default :表示发送套接字缓冲区大小的缺省值(以字节为单位)。
net.core.wmem_max :表示发送套接字缓冲区大小的最大值(以字节为单位)。
本文转自 https://blog.csdn.net/qq_32445015/article/details/119833178,如有侵权,请联系删除。