
前后端分离的项目,接口文档的存在十分重要。与手动编写接口文档不同,swagger是一个自动生成接口文档的工具,在需求不断变更的环境下,手动编写文档的效率实在太低。与新版的swagger3相比swagger2配置更少,使用更加方便。
一、pom文件中引入Swagger3依赖
1<dependency>
2     <groupId>io.springfox</groupId>
3      <artifactId>springfox-boot-starter</artifactId>
4      <version>3.0.0</version>
5</dependency>
二、Application上面加入@EnableOpenApi注解
1@EnableOpenApi
2@SpringBootApplication
3@MapperScan(basePackages = {"cn.ruiyeclub.dao"})
4public class Swagger3Application {
5    public static void main(String[] args) {
6        SpringApplication.run(Swagger3Application.class, args);
7    }
8}
三、Swagger3Config的配置
1@Configuration
2public class Swagger3Config {
3    @Bean
4    public Docket createRestApi() {
5        return new Docket(DocumentationType.OAS_30)
6                .apiInfo(apiInfo())
7                .select()
8                .apis(RequestHandlerSelectors.withMethodAnnotation(ApiOperation.class))
9                .paths(PathSelectors.any())
10                .build();
11    }
12
13    private ApiInfo apiInfo() {
14        return new ApiInfoBuilder()
15                .title("Swagger3接口文档")
16                .description("更多请咨询服务开发者Ray。")
17                .contact(new Contact("Ray。", "http://www.ruiyeclub.cn", "ruiyeclub@foxmail.com"))
18                .version("1.0")
19                .build();
20    }
21}
四、Swagger注解的使用说明
1@Api:用在请求的类上,表示对类的说明
2    tags="说明该类的作用,可以在UI界面上看到的注解"
3    value="该参数没什么意义,在UI界面上也看到,所以不需要配置"
4
5@ApiOperation:用在请求的方法上,说明方法的用途、作用
6    value="说明方法的用途、作用"
7    notes="方法的备注说明"
8
9@ApiImplicitParams:用在请求的方法上,表示一组参数说明
10    @ApiImplicitParam:用在@ApiImplicitParams注解中,指定一个请求参数的各个方面
11        name:参数名
12        value:参数的汉字说明、解释
13        required:参数是否必须传
14        paramType:参数放在哪个地方
15            · header --> 请求参数的获取:@RequestHeader
16            · query --> 请求参数的获取:@RequestParam
17            · path(用于restful接口)--> 请求参数的获取:@PathVariable
18            · body(不常用)
19            · form(不常用)
20        dataType:参数类型,默认String,其它值dataType="Integer"
21        defaultValue:参数的默认值
22
23@ApiResponses:用在请求的方法上,表示一组响应
24    @ApiResponse:用在@ApiResponses中,一般用于表达一个错误的响应信息
25        code:数字,例如400
26        message:信息,例如"请求参数没填好"
27        response:抛出异常的类
28
29@ApiModel:用于响应类上,表示一个返回响应数据的信息
30            (这种一般用在post创建的时候,使用@RequestBody这样的场景,
31            请求参数无法使用@ApiImplicitParam注解进行描述的时候)
32    @ApiModelProperty:用在属性上,描述响应类的属性
Controller层的配置:


1@Api(tags = "用户信息管理")
2@RestController
3@RequestMapping("userRecord")
4public class UserRecordController extends ApiController {
5    /**
6     * 服务对象
7     */
8    @Resource
9    private UserRecordService userRecordService;
10
11    /**
12     * 分页查询所有数据
13     * @param page       分页对象
14     * @param userRecord 查询实体
15     * @return 所有数据
16     */
17    @ApiOperation("分页查询所有数据")
18    @GetMapping("page")
19    public R selectAll(Page<UserRecord> page, UserRecord userRecord) {
20        return success(this.userRecordService.page(page, new QueryWrapper<>(userRecord)));
21    }
22
23    /**
24     * 通过主键查询单条数据
25     * @param id 主键
26     * @return 单条数据
27     */
28    @ApiOperation("通过主键查询单条数据")
29    @GetMapping("{id}")
30    public R selectOne(@PathVariable Serializable id) {
31        return success(this.userRecordService.getById(id));
32    }
33
34    /**
35     * 新增数据
36     * @param userRecord 实体对象
37     * @return 新增结果
38     */
39    @ApiOperation("新增数据")
40    @PostMapping("insert")
41    public R insert(@RequestBody UserRecord userRecord) {
42        return success(this.userRecordService.save(userRecord));
43    }
44
45    /**
46     * 修改数据
47     * @param userRecord 实体对象
48     * @return 修改结果
49     */
50    @ApiOperation("修改数据")
51    @PutMapping("update")
52    public R update(@RequestBody UserRecord userRecord) {
53        return success(this.userRecordService.updateById(userRecord));
54    }
55
56    /**
57     * 删除数据
58     * @param idList 主键结合
59     * @return 删除结果
60     */
61    @ApiOperation("删除数据")
62    @DeleteMapping("delete")
63    public R delete(@RequestParam("idList") List<Long> idList) {
64        return success(this.userRecordService.removeByIds(idList));
65    }
66}
View Code
五、Swagger界面效果
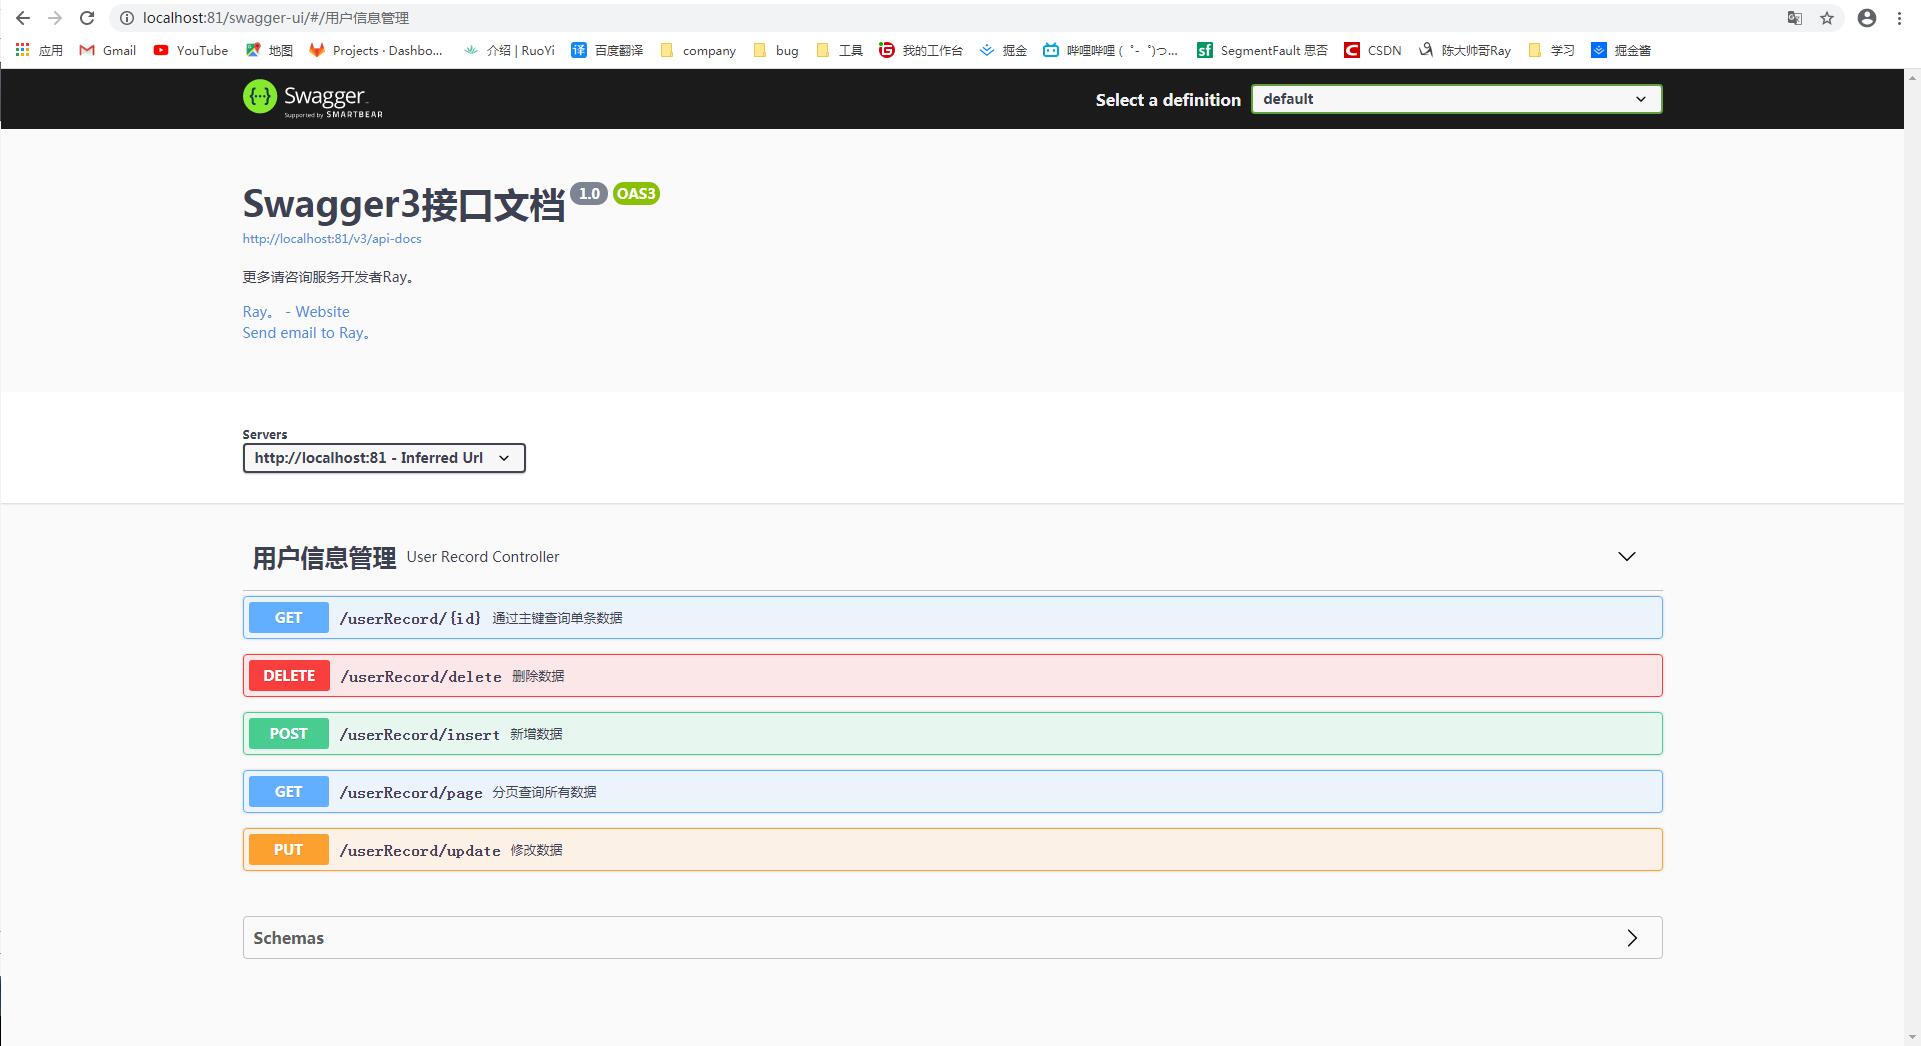
Swagger的访问路径由port/swagger-ui.html改成了port/swagger-ui/ 或port/swagger-ui/index.html,项目演示代码在springboot-swagger