
作者:京东科技 刘宁
一、前言
通过本文你将全面清晰的洞悉动态化跨端的实现原理,感受黑悟空(数据)一路打怪升级(在不同语言环境中流转改造),逆天改命(操控原生视图绘制),终成齐天大圣(完成视图渲染呈现)的艰辛历程。
二、原理介绍
1.动态化跨端原理介绍
动态化- 罗码(Roma,后文统称动态化)是一个完全自主研发的一站式跨平台解决方案,一份代码,可以在 Android、iOS、Harmony 及 Web 上运行。动态化的跨端原理与 React Native 、Weex 一致,在吸取业界各跨端框架优势的基础上,加上自主创新,打造的一个完全自主可控的综合跨端解决方案。其跨端的理论基础在于各端都具备统一解析和执行 JavaScript 的能力(JS 虚拟机)。业务代码被打包成 js 文件,在各端被 JS 虚拟机加载,被解析成多条不同功能的指令,调用原生宿主能力,完成数据的传递和视图的绘制。示意图如下:

为了在鸿蒙端更好的接入动态化,有几点需要特别说明一下:
1.鸿蒙系统的方舟虚拟机能直接加载js文件吗?
鸿蒙的开发语言 ArkTS,是js语言的超集,但为了获取更高的执行效率去除了js语言的动态性,是强类型的编程语言,ets 文件会被编译为 abc 文件 (方舟字节码文件),再由方舟虚拟机加载运行。也就是说方舟虚拟机只能加载和运行 abc 文件,而无法直接加载 js 文件。这为动态化在鸿蒙端的应用带来了很大的挑战,我们一边尝试把 V8 移植到鸿蒙(可参考 【史无前例,移植V8虚拟机到纯血鸿蒙系统】 ),一边与华为的工程师沟通建议将 V8 内置到鸿蒙系统中。最终,华为采纳了我们的建议, 提供了一套 JSVM-API,提供了较为完整的 JS 引擎能力,为动态化在鸿蒙端的适配提供了理论支持。
- JS 虚拟机能高效的执行动态化相关指令吗?
为了让不同业务场景下的动态化产物高效地被 JS 虚拟机解析执行,需要扩充 JS 虚拟机的能力,提供适合动态化跨端场景下的功能,包括实例的创建和管理,视图的增、删、改、查以及便捷的跨语言通讯等功能。当然,为了使各平台更好的接入和使用动态化能力,动态化提供了一套统一接口,各平台依靠自身原生能力实现即可。
3.鸿蒙端的 App 如何接入动态化?
为了让 App 更好的接入动态化,我们提供了鸿蒙端的静态库文件 libRomaSdk.so (后文简称 SDK,由 NDK 通过 CMake 和 Ninja 将 C/C++ 代码编译而得来,这个过程可参考官网,这里不展开介绍),只要在工程中配置相关依赖即可使用动态化能力。
2.鸿蒙接入动态化原理介绍
动态化在鸿蒙端的架构示意图如下:

App启动时第一时间就会加载动态化 SDK,包括 JS Engine(动态化自主研发的为各平台的 JS 虚拟机扩展的功能) 和 Jue Instance (鸿蒙端对 JS Engine Interface 的实现)两部分,完成动态化运行环境的初始化。具体包括业务代码实例管理、任务管理、虚拟Dom树管理、虚拟Dom树 Differ、业务页面渲染管理、生命周期管理、事件分发、业务逻辑处理等一系列功能。
为了适配不同系统,通过制定统一的对外接口规范(JS Engine Interface)让不同平台按照标准化对接及扩展(比如这次华为鸿蒙系统的适配只需实现统一对外接口即可),接口包含了实例创建、生命周期、元素的增删改查、JS和原生的双向通讯、热重载交互等各种能力,各端按需实现。
鸿蒙系统上,Jue Instance 具体实现接口声明的方法,创建动态化页面和处理业务交互逻辑。提供内置基础标签和模块,同时打通了特殊业务场景下的标签和模块的扩展能力,业务可根据具体的业务场景扩充和完善。
在 JS Engine 环境中通过对视图元素的增删改查操作及其他相关指令构建出了一个组件树(后文统称 V-Dom Tree, 作为一个纯对象,可以清晰的提炼出视图元素的层级结构,这个抽象描述是与平台无关的,因此可在 JS环境中生成 V-Dom Tree),在原生端根据 V-Dom Tree 的结构创建出对应的 Render Tree,再经过布局引擎布局后,就显示出了业务具体的视图效果;由于通过统一接口实现了 JS 和原生的双向通讯,当用户在业务视图上触发了交互事件,或业务方需要改变视图显示的时候,都可通过统一接口顺利的完成事件和数据的交互逻辑以及业务视图的渲染。
三、业务示例
以在京东金融中加载一个简单的动态化页面为例,来分析视图的加载和更新流程。创建一个如下所示的动态化页面,点击页面中“更新节点数据”按钮,修改图片为一张新图片,并且将一个子视图的背景色修改为红色。鸿蒙端效果如下所示。

1.业务代码展示
首先看动态化代码,按照前端标准的三段式风格,上手开发很容易。新建 ADemo.jue 文件( Jue 是我们自定义的开发语言,语法几乎和 Vue 一致,但扩展了新增标签的能力),代码如下:
1<template style="border-width: 2px;">
2  <div class="normalClass" style="margin-top: 100px;">
3    <image class="normalClass" :src="imageUrl" style="height: 200;">
4    </image>
5    <div class="normalClass" :style="{'background-color':bgColor}" style="height:60px;">
6      <text
7        style="border-width: 2px;width:260px;height:40px;align-self: center;text-align: center;background-color: white;"
8        @click="change()">
9        更新节点数据
10      </text>
11    </div>
12  </div>
13</template>
14
15<script>
16  export default {
17    data() {
18      return {
19        bgColor: "white",
20        imageUrl: "https://static.foodtalks.cn/company/images/434/121logo.png"
21      }
22    },
23    mounted() {
24    },
25
26    methods: {
27      change() {
28        this.bgColor = "red";
29        this.imageUrl = "https://www.szniego.com/uploads/image/20210202/1612232326.png";
30        this.updateInstance();
31      }
32    }
33  }
34</script>
35
36<style scoped>
37  .normalClass {
38    margin: 10px;
39    justify-content: center;
40    align-items: center;
41    align-self: stretch;
42    border-width: 2px;
43  }
44</style>
2.资源加载流程
通过平台线上打包或者使用动态化提供的脚手架打包命令,将 ADemo.jue 打包成 ADemo.zip,通过资源管理平台下发至客户端设备,经过解压、解密等手段获取 ADemo.js 等文件,原生在合适的时候创建动态化视图,并通过 JS 虚拟机加载 ADemo.js 文件,从而开始视图绘制。
动态化资源从打包到被 JS 虚拟机加载的流程图如下:

3.产物代码展示
下面我们来看一下 ADemo.js 文件的具体内容,截取主要代码如下:
1/******/ (function(modules) { })
2/************************************************************************/
3/******/ ({
4/***/ "./src/jueDemoList/ADemo/ADemo.jue":
5/*!*******************************************!*\
6  !*** ./src/jueDemoList/ADemo/ADemo.jue ***!
7  *******************************************/
8/*! exports provided: default */
9/***/ (function(module, __webpack_exports__, __webpack_require__) {
10
11"use strict";
12__webpack_require__.r(__webpack_exports__);
13var template = JRTemplateManager._jr_create_jue_template('ADemo.jue', {
14  "id": "ADemo",
15  "version": "11",
16  "dependencies": {
17    "JSEngine": "0.9.4"
18  }
19});
20
21JRTemplateManager._jr_create_t_node('ADemo.jue', '0', '40e129af-5e6a-70b8-a757-28a22785dc2f', 'document', {
22  "style": "border-width: 2px;"
23});
24
25JRTemplateManager._jr_create_t_node('ADemo.jue', '40e129af-5e6a-70b8-a757-28a22785dc2f', '918d8bb8-9362-bcd6-00ee-35b85c435072', 'div', {
26  "class": "normalClass",
27  "style": "margin-top: 100px;"
28});
29
30JRTemplateManager._jr_create_t_node('ADemo.jue', '918d8bb8-9362-bcd6-00ee-35b85c435072', '9e848985-59ac-bd8b-e85a-617a6e9a08dd', 'image', {
31  "class": "normalClass",
32  ":src": "imageUrl",
33  "style": "height: 200;"
34});
35
36JRTemplateManager._jr_create_t_node('ADemo.jue', '918d8bb8-9362-bcd6-00ee-35b85c435072', 'b56d24a9-c08e-6b32-9558-162f2aece68d', 'div', {
37  "class": "normalClass",
38  ":style": "{'background-color':bgColor}",
39  "style": "height:60px;"
40});
41
42JRTemplateManager._jr_create_t_node('ADemo.jue', 'b56d24a9-c08e-6b32-9558-162f2aece68d', '440bad33-f8bb-6baf-fe4f-b9bf768d4cc1', 'text', {
43  "style": "border-width: 2px;width:260px;height:40px;align-self: center;text-align: center;background-color: white;",
44  "@click": "change()"
45});
46
47JRTemplateManager._jr_add_t_node_value('ADemo.jue', '440bad33-f8bb-6baf-fe4f-b9bf768d4cc1', 'value', '更新节点数据');
48
49var __default__ = {
50  data: function data() {
51    return {
52      bgColor: "white",
53      imageUrl: "https://static.foodtalks.cn/company/images/434/121logo.png"
54    };
55  },
56  mounted: function mounted() {},
57  methods: {
58    change: function change() {
59      this.bgColor = "red";
60      this.imageUrl = "https://www.szniego.com/uploads/image/20210202/1612232326.png";
61      this.updateInstance();
62    }
63  }
64};
65template.script = __default__;
66__default__.filename = 'ADemo.jue';
67
68__default__.__template__ = function () {
69  return template;
70};
71
72/* harmony default export */ __webpack_exports__["default"] = (__default__);
73template.globalStyle = {};
74template.style = {
75  ".normalClass": {
76    "margin": "10px",
77    "justify-content": "center",
78    "align-items": "center",
79    "align-self": "stretch",
80    "border-width": "2px"
81  }
82};
83
84/***/ })
85/******/ });
86//# sourceMappingURL=ADemo.js.map
可以看到页面数据都被封装到一个自执行函数中,在加载资源文件时,此函数就会被调用。函数内页面数据都被保存到__default__变量中,视图以及视图层级关系则被解析成一条条节点相关的指令。
四、视图绘制流程
1.绘制原理
在鸿蒙端,进入动态化页面之前,确保资源文件(ADemo.js)已被加载到内存中后,由原生端(ArkTS)发起动态化实例的创建,调用动态化 SDK 提供的创建动态化实例(Instance)的方法,通过 N-API 调用宿主环境(C++)的具体实现,创建 C++ 环境下的 Instance。然后通过 JSI (将C++ 中的常用类型与 JavaScript 中的类型一一对应,可互调方法和操作对象。从而消除了数据序列化和线程切换调用的开销,极大提升通讯性能)调用预置到 JS 虚拟机中的 JS Engine 的接口方法,创建 JS 环境下的 Instance。 在 JS 环境中,收集页面信息,完成 V-Dom Tree 的创建,再通过 JSI 将页面数据传递给宿主环境(C++),根据 V-Dom 的结构创建组件树(Component Tree),再通过 N-API 将数据传递给原生,调用 ArkTS 构建对应的渲染树(Render Tree),完成视图绘制。
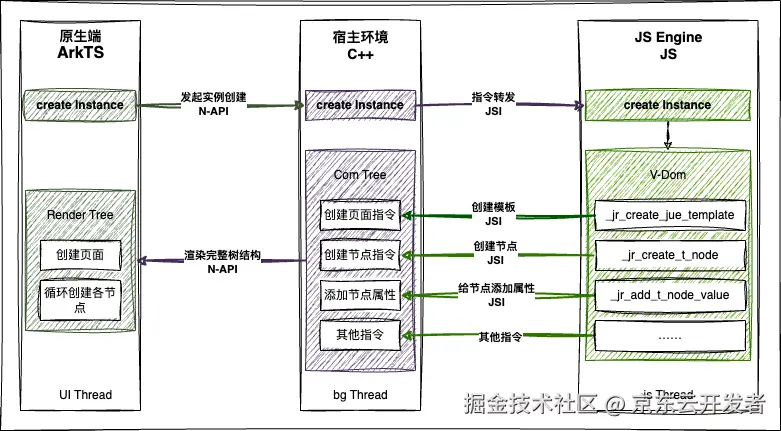
上图展示了动态化在鸿蒙端绘制页面的过程,总结一下就是三种语言环境,三个 Instance,三个 Thread 。三个 Instance 独立且一一对应。ArkTs 中的 Instance 在 UI 线程中用来完成页面的绘制,数据的绑定和事件的触发等。C++ 中的 Instance 作为数据的中转存储和事件转发,在 bg Thread 处理复杂耗时的逻辑,避免阻塞 UI Thread 和 js Thread。JS 中的 Instance 负责搜集产物信息,构建 V-Dom Tree,传递数据和事件等都在 js Thread 中处理。C++ 和 ArkTs 中根据 V-Dom Tree 创建 Component Tree 和 Render Tree。
通过查看 ADemo.js 资源文件,可以得出 V-Dom Tree 的结构,以及对应的 Component Tree 和 Render Tree。三者的结构如下图所示:

2.代码分析
下面截取部分核心代码,分析动态化页面的创建过程。首先在原生端进入动态化页面,创建 RomaInstanceView 对象,首先触发 aboutToAppear 方法,准备创建 ArkTS/C++/JS 三种语言环境下的 Instance 实例。
1public aboutToAppear() {
2    // 确保获取资源js文件并加载到内存中
3    romaAssetsManager.ensureAsset(this.jueName!, progress).then((version) => {
4        // 完成不同语言环境下Instance实例的创建
5        // 1 创建 arkTS 和 cpp 实例
6        this.romaInstance = this.createInstance(this.rootContent, this.pageId);
7        // 2 创建 JS 实例
8        this.romaInstance!.startInstance(this.initialProps).then((result) => {});
9    }).catch((error: Error) => {
10    })
11  }
1.创建 ArkTS 环境中的 Instance 实例
通过调用 createInstance 方法创建 ArkTS 环境下的 Instance 实例,并传入 stateListener 参数监听 Instance 在C++ 语言环境中的创建过程,包括开始创建实例、创建完成和更新完成的状态。
1private createInstance(root: NodeContent, pageId: string | null): RomaInstance {
2    this.shouldDestroyRomaInstance = true
3    return RomaEnv.createAndRegisterRomaInstance(this.jueName!, {
4      root: root,
5      uiContext: this.getUIContext(),
6      abilityContext: getContext(this) as common.UIAbilityContext,
7      pageId: pageId,
8      errorListener: this.errorListener ? (error) => {
9        this.errorListener?.(error);
10        console.warn("CreateInstanceView", error.message);
11        this.pageStage = PageStage.ERROR
12      } : undefined
13    }, this.stateListener);
14  }
15
16  // 类型
17  public stateListener?: RomaStateListener;
18
19  export type RomaStateListener = (instanceId: string, state: "createFinish" | "updateFinish" | "createInstance",
20  romaInstance: RomaInstance) => void;
createAndRegisterRomaInstance 方法内直接调用 createInstance 方法完成 ArkTs 环境中 Instance 的创建,并绑定实例状态变化的监听。
1public createInstance(jueName:string, param: RomaInstanceParam, stateListener?:RomaStateListener): RomaInstance {
2    const id = ++this.nextInstanceId;
3    // 创建 arkTS 侧的实例
4    const instance = new RomaInstance(
5          jueName,
6          id.toString(),
7          "",
8          this.napiBridge,
9          param.uiContext,
10          param.abilityContext
11    )
12    // 给实例绑定状态变化的监听
13    if (stateListener) {
14      instance.addStateListeners(stateListener);
15    }
16    instance.setPageId(param.pageId);
17    instance.initialize(param.root);
18    this.instanceMap.set(id.toString(), instance);
19    return instance;
20}
2.创建 C++ 环境中的 Instance 实例
在调用 instance.initialize 中通过 N-API调用 crateInstance,准备在 C++ 环境中创建 Instance。其中第4个参数 (mutations: Mutation[], isFromCore: boolean) => { this.descriptorManager.applyMutations(mutations, isFromCore) } 用来监听 C++ 环境中 Instance 的创建状态。当后面分析到 C++ 环境中实例创建完成时,我们在分析 this.descriptorManager.applyMutations(mutations, isFromCore) 中具体做了什么。这里只需要知道 ArkTs 中的 Instance 在监听 C++ 中的 Instance 的创建过程。
1public initialize(root: NodeContent | null = null) {
2    // 注册实例变化监听器
3    this.napiBridge.createInstance( this.jueName, this.getId(), root,
4                (mutations: Mutation[], isFromCore: boolean) => {
5                      this.descriptorManager.applyMutations(mutations, isFromCore)
6                },
7                (tag, commandName, args) => {
8                      // 省略无关代码
9                },
10               (instanceId: string, state: string) => {
11                      // 省略无关代码
12                })
13  }
通过 N-API 在 C++ 环境中创建对应的实例,并在创建 Instance 的回调中触发从 ArkTS 环境中传递过来的状态监听, auto listener = arkJs.getReferenceValue(listener_ref); arkJs.call<1>(listener, args); 从而将 C++ 中 Instance 创建过程传递到 ArkTs 的 Instance 中。
1 static napi_value createInstance(napi_env env, napi_callback_info info) {
2    ArkTS arkJs(env);
3    auto args = arkJs.getCallbackArgs(info, 6);
4    auto jueName = arkJs.getString(args[0]);
5    InstanceId instanceId = arkJs.getString(args[1]);
6    ArkUI_NodeContentHandle nodeContentHandle_;
7    if(!arkJs.isUndefined(args[2])){
8        OH_ArkUI_GetNodeContentFromNapiValue(env, args[2], &nodeContentHandle_);
9    }
10    auto listener_ref = arkJs.createReference(args[3]);
11    auto componentMethod_ref = arkJs.createReference(args[4]);
12    auto stateListenerMethod_ref = arkJs.createReference(args[5]);
13    auto &engine = RomaEnv::getInstance();
14    engine.createInstance(jueName, instanceId, nodeContentHandle_,
15          [env, listener_ref](MutationsToNapiConverter mutationsToNapiConverter, auto const &mutations) {
16          // C++环境中 Instance 状态变化时触发
17           if (mutations.size() <= 0) {
18                  return;
19           }
20           ArkTS arkJs(env);
21           auto napiMutations = mutationsToNapiConverter.convert(env, mutations);
22           std::array<napi_value, 1> args = {napiMutations};
23           // 获取从 ArkTS 环境中传递过来的监听对象并触发
24           auto listener = arkJs.getReferenceValue(listener_ref);
25           arkJs.call<1>(listener, args);
26    },
27    return arkJs.getUndefined();
28}
在 C++ 环境中创建 Instance 的具体实现如下,记录下从 ArkTs 中获取的状态监听参数 mutationsListener 以便在合适的时机触发。
1void RomaEnv::createInstance(std::string jueName, InstanceId instanceId, ArkUI_NodeContentHandle nodeContentHandle_, MutationsListener mutationsListener,
2                                    ComponentMethodListener componentMethodListener, StateListener stateListener) {
3        RomaEnv::getInstance().getBackgroundExecutor()([=]() {
4              auto nonConstRef = RomaInstanceManager::getInstance().get(instanceId);
5              // 创建实例,页面 | 模板
6              RomaInstance::Shared instance = std::make_shared<RomaInstance>(jueName, instanceId);
7              instance->rootInstance_ = instance;
8              instance->attachNativeXComponent(nodeContentHandle_);
9              // 注册监听器
10              instance->registerInstanceChangeListener(mutationsListener);
11              ……
12        });
13    }
3.创建 JS 环境中的 Instance 实例
下面分析 JS 端 Instance 的创建过程,接上面 this.romaInstance!.startInstance(this.initialProps).then((result) => {}); 往下看
1 public async startInstance(initialProps: TObject): Promise<void> {
2      return this.napiBridge.startInstance(this.getId(),initialProps);
3  }
在 ArkTs 端通过 N-API 调用 SDK 中的 startInstance 进入 C++环境
1static napi_value startInstance(napi_env env, napi_callback_info info) {
2    ArkTS arkJs(env);
3    arkJs.methodName = "startInstance";
4    auto args = arkJs.getCallbackArgs(info, 3);
5
6    InstanceId instanceId = arkJs.getString(args[0]);
7    auto onFinishRef = arkJs.createReference(args[2]);
8
9    auto &engine = RomaEnv::getInstance();
10    engine.startInstance(instanceId, arkJs.getDynamic(args[1]), [env, onFinishRef]() {
11        ArkTS arkJs(env);
12        auto listener = arkJs.getReferenceValue(onFinishRef);
13        arkJs.call<0>(listener, {});
14        arkJs.deleteReference(onFinishRef);
15    });
16
17    return arkJs.getUndefined();
18}
19
20 // startInstance 的具体实现
21void RomaEnv::startInstance(InstanceId instanceId, folly::dynamic &&initialProps,
22                                   std::function<void()> &&onFinish) {
23        try {
24            RomaEnv::getInstance().getBackgroundExecutor()([=]() {
25                auto nonConstRef = RomaInstanceManager::getInstance().get(instanceId);
26                if (nonConstRef) {
27                    // 准备进入 js 环境创建 Instance
28                    nonConstRef->start(instanceId, initialProps);
29                    this->taskExecutor_->runTask(TaskThread::MAIN, [onFinish]() {
30                        onFinish();
31                    });
32                }
33            });
34
35        } catch (const std::exception &e) {
36            throw e.what();
37        };
38    }
在 start 方法中开始创建 js 环境下的 Instance,通过 JSI 获取 JS 虚拟机对象 runtime ,调用在 App 启动时就注入到 JS 虚拟机中的 JRPageManager 对象的 createInstance 方法
1void  RomaInstance::start(SurfaceId surfaceId, folly::dynamic const &initialProps){
2    // 进入js线程执行实例创建
3    RomaEnv::getInstance().getRuntimeExecutor()([jueName_ = jueName_,  initialProps, surfaceId](jsi::Runtime &runtime) {
4    // 判断 JS 的全局变量中是否有 JRPageManager
5    if (runtime.global().hasProperty(runtime, "JRPageManager")) {
6        jsi::Object JRPageManager = runtime.global().getPropertyAsObject(runtime, "JRPageManager");
7        if (JRPageManager.hasProperty(runtime, "createInstance")) {
8              jsi::Function method = JRPageManager.getPropertyAsFunction(runtime, "createInstance");
9              method.callWithThis(runtime, JRPageManager,
10                                  {
11                                       jsi::valueFromDynamic(runtime, jueName_+".jue"),
12                                       jsi::valueFromDynamic(runtime, surfaceId),
13                                       jsi::valueFromDynamic(runtime, initialProps),
14                                  });
15            }
16        }
17    });
18}
进入 JS 环境后调用 createInstance 方法,开始创建 JS 环境下的 Instance
1export function createInstance(bundleName,instanceID,options){
2    // 判断是否传入实例bundleName以及对应bundle是否已经加载
3    if (!bundleName || !has_load_bundle(bundleName)) {
4        callLoadBundleJsFileFail(instanceID)
5        return;
6    }
7    JRTransUICore._jr_ydby_new_template_instance(bundleName,instanceID,options);
8}
在 JS环境中完成 Instance 创建后,调用 _jr_ydby_new_node_instance 开始构建 V-Dom Tree
1function _jr_ydby_new_template_instance(template_id, ctx_id, template_data, is_batchCreate) {
2    // 1.根据模板创建JUE实例
3    var ctx = new JueInstance(ctx_id, template, template_data);
4    ctx.initRootCtxAndStaticCss();
5
6     ……
7    // 创建v-dom
8    var v_dom = new _jr_ydby_v_dom(template_id);
9    ctx.v_dom = v_dom;
10
11    // 2.构建v-dom 对应 root-node
12    var root_node = _jr_ydby_new_node_instance(ctx.c_id, v_dom, template.root_node, null, {}, is_batchCreate);
13    // 构建结束
14    _jr_ydby_create_finshed(ctx.c_id);
15
16    return ctx.c_id;
17}
4.在 JS 环境中构建 V-Dom Tree
通过 _jr_ydby_new_node_instance 方法,遍历视图中所有节点及子节点,完成整个 V-Dom Tree 的创建
1export function _jr_ydby_new_node_instance(ctx_id, v_dom, current_t_node, parent_node, v_f_ctx, is_batchCreate, itemIndex) {
2    var cur_env = _jr_ydby_node_parse_jscontext(ctx_id, v_f_ctx);
3    let ctx = __jr_template__ctx[ctx_id];
4    var current_node = null;
5
6    if (current_t_node.type === 'document') {
7        // 创建根节点
8        current_node = new JUE_NODE(v_f_ctx, ctx_id, "", current_t_node);
9        current_node.setAttr(cur_env, ctx)
10         _jr_ydby_create_body(current_node);
11    }else{
12        // 创建其他子节点
13        current_node = new JUE_NODE(v_f_ctx, ctx_id, parent_node.id, current_t_node);
14        current_node.setAttr(cur_env, ctx);
15        current_node.setStyle(cur_env, parent_node.style);
16        current_node.setValue(cur_env, v_f_ctx);
17        current_node.setEvent(cur_env);
18        // 组装数据,生成 _jr_ydby_v_node对象
19        parent_node.appendChild(current_node, v_dom);
20        // 添加节点
21         _jr_ydby_add_element(current_node, current_node.node_index);
22    }
23
24    // 循环创建当前节点下的子节点
25    if (current_t_node.sub_nodes) {
26        let v_if_else_parse_result = [];
27        for (let i = 0; i < current_t_node.sub_nodes.length; i++) {
28            v_f_ctx = Object.assign({}, v_f_ctx);
29
30            let sub_t_node = current_t_node.sub_nodes[i];
31            let att = sub_t_node.attr;
32            let v_for_value = att['v-for'];
33            ……
34            // 递归创建子节点
35            _jr_ydby_new_node_instance(ctx_id, v_dom, sub_t_node, current_node, v_f_ctx, is_batchCreate);
36
37        }
38    }
39    return current_node;
40}
5.在 C++ 环境中构建 Component Tree
在构建 V-Dom Tree 的过程中,每创建一个节点,都会调用 _jr_ydby_add_element 方法,向宿主C++环境发起创建节点的指令:
1_jr_ydby_add_element(current_node, current_node.node_index);
2
3// 搜集节点信息
4var nodePorperty = {
5        template_id: node.template_id,
6        ctx_d: node.ctx_id,
7        tag: node.tag,
8        id: node.id,
9        is_root: node.is_root,
10        type: node.type,
11        parent_node: node.parent_node,
12        style: node.style,
13        cache: node.cache,
14        attr: _jr_ydby_tools_deep_copy(node.attr),
15        value: node.value,
16        event: node.event,
17        index: node.index,//仅cell-slot节点使用
18        isComponentNode: node.isComponentNode,
19        componentInstanceId: node.componentInstanceId,
20        componentBundleName: node.componentBundleName
21    };
22
23// 调用添加方法
24callAddElement(node.ctx_id, node.parent_node, nodePorperty, index);
在 App 启动时,已向 JS 虚拟机内植入 callAddElement 方法,这里通过 JSI通道将指令从 JS 打通到C++环境
1runtime_->global().setProperty( *runtime_, "callAddElement",
2                Function::createFromHostFunction( *runtime_,
3                                PropNameID::forAscii(*runtime_, "callAddElement"), 4,
4                                [](jsi::Runtime &runtime,
5                                jsi::Value const & /*thisValue*/,
6                                jsi::Value const *arguments,
7                                size_t /*count*/) noexcept -> jsi::Value {
8                                    UIManager::callAddElement(surfaceIdFromValue(runtime, arguments[0]),
9                                                              stringFromValue(runtime, arguments[1]),
10                                                              commandArgsFromValue(runtime, arguments[2]),
11                                                              arguments[3].getNumber());
12                                    return jsi::Value::undefined();
13                                }));
在C++环境中接收到添加指令后,这里开始构建 Component Tree,保存各节点数据信息,并不会同步在界面上添加视图(因为每次使用 N-API在 C++ 和 ArkTS 中通讯,都会因跨语言和类型转换带来一定的性能损耗),待接收到 V-Dom Tree 构建完成的消息后,对应的 Component Tree 的结构也构建完成了,这时再一次性完成视图的绘制。
1void UIManager::callAddElement(SurfaceId surfaceId, std::string const &parent_id, folly::dynamic props, size_t index) {
2    ComponentName name = props["type"].asString();
3    RomaEnv::getInstance().getBackgroundExecutor()([=]() {
4        RomaNode::Shared node = nullptr;
5        auto nonConstRef= RomaInstanceManager::getInstance().get(surfaceId);
6        auto parent = nonConstRef->getNode(parent_id);
7        if(parent == nullptr){
8            return;
9        }
10        // 强引用保存节点到父节点的children_数组中
11        folly::dynamic style = props["style"];
12        node = RomaNodeFactory::createSharedNode(surfaceId, tag, name, parent_id, index, isComponentNode,
13                                                 componentInstanceId, props["attr"], style, props["event"],
14                                                 props["value"]);
15        size_t childIndex = index;
16        parent->appendChild(node, childIndex);
17        auto shadowView = std::make_shared<ShadowView>(*node);
18        // 组件节点,只插入,不创建,等组件实例创建时,再创建
19        if (!isComponentNode) {
20            // 增加普通节点的创建指令
21            nonConstRef->rootInstance_.lock()->lastMutations_.push_back(
22                ShadowViewMutation::CreateMutation(shadowView->getSharedShadowView()));
23        }
24        if ((parent->getComponentName() == "document") && nonConstRef->isComponent) {
25            // 如果是子组件中的节点,并且是document的直接子节点
26            auto parentNonConstRef = RomaInstanceManager::getInstance().get(nonConstRef->parentInstanceId_);
27            if (parentNonConstRef) {
28                auto componentNode = parentNonConstRef->getNode(nonConstRef->componentNodeId_);
29                if (componentNode) {
30                    if (RomaEnv::getInstance().isUseYoga) {
31                        // 父子组件衔接yoga树
32                        componentNode->appendChild(node, index);
33                    }
34                    // 增加组件节点的插入指令
35                    auto parentShadowView = componentNode->getShadowView();
36                    auto documentShadowView = parent->getShadowView();
37                    ……
38                    for (auto const &pair : documentShadowView->style_.items()) {
39                        parentShadowView->style_[pair.first] = pair.second;
40                    }
41                    nonConstRef->rootInstance_.lock()->lastMutations_.push_back(ShadowViewMutation::InsertMutation(
42                        parentShadowView, shadowView->getSharedShadowView(), index));
43                }
44            }
45        } else {
46            // 增加普通节点的插入指令
47            auto parentShadowView = parent->getShadowView();
48            nonConstRef->rootInstance_.lock()->lastMutations_.push_back(
49                ShadowViewMutation::InsertMutation(parentShadowView, shadowView->getSharedShadowView(), childIndex));
50        }
51        // 保存到节点
52        node->setShadowView(shadowView->getSharedShadowView());
53        // 弱引用保存节点到实例的map中
54        nonConstRef->addNode(tag, node);
55    });
6. 在 JS 环境中发送节点创建完成的消息
V-Dom Tree 构建完成后,会调用 _jr_ydby_create_finshed
1export function _jr_ydby_create_finshed(ctx_id) {
2    let instance = getInstanceById(ctx_id);
3    callCreateFinish(ctx_id,{template_id:instance.template_id,version:instance.currentVersion});
4}
同样在动态化 SDK 初始化阶段,已向 JS虚拟机中植入callCreateFinish方法,当 JS 端调用callCreateFinish时,通过 JSI 通道将数据传递到 C++环境中。
1runtime_->global().setProperty(
2            *runtime_, "callCreateFinish",
3            Function::createFromHostFunction(*runtime_,
4                                            PropNameID::forAscii(*runtime_, "callCreateFinish"), 1,
5                                            [](jsi::Runtime &runtime, jsi::Value const & ,
6                                               jsi::Value const *arguments, size_t /*count*/) noexcept -> jsi::Value {
7                                                     auto surfaceId = surfaceIdFromValue(runtime, arguments[0]);
8                                                     UIManager::callCreateFinish(surfaceId);
9                                                     return jsi::Value::undefined();
10                                             }));
在C++环境中收到创建完成的消息后,执行 yoga 布局,获取视图尺寸并调用在 Instance 创建过程中预置的状态监听 mutationsListener 方法。
1void UIManager::callCreateFinish(SurfaceId surfaceId) {
2    RomaEnv::getInstance().getBackgroundExecutor()([=]() {
3        auto nonConstRef = RomaInstanceManager::getInstance().get(surfaceId);
4        if (nonConstRef && !nonConstRef->isComponent) {
5
6            // 执行yoga布局
7            // Layout nodes.
8            std::vector<YogaLayoutableShadowNode const *> affectedLayoutableNodes{};
9            // affectedLayoutableNodes.reserve(1024);
10            LayoutContext layoutContext = LayoutContext();
11            ……
12            if(starts_with(nonConstRef->rootInstance_.lock()->jueName_, "template")){
13                layoutContext.layoutType = TEMPLATE;
14            }
15            if (nonConstRef->rootInstance_.lock()) {
16                nonConstRef->rootInstance_.lock()->rootNode_->layoutIfNeeded(layoutContext);
17            }
18
19            if (nonConstRef->rootInstance_.lock()) {
20                ShadowViewMutationList mutableList = nonConstRef->rootInstance_.lock()->lastMutations_;
21                nonConstRef->rootInstance_.lock()->lastMutations_.clear();
22                RomaEnv::getInstance().taskExecutor_->runTask(TaskThread::MAIN, [nonConstRef, mutableList, surfaceId] {
23                    // 使用 ArkUI 渲染 ,并触发 mutationsListener 监听
24                    if (nonConstRef->rootInstance_.lock()) {
25                        auto a = nonConstRef->rootInstance_.lock()->m_mutationsToNapiConverter;
26                        nonConstRef->rootInstance_.lock()->mutationsListener(a, mutableList,true);
27                        }
28                    nonConstRef->createFinish();
29                });
30            }
31        } else if (nonConstRef) {
32            RomaEnv::getInstance().taskExecutor_->runTask(
33                TaskThread::MAIN, [nonConstRef, surfaceId] { nonConstRef->createFinish(); });
34        }
35    });
36}
下面我们具体分析一下在触发 mutationsListener 后,都发生了什么?通过 C++ 的转发,最终在 ArkTS 环境中触发如下回调(这是在 ArkTS创建 Instance 时就通过 N-API传入到 C++ 环境的参数之一,上面有介绍)
(mutations: Mutation[], isFromCore: boolean) => { this.descriptorManager.applyMutations(mutations, isFromCore) }
7.在 ArkTS 环境中构建 Render Tree
实例创建完成后触发 applyMutations 方法,将各节点数据都保存到 descriptor 中。
1public applyMutations(mutations: Mutation[], isFromCore: boolean) {
2    // 去重
3    const tags = mutations.flatMap(mutation => this.applyMutation(mutation, isFromCore));
4    const tags = new Set(tags);
5    // 遍历各节点
6    tags.forEach(tag => {
7        // 取实例id,和tag
8        const strArr: string[] = tag.split("##");
9        const instanceId = strArr[0];//实例id
10        const nodeId = strArr[1];//节点id
11        if(instanceId === this.romaInstance.getId()){
12            // 更新节点
13            let updatedDescriptor = this.getDescriptor(nodeId);
14            if(!updatedDescriptor) return;
15            // 在当前实例中更新tag组件的UI描述信息
16            this.descriptorListenersSetByTag.get(nodeId)?.forEach(cb => {
17                onDescriptorChange(cb, updatedDescriptor);
18            });
19        }else {
20            // 创建节点
21            const instance: RomaInstance = RomaEnv.getRomaInstanceManager()?.getInstance(instanceId) as RomaInstance;
22            let updatedDescriptor  = instance?.getDescriptor(nodeId);
23            if(!updatedDescriptor) return;
24            instance.refreshComponentUI(nodeId, updatedDescriptor);
25        }
26    });
27}
在 refreshComponentUI 方法中会触发当前节点对应标签的数据变化监听
1public refreshComponentUI(tag: Tag, d: Descriptor) {
2    this.getDescriptorListenersSet(tag)?.forEach(cb => {
3      onDescriptorChange(cb,d);
4    });
5}
假如标签是 image ,则触发 image 标签的在 aboutToAppear 中的关于标签数据 descriptor 的监听,从 newDescriptor 中获取标签上所有的数据,包括尺寸数据。
1 aboutToAppear() {
2    if (!this.componentCtx) {
3      return;
4    }
5
6    this.componentCtx?.aboutToAppear((newDescriptor) => {
7      this.descriptor = newDescriptor;
8      // 链接自定义alt图方法
9      this.customAltImage = RomaConfig.instance().getImageAltMethod();
10      // 触发更新
11      this.onLoadStart();
12      this.updateImageSource();
13      // 处理图片 object-position 模式相关逻辑
14      this.initObjectPositionHandle()
15      // 解析占位图
16      this.altSource = this.getImageAlt();
17      this.hasPlaceHoldImage = this.altSource ? true : false;
18      // 解析背景色
19      let bgColorStr = RomaStyleParser.getStyleToString('background-color',this.descriptor);
20      ……
21      // 设置tint-color
22      this.getTintColor();
23      // 是否开启抗锯齿
24      this.interpolation = this.colorFilter ? ImageInterpolation.High : ImageInterpolation.Low;
25    }, (methodName, args:TAny[]) => {
26      // 注册标签方法
27      if (methodName === 'loadRef') {
28        this.loadRef(args[0]);
29      }
30    });
31  }
8.根据 Render Tree 绘制视图
到此我们也仅仅是完成了进入动态化页面 RomaInstanceView 视图中的 abountToAppear 方法中的数据准备工作。完成了三个 Instance 的创建,完成了三棵树的创建以及把所有组件和标签相关数据都保存到对应的 descriptor 中,接下来就是在 build 方法中真正绘制视图了。
1public build() {
2    // 根据表述信息,构建
3    RomaComponentFactory.builder(new RomaComponentParam(this.romaInstance, this.descriptor.tag));
4}
RomaComponentFactory是所有标签组件的工厂方法,定义如下:
export const RomaComponentFactory: WrappedBuilder<[RomaComponentParam]> = wrapBuilder(RomaComponentFactoryBuilder);
在调用 RomaComponentFactory.builder 时,触发 RomaComponentFactoryBuilder 方法,如下只列出示例中用到的标签的实现,其他的省略了。
param.descriptor 中保存了已经构建好的 Render Tree,包括各节点对应的标签类型和所有的节点数据。
1@Builder
2function RomaComponentFactoryBuilder(param: RomaComponentParam) {
3  if (param.type == "document") {
4    RomaDocument({
5      componentCtx: param.componentCtx
6    })
7  } else if (param.type == "div") {
8    RomaDiv({
9      componentCtx: param.componentCtx
10    })
11  } else if (param.type === "text") {
12    RomaText({
13      componentCtx: param.componentCtx
14    })
15  } else if (param.type === "image" || param.type === "img") {
16    RomaImageView({
17      componentCtx: param.componentCtx
18    })
19  } else {
20      RomaCustomComponentFactory.customComponentBuilder.builder(param.componentCtx);
21  }
22}
以图片标签为例,会创建 RomaImageView ****对象,调用其 build 方法,最终将 image 视图渲染到页面上。
1build() {
2    if(this.componentCtx && this.descriptor) {
3      Image(this.imgSource)
4          .attributeModifier(this.componentCtx?.build(this.descriptor))
5          .gestureModifier(this.componentCtx?.build(this.descriptor))
6          .alt(this.getImageAlt())
7          .objectFit(this.getResizeMode(RomaStyleParser.getStyleToString('object-fit', this.descriptor)))
8          .renderMode(this.getRenderMode())
9          .colorFilter(this.colorFilter)
10          .interpolation(this.interpolation)
11          .backgroundColor(this.showColor)
12          .blur(this.getBlurNumber())
13          .onComplete(event => this.onLoad(event as ImageOnCompleteEvent))
14          .onError(event => this.dispatchOnError(event as ImageOnErrorEvent))
15          .position(this.imgPosition)
16          .clipShape(this.imgClipShape)
17    }
18}
至此!动态化终不辱使命,一路逢山开路,遇水架桥,跨越层层关隘,破天命所缚,所言终达天听,辅社稷,开盛世太平!就是说动态化完成了从资源被加载-到数据被层层加工流转-到视图被创建-再到渲染到页面上的全过程。
五、视图更新流程
当点击“更新节点数据”按钮后,图片资源被修改,div视图的背景色也被修改。相比创建的过程,这个页面中节点数据的更新要简单一些,因为各环境下的 Instance 都已经创建好了,各环境中的通道也打通了,只是各节点Differ(数据对比)的过程,并将 Differ 结果通过各环境中的通道传递给相关视图节点更新即可。这里不详细介绍具体的过程了,因为数据在三种语言环境中传递的逻辑是一致的,这里只介绍一下 Differ 的逻辑。
1.Differ 原理介绍
当业务需要更新视图的时候,会根据新的视图数据重新生成一棵新的 V-Dom Tree,和页面旧的 V-Dom Tree 进行对比,最终得到需要更新的节点数组,将这个数组同步到 ArkTS 的 Render Tree 的对应的节点,触发相应节点更新。

六、规划总结
目前已使用三个线程确保数据在不同环境中的高效处理,为了避免阻塞 JS 线程和 UI 线程,已将复杂耗时的功能放到 bg 线程中处理,尽可能的提升了页面绘制效率。但使用 ArkUI 封装好的视图组件绘制的视图层级相比 Android 和 iOS端多出一倍,且使用N-API通讯会带来一定的性能开销,因此先天性的多做了很多的工作。为了进一步提升视图渲染和数据通讯的效率,计划接下来将 C-API (鸿蒙提供的一组绘制视图的 C 接口)接入到动态化鸿蒙 SDK 中,在 C++ 环境中就完成视图的绘制,以更直接和高效的方式绘制视图,视图的层级将减少一半,同时省去了跨语言通讯的相关成本。经测试,视图绘制和渲染效率将进一步提升,用户将获得更好的使用体验。
动态化是一个涉及 Android、iOS、Harmony、Web、Java、C/C++、Vue、JavaScript、Node、Webpack、CLang、Ninja 等众多领域的综合解决方案。我们有各个领域优秀的小伙伴共同前行,如果你想深入了解某个领域的具体实现,可在评论区留言随时交流~!