
@[TOC]
1 概述
本文主要讲述了AOP的基本概念以及在Spring中AOP的几种实现方式。
2 AOP
AOP,即Aspect-Oriented Programming,面向切面编程,与OOP相辅相成。类似的,在OOP中,以类为程序的基本单元,在AOP中的基本单元是Aspect(切面)。AOP采用横向抽取的机制,将分散在各个方法中重复的代码提取出来,然后在程序编译或运行阶段将这些抽取出来的代码应用到需要执行的地方,这种横向抽取机制是OOP无法办到的。
AOP最典型的一个应用就是抽离出业务模块中与业务不相关的代码,比如,日志记录,性能统计,安全控制,事务处理等。假设业务代码如下:
1public void save()
2{
3	saveUser();
4}
但是随着软件开发越来越复杂,业务代码变成了下面的样子:
1public void save()
2{
3	//安全控制
4	//性能统计
5	//事务处理
6	//日志记录
7	saveUser();
8}
这样业务类就回混杂很多业务无关的代码,不仅会显得类臃肿不堪,同时也难于开发人员进行维护。因此,引入AOP后,可以将安全控制等的代码抽取出来,交给AOP机制在编译时或运行时再将这些代码进行动态“织入”,这样就可以让业务层专注于业务代码,而不用混杂其他逻辑的代码。
3 AOP实现方式
AOP的实现方式主要有以下几种:
- 动态代理:
JDK、CGLIB、Javassist、ASM等 Spring中AOP实现:基于代理类/AspectJ实现
下面先来看一个简单的例子。
4 动态代理实现
Java中有多种动态代理技术,比如:
JDKCGLIBJavassistASM
等等,在Spring AOP中常用的有JDK和CGLIB,先看一下最经典的JDK动态代理的实现。
4.1 JDK实现
结构:
JDKInterface:测试接口,含三个方法JDKImpl:测试接口实现类JDKAspect:切面类JDKProxy:代理类JDKTest:测试类
首先对接口类进行编写,包含三个方法:
1public interface JDKInterface {
2    void save();
3    void modify();
4    void delete();
5}
编写实现类:
1public class JDKImpl implements JDKInterface {
2    @Override
3    public void save() {
4        System.out.println("保存");
5    }
6
7    @Override
8    public void modify() {
9        System.out.println("修改");
10    }
11
12    @Override
13    public void delete() {
14        System.out.println("删除");
15    }
16}
接下来是定义切面类,模拟上面提到的异常处理等功能:
1public class JDKAspect {
2    public void check()
3    {
4        System.out.println("模拟权限控制");
5    }
6
7    public void except()
8    {
9        System.out.println("模拟异常处理");
10    }
11
12    public void log()
13    {
14        System.out.println("模拟日志记录");
15    }
16
17    public void monitor()
18    {
19        System.out.println("模拟性能监测");
20    }
21}
22
再接着是很关键的代理类,该类的任务是创建代理对象,并且负责如何对被代理对象进行增强处理:
1public class JDKProxy implements InvocationHandler {
2    public JDKInterface testInterface;
3    public Object createProxy(JDKInterface testInterface)
4    {
5        this.testInterface = testInterface;
6        //获取代理类的类加载器
7        ClassLoader loader = JDKProxy.class.getClassLoader();
8        //获取被代理对象(目标对象)的接口
9        Class<?>[] classes = testInterface.getClass().getInterfaces();
10        //创建代理后的对象
11        return Proxy.newProxyInstance(loader,classes,this);
12    }
13    @Override
14    public Object invoke(Object o, Method method, Object[] objects) throws Throwable {
15    	//创建一个切面
16        JDKAspect aspect = new JDKAspect();
17        //前增强
18        aspect.check();
19        aspect.except();
20        //调用被代理对象的方法,这里指的是testInterface的方法,objects是参数,obj是返回值
21        Object obj = method.invoke(testInterface,objects);
22        //后增强
23        aspect.log();
24        aspect.monitor();
25        return obj;
26    }
27}
创建代理对象时,需要指定代理类的类加载器以及被代理对象的接口,接着通过Proxy.newProxyInstance创建代理对象。
测试:
1public class JDKTest {
2    public static void test()
3    {
4        JDKProxy proxy = new JDKProxy();
5        JDKInterface testInterface = (JDKInterface) proxy.createProxy(new JDKImpl());
6        testInterface.save();
7        testInterface.modify();
8        testInterface.delete();
9    }
10}
输出:
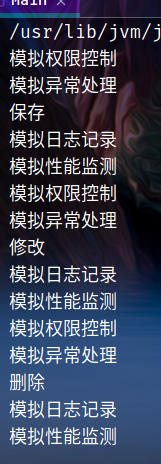
可以看到:
- 在执行真正的业务操作之前,被动态织入了权限控制,异常处理功能
- 在执行业务操作后被织入了日志记录和性能监测功能
这就是AOP的一种最典型的应用。
4.2 CGLIB实现
首先添加依赖(由于这是新建的工程需要手动添加CGLIB,在Spring Core中已经包含了CGLIB无需手动添加):
1<dependency>
2    <groupId>cglib</groupId>
3    <artifactId>cglib</artifactId>
4    <version>3.3.0</version>
5</dependency>
结构与上面的类似:
CGLibInterface:一个简单的接口CGLibImpl:接口实现类CGLibProxy:代理对象创建类CGLibAspect:切面类CGLibTest:测试类
首先是接口类和接口实现类,与上面的一样:
1public interface CGLibTestInterface {
2    void save();
3    void modify();
4    void delete();
5}
6
7public class CGLibImpl implements CGLibTestInterface{
8    @Override
9    public void save() {
10        System.out.println("保存");
11    }
12
13    @Override
14    public void modify() {
15        System.out.println("修改");
16    }
17
18    @Override
19    public void delete() {
20        System.out.println("删除");
21    }
22}
切面类也一样:
1public class CGLibAspect {
2    public void check()
3    {
4        System.out.println("模拟权限控制");
5    }
6
7    public void except()
8    {
9        System.out.println("模拟异常处理");
10    }
11
12    public void log()
13    {
14        System.out.println("模拟日志记录");
15    }
16
17    public void monitor()
18    {
19        System.out.println("模拟性能监测");
20    }
21}
唯一不同的是代理类,需要实现MethodInterceptor接口:
1public class CGLibProxy implements MethodInterceptor {
2    public Object createProxy(Object target)
3    {
4        Enhancer enhancer = new Enhancer();
5        enhancer.setSuperclass(target.getClass());
6        enhancer.setCallback(this);
7        return enhancer.create();
8    }
9
10    @Override
11    public Object intercept(Object o, Method method, Object[] objects, MethodProxy methodProxy) throws Throwable {
12        CGLibAspect aspect = new CGLibAspect();
13        aspect.check();
14        aspect.except();
15        Object obj = methodProxy.invokeSuper(o,objects);
16        aspect.log();
17        aspect.monitor();
18        return obj;
19    }
20}
其中代理对象创建过程如下:
1Enhancer enhancer = new Enhancer();
2enhancer.setSuperclass(target.getClass());
3enhancer.setCallback(this);
4return enhancer.create();
首先使用Enhancer生成一个代理类,该代理类的父类通过setSuperclass设置,回调函数通过setCallback设置,其中setCallback的参数为MethodInterceptor,也就是实现了该接口的类,最后通过create创建代理对象。
接着在intercept对方法进行织入,过程与JDK的实现类似。
测试:
1public class CGLibTest {
2    public static void test() {
3        CGLibProxy proxy = new CGLibProxy();
4        CGLibTestInterface cgLibTestInterface = (CGLibTestInterface) proxy.createProxy(new CGLibImpl());
5        cgLibTestInterface.delete();
6        cgLibTestInterface.modify();
7        cgLibTestInterface.save();
8    }
9}
输出也是一致:
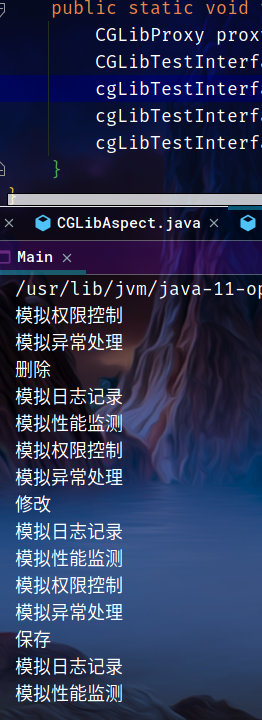 的
的
这里因为笔者用的是OpenJDK11,使用CGLIB包时会有非法反射访问警告:
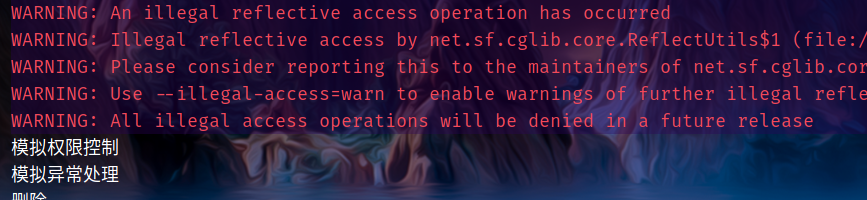
加上JVM参数就好了:
--illegal-access=deny --add-opens java.base/java.lang=ALL-UNNAMED
5 相关术语
看了两个Demo后应该可以大概知道AOP的作用了,下面正式介绍相关术语:
Join Pont:连接点,可能需要注入切面的地方,包括方法调用的前后等等Pointcut:切点,需要特殊处理的连接点,通过切点确定哪些连接点需要处理,比如上面的两个接口JDKInterface和CGLibInterface中的方法就是切点,当调用这些接口中的方法(也就是切点)时需要进行特殊的处理Advice:通知,定义在什么时候做什么事情,上面的例子没有提到,下面Spring AOP的例子会有体现Aspect:切面,通知+切点的集合,类似于Java中的类声明,比如上面的JDKAspect以及CGLibAspect就相当于切面Target:目标对象,需要被通知的对象,比如上面的new CGLibImpl()以及new JDKImpl(),也就是实现了接口的对象Proxy:代理,通知应用到目标对象后被创建的对象,比如上面的通过createProxy创建的对象Weaving:织入,把切面代码插入到目标对象后生成代理对象的过程,比如上面的把check、except等代码插入到目标对象(new CGLibImpl()以及new JDKImpl())后,生成代理对象(通过Proxy.newInsatnce()或enhancer.create())的过程。织入有三种方式,一种是编译器织入,需要有特殊的编译器,一种是类装载期织入,需要有特殊的类装载器,一种是动态代理织入,在运行时期为目标类添加通知生成子类的方式,Spring AOP默认使用动态代理织入,AspectJ采用编译器织入和类装载期织入
如果还是不明白就自己动手多实现几次,AOP确实是有点难理解,笔者也只能帮大家到这了。
6 Spring AOP实现
Spring中AOP实现主要有两种方式:
- 使用
JDK自带的动态代理,配合ProxyFactoryBean实现 - 使用
AspectJ实现,可以通过XML或注解配置实现
先来看一下代理类实现的方式。
6.1 代理类实现
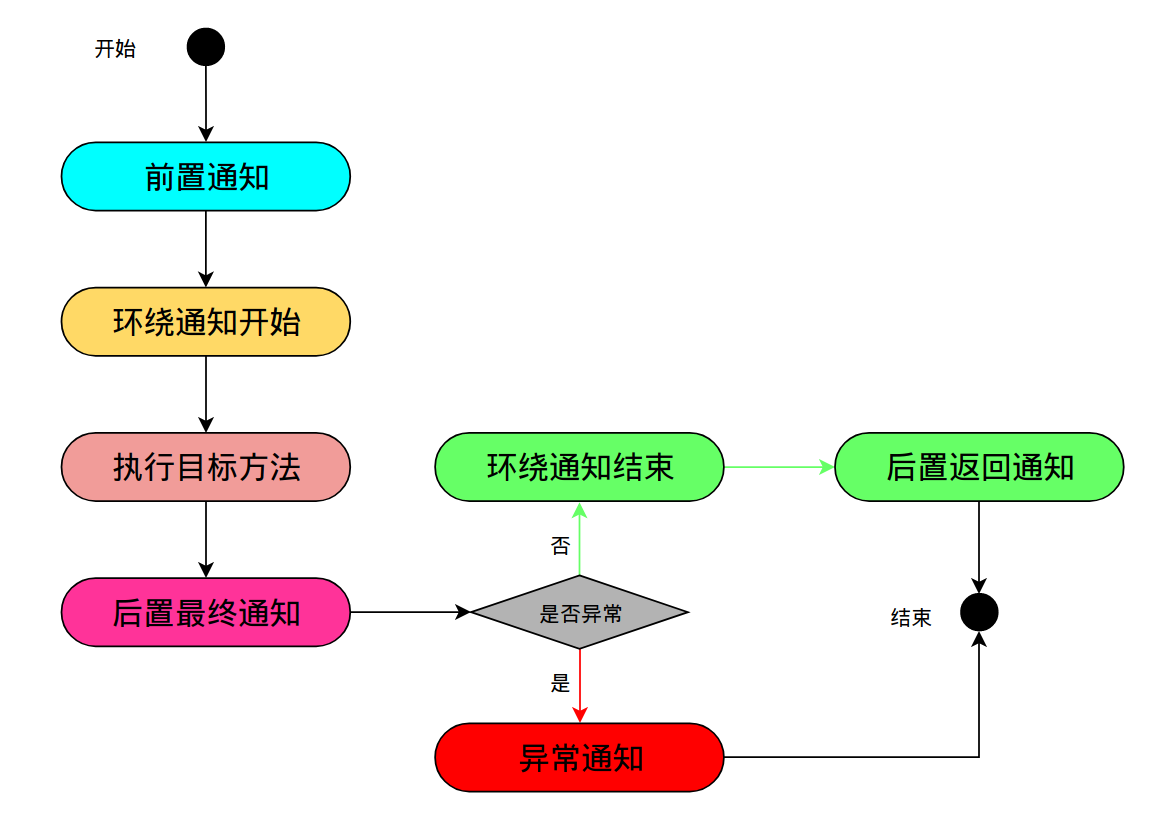
使用代理类实现需要ProxyFactoryBean类,同时也需要了解一下AOP中的通知类型。
6.1.1 Spring AOP通知类型
6种:
- 环绕通知:目标方法执行前和执行后实施的增强
- 前置通知:目标方法执行前实施增强
- 后置返回通知:目标方法执行成功后实施增强,发生异常不执行
- 后置最终通知:目标方法执行后实施增强,不管是否发生异常都要执行
- 异常通知:抛出异常后实施增强
- 引入通知:在目标类添加一些新的方法和属性,可用于修改目标类
流程如下:
6.1.2 ProxyFactoryBean
ProxyFactoryBean是FactoryBean的一个实现类,负责为其他Bean实例创建代理实例,XML配置中常用属性如下:
target:代理的目标对象proxyInterfaces:代理需要实现的接口列表interceptorNames:需要织入目标的AdviceproxyTargetClass:是否对类代理而不是接口,默认为false,使用JDK动态代理,为true时使用CGLIBsingleton:代理类是否为单例,默认trueoptimize:设置为true时强制使用CGLIB
6.1.3 实现
依赖:
1<dependency>
2    <groupId>org.springframework</groupId>
3    <artifactId>spring-aop</artifactId>
4    <version>5.2.8.RELEASE</version>
5</dependency>
结构类似:
ProxyClassInterface:一个简单的接口ProxyClassImpl:接口实现类ProxyClassAspect:切面类ProxyTest:测试类
其中接口类与接口实现类与上面一致:
1public interface ProxyInterface {
2    void save();
3    void modify();
4    void delete();
5}
6
7public class ProxyClassImpl implements ProxyInterface{
8    @Override
9    public void save() {
10        System.out.println("保存");
11    }
12
13    @Override
14    public void modify() {
15        System.out.println("修改");
16    }
17
18    @Override
19    public void delete() {
20        System.out.println("删除");
21    }
22}
切面类实现了MethodInterceptor(org.aopalliance.intercept.MethodInterceptor),同时指定了增强方法:
1public class ProxyClassAspect implements MethodInterceptor {
2    @Override
3    public Object invoke(MethodInvocation methodInvocation) throws Throwable {
4        check();
5        expect();
6        Object obj = methodInvocation.proceed();
7        log();
8        monitor();
9        return obj;
10    }
11
12    private void check()
13    {
14        System.out.println("模拟权限控制");
15    }
16
17    private void expect()
18    {
19        System.out.println("模拟异常处理");
20    }
21
22    private void log()
23    {
24        System.out.println("模拟日志记录");
25    }
26
27    private void monitor()
28    {
29        System.out.println("性能监测");
30    }
31}
这里调用目标方法相比起CGLIB以及JDK简单了很多,无需参数,返回Object,接着是测试类:
1public class ProxyClassTest {
2    public static void test()
3    {
4        ApplicationContext context = new ClassPathXmlApplicationContext("applicationContext.xml");
5        ProxyInterface proxyInterface = (ProxyInterface)context.getBean("factory");
6        proxyInterface.delete();
7        proxyInterface.save();
8        proxyInterface.modify();
9    }
10}
配置文件:
1<?xml version="1.0" encoding="utf-8" ?>
2<beans xmlns="http://www.springframework.org/schema/beans"
3       xmlns:xsi="http://www.w3.org/2001/XMLSchema-instance"
4       xsi:schemaLocation="http://www.springframework.org/schema/beans
5       http://www.springframework.org/schema/beans/spring-beans.xsd">
6
7    <bean id="impl" class="com.proxyclass.ProxyClassImpl"/>
8    <bean id="aspect" class="com.proxyclass.ProxyClassAspect" />
9    <bean id="factory" class="org.springframework.aop.framework.ProxyFactoryBean">
10        <property name="proxyInterfaces" value="com.proxyclass.ProxyInterface"/>
11        <property name="target" ref="impl" />
12        <property name="interceptorNames" value="aspect"/>
13        <property name="proxyTargetClass" value="true"/>
14    </bean>
15</beans>
配置文件说明:
impl:接口实现类Beanaspect:切面类Beanfactory:代理Bean,proxyInterfaces指定代理实现的接口,target指定目标对象,interceptorNames指定切面,proxyTargetClass设置为true,指定使用CGLIB
输出:
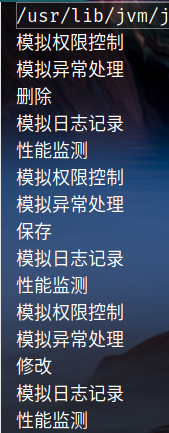
6.2 XML配置的AspectJ实现
6.2.1 AspectJ
AspectJ是一个基于Java的AOP框架,使用AspectJ实现Spring AOP的方法有两种,一种是基于XML配置,一种是基于注解配置,先来看基于XML配置的实现。
6.2.2 XML元素
基于XML配置的AspectJ需要在其中定义切面,切点以及通知,需要定义在<aop:config>内。
<aop:config>是AspectJ顶层配置元素,子元素如下:
<aop:aspect>:定义切面<aop:pointcut>:定义切点<aop:before>:定义前置通知<aop:after-returning>:定义后置返回通知<aop:around>:定义环绕通知<aop:after-throwing>:定义异常通知<aop:after>:定义后置最终通知
6.2.3 实现
依赖:
1<dependency>
2    <groupId>org.springframework</groupId>
3    <artifactId>spring-aspects</artifactId>
4    <version>5.2.8.RELEASE</version>
5</dependency>
接口与实现类:
1public interface XMLInterface {
2    void save();
3    void modify();
4    void delete();
5}
6
7public class XMLImpl implements XMLInterface {
8    @Override
9    public void save() {
10        System.out.println("保存");
11    }
12
13    @Override
14    public void modify() {
15        System.out.println("修改");
16    }
17
18    @Override
19    public void delete() {
20        System.out.println("删除");
21    }
22}
切面类:
1public class XMLAspect {
2    public void before()
3    {
4        System.out.println("前置通知");
5    }
6
7    public void afterReturning()
8    {
9        System.out.println("后置返回通知");
10    }
11
12    public Object around(ProceedingJoinPoint proceedingJoinPoint) throws Throwable
13    {
14        System.out.println("环绕通知开始");
15        Object object = proceedingJoinPoint.proceed();
16        System.out.println("环绕通知结束");
17        return object;
18    }
19
20    public void expect(Throwable e)
21    {
22        System.out.println("异常通知");
23    }
24
25    public void after()
26    {
27        System.out.println("后置最终通知");
28    }
29}
提供了更加精细的方法,比如前置通知以及后置通知。在环绕通知中,简化了目标方法的调用,只需要通过proceed调用即可获取返回值,测试类如下:
1public class XMLTest {
2    public static void test()
3    {
4        ApplicationContext context = new ClassPathXmlApplicationContext("applicationContext.xml");
5        XMLInterface xmlInterface = (XMLInterface)context.getBean("xmlImpl");
6        xmlInterface.delete();
7        xmlInterface.modify();
8        xmlInterface.save();
9    }
10}
配置文件:
1<bean id="xmlImpl" class="com.aspectj_xml.XMLImpl"/>
2<bean id="xmlAspect" class="com.aspectj_xml.XMLAspect" />
3<aop:config>
4    <aop:pointcut id="pointCut" expression="execution(* com.aspectj_xml.XMLInterface.*(..))"/>
5    <aop:aspect ref="xmlAspect">
6        <aop:before method="before" pointcut-ref="pointCut"  />
7        <aop:after-returning method="afterReturning" pointcut-ref="pointCut" />
8        <aop:around method="around" pointcut-ref="pointCut" />
9        <aop:after-throwing method="expect" pointcut-ref="pointCut" throwing="e"/>
10        <aop:after method="after" pointcut-ref="pointCut"/>
11    </aop:aspect>
12</aop:config>
说明如下:
pointCut定义了一个切点,expression是切点表达式expression中第一个*表示返回类型,使用*表示任意类型- 注意第一个
*与后面的包名有空格 - 第二个
*表示该接口/类中的所有方法 (..)表示方法的参数,..表示任意参数
关于expression更详细的例子请查看文档,戳这里:
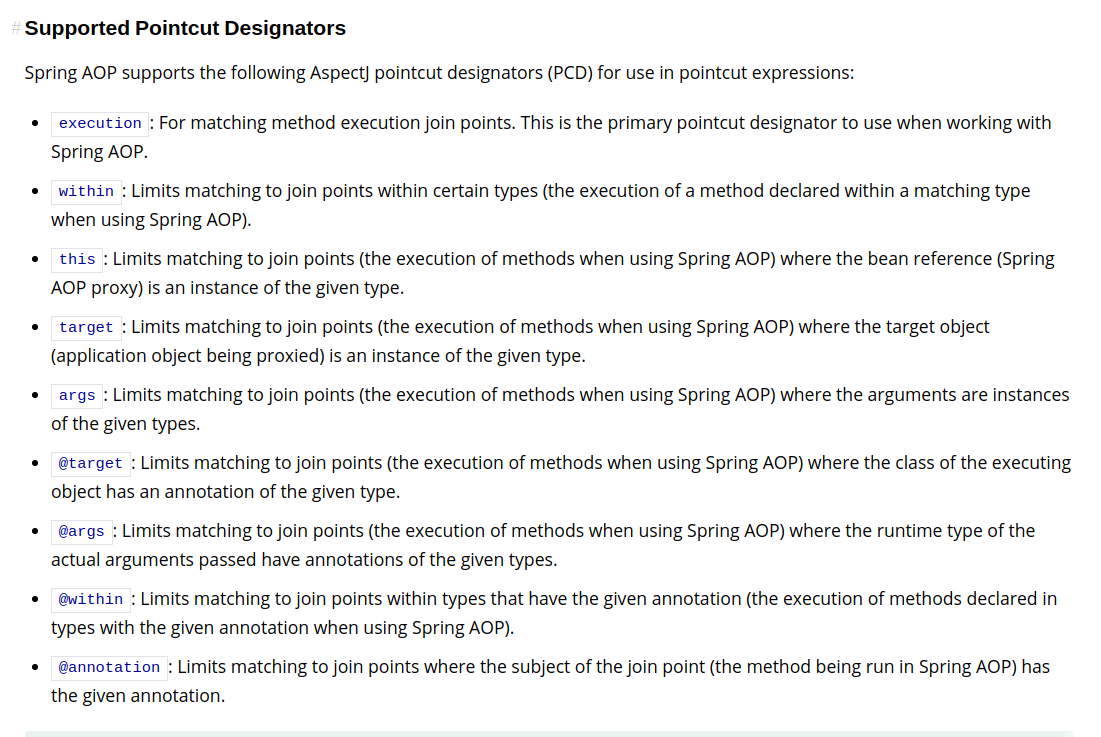
<aop:aspect>定义了一个切面,里面包含了前置通知/后置通知/异常通知等等,method表示的是调用的方法,pointcut-ref是切点的引用,表示在哪一个切点上进行增强处理
6.2.4 输出
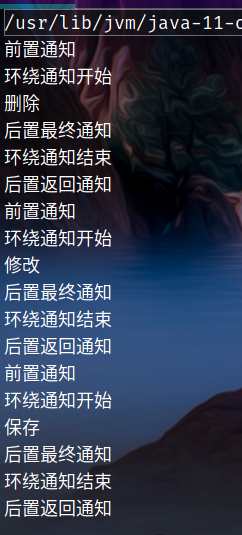
可以看到执行顺序为:
前置通知->环绕通知开始->目标方法->后置最终通知->环绕通知结束->后置返回通知
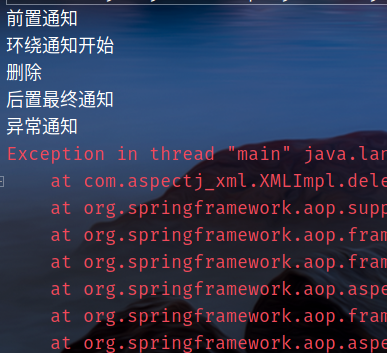
可以看到顺序为:
前置通知->环绕通知开始->目标方法-后置最终通知->异常通知
与上面的执行流程图一致。
6.3 注解配置的AspectJ实现(推荐)
6.3.1 常用注解
基于注解开发是目前最常用的方式,比XML要便捷很多,常见的注解如下:
@Aspect:定义一个切面,注解在切面类上@Pointcut:定义切点表达式,需要一个返回值与方法体都为空的方法,并将@Pointcut注解在该空方法上@Before:定义前置通知,值可以是切点或切点表达式@AfterReturning:定义后置返回通知@Around:定义环绕通知@AfterThrowing:定义异常通知@After:定义后置最终通知
6.3.2. 实现
接口与实现类:
1public interface AnnotationInterface {
2    void save();
3    void modify();
4    void delete();
5}
6
7@Component
8public class AnnotationImpl implements AnnotationInterface {
9    @Override
10    public void save() {
11        System.out.println("保存");
12    }
13
14    @Override
15    public void modify() {
16        System.out.println("修改");
17    }
18
19    @Override
20    public void delete() {
21        System.out.println("删除");
22//        注释下面这行语句开启异常通知
23//        int a = 1/0;
24    }
25}
切面类:
1@Aspect
2@Component
3public class AnnotationAspect {
4
5    @Pointcut("execution(* com.aspectj_annotation.AnnotationInterface.*(..))")
6    public void pointcut(){}
7
8    @Before("pointcut()")
9    public void before()
10    {
11        System.out.println("前置通知");
12    }
13
14    @AfterReturning(value = "pointcut()")
15    public void afterReturning()
16    {
17        System.out.println("后置返回通知");
18    }
19
20    @Around("pointcut()")
21    public Object around(ProceedingJoinPoint proceedingJoinPoint) throws Throwable
22    {
23        System.out.println("环绕通知开始");
24        Object object = proceedingJoinPoint.proceed();
25        System.out.println("环绕通知结束");
26        return object;
27    }
28
29    @AfterThrowing(value = "pointcut()",throwing = "e")
30    public void except(Throwable e)
31    {
32        System.out.println("异常通知");
33    }
34
35    @After("pointcut()")
36    public void after()
37    {
38        System.out.println("后置最终通知");
39    }
40
41}
测试类:
1public class AnnotationTest {
2    public static void test()
3    {
4        ApplicationContext context = new ClassPathXmlApplicationContext("applicationContext.xml");
5        AnnotationInterface annotationInterface = (AnnotationInterface)context.getBean("annotationImpl");
6        annotationInterface.delete();
7        annotationInterface.modify();
8        annotationInterface.save();
9    }
10}
配置文件:
1<context:component-scan base-package="com.aspectj_annotation"/>
2<aop:aspectj-autoproxy/>
输出:
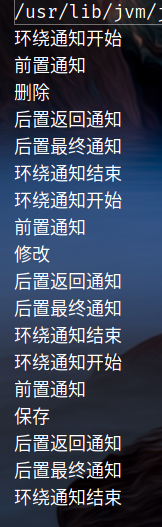
值得注意的是输出的顺序变动了,首先是环绕通知而不是前置通知。至于为什么这样笔者也不是很清楚,欢迎大神留言补充。
7 参考源码
Java版:
Kotlin版: