
离线地图最终解决方案
前言
能找到这个帖子的朋友应该是公司要求做离线地图,但是没了解过的吧,我前一段也是公司要求做离线地图但是我没了解过,我就去搜了很多文章,找了很多方案,最后和leader定下来了两个方案,一个是使用一张固定缩放的图片,然后将像素转化为px来做撒点的效果,另一个就是使用瓦片地图框架openlayers来实现瓦片地图,后文将一一介绍两个方法。
- 方法1:用一张固定缩放的图片将像素转化成px来做撒点的效果
- 方法2:用地图框架
openlayers来实现瓦片地图
1.使用openlayers来实现瓦片地图
为什么使用
openlayers而不是使用leaflet,原因是我找到的教程很多是openlayers的,我看leaflet的很多功能都是社区做的,这样会增大我的学习量,所以我没有选
首先解决地图问题
如果你要用原版地图的话,就可以直接使用地图下载工具瓦片地图下载工具,这只支持你下载原版地图,还有就是每个地图公司的坐标系可能存在不一样,本文是用<span style="color:red;">腾讯地图</span>来做的,为什要用腾讯一会儿说。
为什么要用腾讯地图?
因为腾讯地图有一个东西叫做<span style="color:red;">自定义地图样式</span>的工具,据网上帖子来说,你可以通过控制台去抓取到你自定义样式的地图的瓦片文件,然后用一些工具去批量抓取,但是实测<span style="color:red;">百度地图更新了,抓不到了</span>就很烦!
- 用上面的那个地图下载工具下载的地图格式有点问题,你需要给文件夹改成下面这样的格式
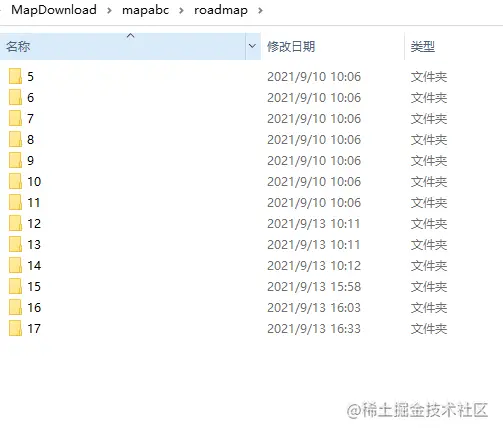
地图存放到服务器
如果给本地搞个
Tomcat什么的起个服务会很麻烦,这里也是用一个非常快捷的办法直接解决
1//首先先去下载 2npm install httpserver1//上一步下载完毕后,在你瓦片的分级目录里面打开cmd直接启动服务 2http-server下面会输出一堆东西,不用管他,你只需要知道那个是你的
ip+端口就行了,将你的ip+端口复制走,等下要用
使用openlayers加载离线地图,用Vue项目为例
1//小声bb : 其实到这里下面的步骤基本就是复制另一个帖子了 这个帖子也给了我很多帮助
安装openlayers
-
1npm install ol -
1//或者直接用js引入
2<script src="https://cdn.jsdelivr.net/gh/openlayers/openlayers.github.io@master/en/v6.8.1/build/ol.js"></script>
3<link rel="stylesheet" href="https://cdn.jsdelivr.net/gh/openlayers/openlayers.github.io@master/en/v6.8.1/css/ol.css">
4
复制下面代码
1<template>
2  <div style="width: 100%;height: 100%">
3    <div class="map" id="map"></div>
4    <el-card id="popup" class="popup">
5      <div class="popupContainer"></div>
6    </el-card>
7  </div>
8</template>
9
10<script>
11import 'ol/ol.css';
12import Map from 'ol/Map';
13import Feature from 'ol/Feature';
14import VectorSource from 'ol/source/Vector';
15import Overlay from 'ol/Overlay';
16import {Tile as TileLayer, Vector as VectorLayer} from 'ol/layer';
17import View from 'ol/View';
18import {transform} from 'ol/proj';
19import XYZ from 'ol/source/XYZ'
20import Point from 'ol/geom/Point';
21import GeoJSON from 'ol/format/GeoJSON';
22import {Fill, Stroke, Icon, Style} from 'ol/style'
23import markerImg from '@/assets/img/markerIcon.png'
24export default {
25  name: "openlayersMap",
26  data () {
27    return {
28      mapObj: null,
29      mapDom: null,
30      mapPointList: [],
31      pointLayerSource:null,
32      pointLayer: null,
33      markerIcon: markerImg
34    }
35  },
36  mounted() {
37    this.initMap()
38  },
39  methods: {
40    // 清除地图 某些情况 地图容器会存在两个 导致地图无法正常显示 这个问题折腾了我半天。
41    // 找了半天官方貌似也没有提供 对应的 api,自己动手了。
42    mapClear (){
43      if (this.mapDom) {
44        this.mapDom.innerHTML = ''
45        this.mapDom = null
46      }
47    },
48
49    // 初始化地图
50    initMap () {
51      // 先尝试清除
52      this.mapClear()
53      // 获取地图容器
54      this.mapDom = document.getElementById('map')
55
56      // 初始化地图配置
57      this.mapObj = new Map({
58        target: this.mapDom, // 地图容器
59        view: new View({
60          //设置你的地图初始中心点
61          center: [117.990969, 36.635013], // 地图中心点
62          zoom: 10, // 缩放
63          projection: 'EPSG:4326' // 坐标系
64        })
65      })
66
67      // 添加一个使用离线瓦片地图的层
68      const offlineMapLayer = new TileLayer({
69        source: new XYZ({
70          //这里的url就是你要改的地方
71          url: 'http://192.168.3.6:8081' + '/{z}/{x}/{y}.png'  // 设置本地离线瓦片所在路径
72        })
73      })
74      // 将图层添加到地图
75      this.mapObj.addLayer(offlineMapLayer)
76
77      // 加载地理坐标
78      this.addPoint()
79    },
80
81    // 添加地理坐标
82    addPoint () {
83      this.delPointAll()
84      // 地理坐标数组
85      const pointData = [
86        {longitude: 117.990969, latitude: 36.635013}
87      ]
88
89      pointData.map(item => {
90        // 创建点
91        const point = new Feature({
92          geometry: new Point([item.longitude, item.latitude]),
93          data: item
94        })
95
96        // 点的样式
97        const iconStyle = new Style({
98          image: new Icon({
99            color: '#ffffff',
100            crossOrigin: 'anonymous',
101            src: this.markerIcon,
102          }),
103        })
104        // 设置样式
105        point.setStyle(iconStyle)
106        // 保存到数据  方便删除
107        this.mapPointList.push(point)
108      })
109
110      // 创建geojson据源
111      this.pointLayerSource = new VectorSource({features: this.mapPointList})
112      // 创建图层 并加载数据
113      this.pointLayer = new VectorLayer({source: this.pointLayerSource})
114      // 将图层添加地图上
115      this.mapObj.addLayer(this.pointLayer)
116    },
117
118    // 地理点位删除
119    delPointAll(){
120      // 判断 删除的数据源是否存在
121      if (this.pointLayerSource) {
122        // 遍历删除
123        this.mapPointList.map(item => {
124          this.pointLayerSource.removeFeature(item)
125        })
126
127        // 删除图层 重置数据
128        this.mapObj.removeLayer(this.pointLayer)
129        this.pointLayerSource = null
130        this.pointLayer = null
131        this.mapPointList = []
132      }
133    }
134  },
135  beforeDestroy() {
136    this.mapClear()
137  }
138}
139</script>
140
141<style scoped>
142.map {
143  width: 100%;
144  height: 100%;
145}
146</style>
147
这里面你需要改的地方基本就那几个
- <span style="color:skyblue;">this.mapObj </span>中的
center字段,是用来设置你地图的默认中心点的 - <span style="color:skyblue;">offlineMapLayer</span>中的
url这个字段,后面的不需要改,只需要给前面的ip+端口改成你本地启动的就行 - 那么跑起来基本就没啥问题了。
撒点功能的实现
撒点应该很多做地图的都要实现这个功能吧
还是看上述代码块,他中间的<span style="color:skyblue;">addPoint</span>中的
pointData数组是用来放你要撒的点的坐标的,iconStyle是用来设置点的样式的,你可以直接给color删掉,然后给最后的src赋上图片链接就行了
撒点弹窗功能的实现
这个可以看一下原帖的另一段代码,因为这块我没有用到所以就没去看他
1 // 地图点击事件
2    this.mapObj.on('click', function (evt) {
3        // 获取点击位置的数据
4        const feature = self.mapObj.forEachFeatureAtPixel(evt.pixel, function (feature) {
5            return feature;
6        })
7
8        // 根据 点击元素 className 判断是否点击在自定义popup上
9        const isClickPopUp = evt.originalEvent.path.map(item => item.className).includes('el-card__body')
10        if (!isClickPopUp) {
11            popupDom.style.display = 'none'
12        }
13
14        // 官方示例 采用 jq + bootstrap弹窗,但是我觉得没有必要 如果大量使用bootstrap 组件可以考虑引入。
15        const popupContainer = document.getElementsByClassName('popupContainer')[0]
16
17        // 判断数据
18        if (feature) {
19            // feature.values_.data ,data字段是在 addPoint 函数创建point时添加 可以自定义
20            if (feature.values_.data) {
21                const pointData = feature.values_.data
22                popup.setPosition(evt.coordinate)
23                popupContainer.innerHTML = `<div>${pointData.name}</div>`
24                popupDom.style.display = 'block'
25            }
26        }
27    })
区县范围的实现
这个具体看原帖吧,我忘了当时是咋写的了QAQ
2.截取地图将坐标转换为px
这个方案其实就简单很多了,你需要给地图固定到一个缩放等级,很多东西都是写死的,然后直接通过一套算法去转换就行了
首先data里面要有一些静态的数据
1data() {
2    return {
3      //   地图缩放等级
4      zoom: 15,
5      //   一些默认值
6      MCBAND: [12890594.86, 8362377.87, 5591021, 3481989.83, 1678043.12, 0],
7      LLBAND: [75, 60, 45, 30, 15, 0],
8      MC2LL: [
9        [
10          1.410526172116255e-8, 0.00000898305509648872, -1.9939833816331,
11          200.9824383106796, -187.2403703815547, 91.6087516669843,
12          -23.38765649603339, 2.57121317296198, -0.03801003308653, 17337981.2,
13        ],
14        [
15          -7.435856389565537e-9, 0.000008983055097726239, -0.78625201886289,
16          96.32687599759846, -1.85204757529826, -59.36935905485877,
17          47.40033549296737, -16.50741931063887, 2.28786674699375, 10260144.86,
18        ],
19        [
20          -3.030883460898826e-8, 0.00000898305509983578, 0.30071316287616,
21          59.74293618442277, 7.357984074871, -25.38371002664745,
22          13.45380521110908, -3.29883767235584, 0.32710905363475, 6856817.37,
23        ],
24        [
25          -1.981981304930552e-8, 0.000008983055099779535, 0.03278182852591,
26          40.31678527705744, 0.65659298677277, -4.44255534477492,
27          0.85341911805263, 0.12923347998204, -0.04625736007561, 4482777.06,
28        ],
29        [
30          3.09191371068437e-9, 0.000008983055096812155, 0.00006995724062,
31          23.10934304144901, -0.00023663490511, -0.6321817810242,
32          -0.00663494467273, 0.03430082397953, -0.00466043876332, 2555164.4,
33        ],
34        [
35          2.890871144776878e-9, 0.000008983055095805407, -3.068298e-8,
36          7.47137025468032, -0.00000353937994, -0.02145144861037,
37          -0.00001234426596, 0.00010322952773, -0.00000323890364, 826088.5,
38        ],
39      ],
40      LL2MC: [
41        [
42          -0.0015702102444, 111320.7020616939, 1704480524535203,
43          -10338987376042340, 26112667856603880, -35149669176653700,
44          26595700718403920, -10725012454188240, 1800819912950474, 82.5,
45        ],
46        [
47          0.0008277824516172526, 111320.7020463578, 647795574.6671607,
48          -4082003173.641316, 10774905663.51142, -15171875531.51559,
49          12053065338.62167, -5124939663.577472, 913311935.9512032, 67.5,
50        ],
51        [
52          0.00337398766765, 111320.7020202162, 4481351.045890365,
53          -23393751.19931662, 79682215.47186455, -115964993.2797253,
54          97236711.15602145, -43661946.33752821, 8477230.501135234, 52.5,
55        ],
56        [
57          0.00220636496208, 111320.7020209128, 51751.86112841131,
58          3796837.749470245, 992013.7397791013, -1221952.21711287,
59          1340652.697009075, -620943.6990984312, 144416.9293806241, 37.5,
60        ],
61        [
62          -0.0003441963504368392, 111320.7020576856, 278.2353980772752,
63          2485758.690035394, 6070.750963243378, 54821.18345352118,
64          9540.606633304236, -2710.55326746645, 1405.483844121726, 22.5,
65        ],
66        [
67          -0.0003218135878613132, 111320.7020701615, 0.00369383431289,
68          823725.6402795718, 0.46104986909093, 2351.343141331292,
69          1.58060784298199, 8.77738589078284, 0.37238884252424, 7.45,
70        ],
71      ],
72      //   地图可视区域
73      N: { width: 1226, height: 1926 },
74      //   当前可视范围中心点坐标
75      Q: { lng: 121.4391, lat: 31.1676 },
76      //   坐标点数组
77      items: [
78        { x: 121.445613, y: 31.175118 },
79        { x: 121.462861, y: 31.200346 },
80        { x: 121.429338, y: 31.145276 },
81        { x: 121.411697, y: 31.166757 },
82        { x: 121.41999, y: 31.182991 },
83      ],
84    };
85  },
下面是一些转换算法
1// 定位点转px计算函数
2    /** *********将地图坐标转换成像素***********/
3    // point:当前像素 var point = new BMap.Point(x, y);
4    // zoom:当前地图缩放级别 var zoom = map.getZoom();
5    // center:当前地图可视范围中心点坐标 var center = map.getCenter();
6    // bounds:地图可视区域    var bound = map.getSize();
7    PointToPixel(point, zoom, center, bounds) {
8      // 坐标到像素
9      if (!point) {
10        return;
11      }
12      point = this.FormatPoint(point);
13      center = this.FormatPoint(center);
14      var units = this.GetZoomUnits(zoom);
15      var x = Math.round((point.lng - center.lng) / units + bounds.width / 2);
16      var y = Math.round((center.lat - point.lat) / units + bounds.height / 2);
17      // 这个应该是转换完成的像素
18      return { x: x, y: y };
19    },
20    // 转换缩放级别
21    GetZoomUnits(zoom) {
22      return Math.pow(2, 18 - zoom);
23    },
24    FormatPoint(point) {
25      let lng_lat;
26      var mc;
27      point.lng = this.getLoop(point.lng, -180, 180);
28      point.lat = this.getRange(point.lat, -74, 74);
29      lng_lat = {
30        lng: point.lng,
31        lat: point.lat,
32      };
33      for (let i = 0; i < this.LLBAND.length; i++) {
34        if (lng_lat.lat >= this.LLBAND[i]) {
35          mc = this.LL2MC[i];
36          break;
37        }
38      }
39      if (!mc) {
40        for (let i = this.LLBAND.length - 1; i >= 0; i--) {
41          if (lng_lat.lat <= -this.LLBAND[i]) {
42            mc = this.LL2MC[i];
43            break;
44          }
45        }
46      }
47      var cE = this.convertor(point, mc);
48      lng_lat = {
49        lng: cE.lng.toFixed(2),
50        lat: cE.lat.toFixed(2),
51      };
52      return lng_lat;
53    },
54    getLoop(lng, a, b) {
55      while (lng > b) {
56        lng -= b - a;
57      }
58      while (lng < a) {
59        lng += b - a;
60      }
61      return lng;
62    },
63    getRange(lat, a, b) {
64      if (a != null) {
65        lat = Math.max(lat, a);
66      }
67      if (b != null) {
68        lat = Math.min(lat, b);
69      }
70      return lat;
71    },
72    convertor(point, mc) {
73      if (!point || !mc) {
74        return;
75      }
76      var lng = mc[0] + mc[1] * Math.abs(point.lng);
77      var c = Math.abs(point.lat) / mc[9];
78      var lat =
79        mc[2] +
80        mc[3] * c +
81        mc[4] * c * c +
82        mc[5] * c * c * c +
83        mc[6] * c * c * c * c +
84        mc[7] * c * c * c * c * c +
85        mc[8] * c * c * c * c * c * c;
86      lng *= point.lng < 0 ? -1 : 1;
87      lat *= point.lat < 0 ? -1 : 1;
88      return { lng: lng, lat: lat };
89    },
90    isblock(items) {
91      this.aleat = items;
92      this.isAleat = !this.isAleat;
93    },
这些算法你不需要管他都干了什么(我也看不大懂),只需要知道调用<span style="color:skyblue;">PointToPixel</span>方法他会返回给你一个对象,这个对象就是你要的
x和y的坐标就行了1const px = this.PointToPixel(Q, this.zoom, this.Q, this.N);只有第一个值是动态传的你的坐标,后面的三个值全部都是死值!
然后你根据这个
px去做定位就行了,v-for去循环一堆span出来然后position: absolute;动态绑定这个px就好了,至于点击弹窗的话,你可以给span外面套个div然后给span下面再写个div,再用定位定上去就行了,至于点击切换也不是很麻烦,然后用伪类写个小箭头就好了!
第二种方案肯定是简单很多的,但是效果肯定是差很多。
这就是我在网上搜了两天找出来的比较合理的地图解决方案,如果觉得有用希望能给点个赞,如果文中有什么错误的地方,希望各位能在评论区指出,我及时的改正!