
综合概述
数据库连接池负责分配、管理和释放数据库连接,它允许应用程序重复使用一个现有的数据库连接,而不是再重新建立一个;释放空闲时间超过最大空闲时间的数据库连接来避免因为没有释放数据库连接而引起的数据库连接遗漏。通过数据库连接池能明显提高对数据库操作的性能。在Java应用程序开发中,常用的连接池有DBCP、C3P0、Proxool等。
Spring Boot默认提供了若干种可用的连接池,默认的数据源是:org.apache.tomcat.jdbc.pool.DataSource。而Druid是阿里系提供的一个开源连接池,除在连接池之外,Druid还提供了非常优秀的数据库监控和扩展功能。接下来,我们就来讲解如何实现Spring Boot与Druid连接池的集成。
Druid介绍
Druid是阿里开源的一个JDBC应用组件, 其包括三部分:
- DruidDriver: 代理Driver,能够提供基于Filter-Chain模式的插件体系。
- DruidDataSource: 高效可管理的数据库连接池。
- SQLParser: 实用的SQL语法分析
通过Druid连接池中间件, 我们可以实现:
- 可以监控数据库访问性能,Druid内置提供了一个功能强大的StatFilter插件,能够详细统计SQL的执行性能,这对于线上分析数据库访问性能有帮助。
- 替换传统的DBCP和C3P0连接池中间件。Druid提供了一个高效、功能强大、可扩展性好的数据库连接池。
- 数据库密码加密。直接把数据库密码写在配置文件中,容易导致安全问题。DruidDruiver和DruidDataSource都支持PasswordCallback。
- SQL执行日志,Druid提供了不同的LogFilter,能够支持Common-Logging、Log4j和JdkLog,你可以按需要选择相应的LogFilter,监控你应用的数据库访问情况。
- 扩展JDBC,如果你要对JDBC层有编程的需求,可以通过Druid提供的Filter-Chain机制,很方便编写JDBC层的扩展插件。
更多详细信息参考官方文档:https://github.com/alibaba/druid/wiki
实现案例
接下来,我们就通过实际案例来讲解如何集成Druid数据源,为了避免重复篇幅,此篇教程的源码基于《Spring Boot:整合MyBatis框架》一篇的源码实现,读者请先参考并根据教程链接先行获取基础源码和数据库内容。
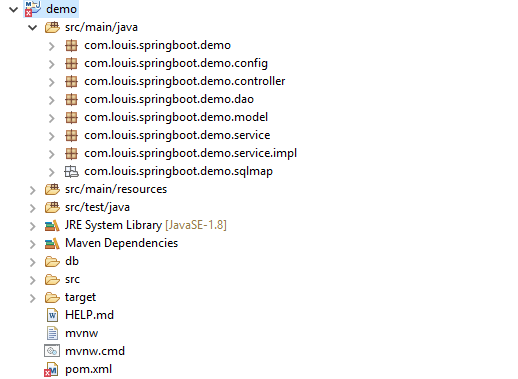
添加相关依赖
打开pom文件,添加 druid 相关的 maven 依赖。
pom.xml
1<!-- druid -->
2<dependency>
3   <groupId>com.alibaba</groupId>
4   <artifactId>druid-spring-boot-starter</artifactId>
5   <version>1.1.17</version>
6</dependency>
Druid Spring Boot Starter 是阿里官方提供的 Spring Boot 插件,用于帮助在Spring Boot项目中轻松集成Druid数据库连接池和监控。
更多资料参考:
Druid: https://github.com/alibaba/druid
Druid Spring Starter: https://github.com/alibaba/druid/tree/master/druid-spring-boot-starter
添加相关配置
把原有的数据源配置替换成 druid 数据源并配置数据源相关参数。
application.yml

1# Tomcat
2server:
3  tomcat:
4    uri-encoding: UTF-8
5    max-threads: 1000
6    min-spare-threads: 30
7  port: 8080
8    #context-path: /springboot
9
10# DataSource
11spring:
12  datasource:
13    name: druidDataSource
14    type: com.alibaba.druid.pool.DruidDataSource
15    druid:
16      driver-class-name: com.mysql.cj.jdbc.Driver
17      url: jdbc:mysql://localhost:3306/springboot?useUnicode=true&zeroDateTimeBehavior=convertToNull&autoReconnect=true&characterEncoding=utf-8
18      username: root
19      password: 123456
20      filters: stat,wall,log4j,config
21      max-active: 100
22      initial-size: 1
23      max-wait: 60000
24      min-idle: 1
25      time-between-eviction-runs-millis: 60000
26      min-evictable-idle-time-millis: 300000
27      validation-query: select 'x'
28      test-while-idle: true
29      test-on-borrow: false
30      test-on-return: false
31      pool-prepared-statements: true
32      max-open-prepared-statements: 50
33      max-pool-prepared-statement-per-connection-size: 20

参数说明:
- spring.datasource.druid.max-active 最大连接数
- spring.datasource.druid.initial-size 初始化大小
- spring.datasource.druid.min-idle 最小连接数
- spring.datasource.druid.max-wait 获取连接等待超时时间
- spring.datasource.druid.time-between-eviction-runs-millis 间隔多久才进行一次检测,检测需要关闭的空闲连接,单位是毫秒
- spring.datasource.druid.min-evictable-idle-time-millis 一个连接在池中最小生存的时间,单位是毫秒
- spring.datasource.druid.filters=config,stat,wall,log4j 配置监控统计拦截的filters,去掉后监控界面SQL无法进行统计,’wall’用于防火墙
Druid提供以下几种Filter信息:
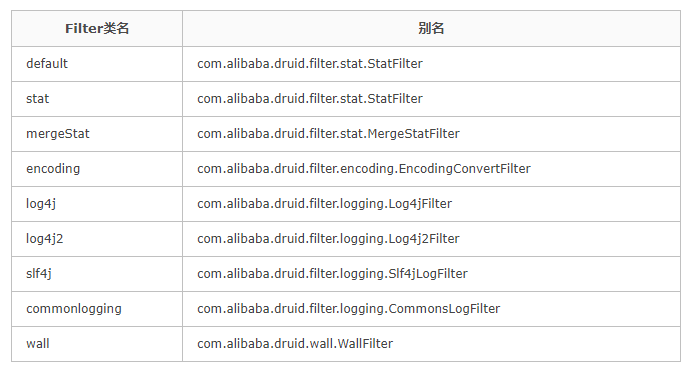
自定义配置属性
如果需要通过定制的配置文件对druid进行自定义属性配置,在config包中添加属性配置类。
DruidDataSourceProperties.java

1package com.louis.springboot.demo.config;
2import org.springframework.boot.context.properties.ConfigurationProperties;
3
4@ConfigurationProperties(prefix = "spring.datasource.druid")
5public class DruidDataSourceProperties {
6
7    // jdbc
8    private String driverClassName;
9    private String url;
10    private String username;
11    private String password;
12    // jdbc connection pool
13    private int initialSize;
14    private int minIdle;
15    private int maxActive = 100;
16    private long maxWait;
17    private long timeBetweenEvictionRunsMillis;
18    private long minEvictableIdleTimeMillis;
19    private String validationQuery;
20    private boolean testWhileIdle;
21    private boolean testOnBorrow;
22    private boolean testOnReturn;
23    private boolean poolPreparedStatements;
24    private int maxPoolPreparedStatementPerConnectionSize;
25    // filter
26    private String filters;
27
28    public int getInitialSize() {
29        return initialSize;
30    }
31
32    public void setInitialSize(int initialSize) {
33        this.initialSize = initialSize;
34    }
35
36    public int getMinIdle() {
37        return minIdle;
38    }
39
40    public void setMinIdle(int minIdle) {
41        this.minIdle = minIdle;
42    }
43
44    public int getMaxActive() {
45        return maxActive;
46    }
47
48    public void setMaxActive(int maxActive) {
49        this.maxActive = maxActive;
50    }
51
52    public long getMaxWait() {
53        return maxWait;
54    }
55
56    public void setMaxWait(long maxWait) {
57        this.maxWait = maxWait;
58    }
59
60    public long getTimeBetweenEvictionRunsMillis() {
61        return timeBetweenEvictionRunsMillis;
62    }
63
64    public void setTimeBetweenEvictionRunsMillis(long timeBetweenEvictionRunsMillis) {
65        this.timeBetweenEvictionRunsMillis = timeBetweenEvictionRunsMillis;
66    }
67
68    public long getMinEvictableIdleTimeMillis() {
69        return minEvictableIdleTimeMillis;
70    }
71
72    public void setMinEvictableIdleTimeMillis(long minEvictableIdleTimeMillis) {
73        this.minEvictableIdleTimeMillis = minEvictableIdleTimeMillis;
74    }
75
76    public String getValidationQuery() {
77        return validationQuery;
78    }
79
80    public void setValidationQuery(String validationQuery) {
81        this.validationQuery = validationQuery;
82    }
83
84    public boolean isTestWhileIdle() {
85        return testWhileIdle;
86    }
87
88    public void setTestWhileIdle(boolean testWhileIdle) {
89        this.testWhileIdle = testWhileIdle;
90    }
91
92    public boolean isTestOnBorrow() {
93        return testOnBorrow;
94    }
95
96    public void setTestOnBorrow(boolean testOnBorrow) {
97        this.testOnBorrow = testOnBorrow;
98    }
99
100    public boolean isTestOnReturn() {
101        return testOnReturn;
102    }
103
104    public void setTestOnReturn(boolean testOnReturn) {
105        this.testOnReturn = testOnReturn;
106    }
107
108    public boolean isPoolPreparedStatements() {
109        return poolPreparedStatements;
110    }
111
112    public void setPoolPreparedStatements(boolean poolPreparedStatements) {
113        this.poolPreparedStatements = poolPreparedStatements;
114    }
115
116    public int getMaxPoolPreparedStatementPerConnectionSize() {
117        return maxPoolPreparedStatementPerConnectionSize;
118    }
119
120    public void setMaxPoolPreparedStatementPerConnectionSize(int maxPoolPreparedStatementPerConnectionSize) {
121        this.maxPoolPreparedStatementPerConnectionSize = maxPoolPreparedStatementPerConnectionSize;
122    }
123
124    public String getFilters() {
125        return filters;
126    }
127
128    public void setFilters(String filters) {
129        this.filters = filters;
130    }
131
132    public String getDriverClassName() {
133        return driverClassName;
134    }
135
136    public void setDriverClassName(String driverClassName) {
137        this.driverClassName = driverClassName;
138    }
139
140    public String getUrl() {
141        return url;
142    }
143
144    public void setUrl(String url) {
145        this.url = url;
146    }
147
148    public String getUsername() {
149        return username;
150    }
151
152    public void setUsername(String username) {
153        this.username = username;
154    }
155
156    public String getPassword() {
157        return password;
158    }
159
160    public void setPassword(String password) {
161        this.password = password;
162    }
163
164}

Druid Spring Starter 简化了很多配置,如果默认配置满足不了你的需求,可以自定义配置。更多配置参考:
Druid Spring Starter: https://github.com/alibaba/druid/tree/master/druid-spring-boot-starter
配置Servlet和Filter
在config包中添加一个DruidConfig配置类。
DruidConfig.java

1package com.louis.springboot.demo.config;
2import java.sql.SQLException;
3import javax.servlet.Filter;
4import javax.servlet.Servlet;
5import javax.sql.DataSource;
6import org.springframework.beans.factory.annotation.Autowired;
7import org.springframework.boot.autoconfigure.condition.ConditionalOnMissingBean;
8import org.springframework.boot.context.properties.EnableConfigurationProperties;
9import org.springframework.boot.web.servlet.FilterRegistrationBean;
10import org.springframework.boot.web.servlet.ServletRegistrationBean;
11import org.springframework.context.annotation.Bean;
12import org.springframework.context.annotation.Configuration;
13
14import com.alibaba.druid.pool.DruidDataSource;
15import com.alibaba.druid.support.http.StatViewServlet;
16import com.alibaba.druid.support.http.WebStatFilter;
17
18@Configuration
19@EnableConfigurationProperties({DruidDataSourceProperties.class})
20public class DruidConfig {
21    @Autowired
22    private DruidDataSourceProperties properties;
23
24    @Bean
25    @ConditionalOnMissingBean
26    public DataSource druidDataSource() {
27        DruidDataSource druidDataSource = new DruidDataSource();
28        druidDataSource.setDriverClassName(properties.getDriverClassName());
29        druidDataSource.setUrl(properties.getUrl());
30        druidDataSource.setUsername(properties.getUsername());
31        druidDataSource.setPassword(properties.getPassword());
32        druidDataSource.setInitialSize(properties.getInitialSize());
33        druidDataSource.setMinIdle(properties.getMinIdle());
34        druidDataSource.setMaxActive(properties.getMaxActive());
35        druidDataSource.setMaxWait(properties.getMaxWait());
36        druidDataSource.setTimeBetweenEvictionRunsMillis(properties.getTimeBetweenEvictionRunsMillis());
37        druidDataSource.setMinEvictableIdleTimeMillis(properties.getMinEvictableIdleTimeMillis());
38        druidDataSource.setValidationQuery(properties.getValidationQuery());
39        druidDataSource.setTestWhileIdle(properties.isTestWhileIdle());
40        druidDataSource.setTestOnBorrow(properties.isTestOnBorrow());
41        druidDataSource.setTestOnReturn(properties.isTestOnReturn());
42        druidDataSource.setPoolPreparedStatements(properties.isPoolPreparedStatements());
43        druidDataSource.setMaxPoolPreparedStatementPerConnectionSize(properties.getMaxPoolPreparedStatementPerConnectionSize());
44
45        try {
46            druidDataSource.setFilters(properties.getFilters());
47            druidDataSource.init();
48        } catch (SQLException e) {
49            e.printStackTrace();
50        }
51
52        return druidDataSource;
53    }
54
55    /**
56     * 注册Servlet信息, 配置监控视图
57     *
58     * @return
59     */
60    @Bean
61    @ConditionalOnMissingBean
62    public ServletRegistrationBean<Servlet> druidServlet() {
63        ServletRegistrationBean<Servlet> servletRegistrationBean = new ServletRegistrationBean<Servlet>(new StatViewServlet(), "/druid/*");
64
65        //白名单:
66        servletRegistrationBean.addInitParameter("allow","192.168.1.195");
67        //IP黑名单 (存在共同时,deny优先于allow) : 如果满足deny的话提示:Sorry, you are not permitted to view this page.
68        servletRegistrationBean.addInitParameter("deny","192.168.1.119");
69        //登录查看信息的账号密码, 用于登录Druid监控后台
70        servletRegistrationBean.addInitParameter("loginUsername", "admin");
71        servletRegistrationBean.addInitParameter("loginPassword", "admin");
72        //是否能够重置数据.
73        servletRegistrationBean.addInitParameter("resetEnable", "true");
74        return servletRegistrationBean;
75
76    }
77
78    /**
79     * 注册Filter信息, 监控拦截器
80     *
81     * @return
82     */
83    @Bean
84    @ConditionalOnMissingBean
85    public FilterRegistrationBean<Filter> filterRegistrationBean() {
86        FilterRegistrationBean<Filter> filterRegistrationBean = new FilterRegistrationBean<Filter>();
87        filterRegistrationBean.setFilter(new WebStatFilter());
88        filterRegistrationBean.addUrlPatterns("/*");
89        filterRegistrationBean.addInitParameter("exclusions", "*.js,*.gif,*.jpg,*.png,*.css,*.ico,/druid/*");
90        return filterRegistrationBean;
91    }
92}

说明:
- @EnableConfigurationProperties({DruidDataSourceProperties.class}) 用于导入上一步Druid的配置信息
- public ServletRegistrationBean druidServlet() 相当于Web Servlet配置
- public FilterRegistrationBean filterRegistrationBean() 相当于Web Filter配置
如果不使用上述的Servlet和Filter配置, 也可以通过下述监控器配置实现:
配置监控拦截器(相当于FilterRegistrationBean)
DruidStatFilter.java

1package com.louis.kitty.boot.config;
2
3import javax.servlet.annotation.WebFilter;
4import javax.servlet.annotation.WebInitParam;
5import com.alibaba.druid.support.http.WebStatFilter;
6
7/**
8 * 配置监控拦截器, druid监控拦截器
9 */
10@WebFilter(filterName="druidWebStatFilter",
11urlPatterns="/*",
12initParams={
13    @WebInitParam(name="exclusions",value="*.js,*.gif,*.jpg,*.bmp,*.png,*.css,*.ico,/druid/*"), // 忽略资源
14})
15public class DruidStatFilter extends WebStatFilter {
16
17}

配置Druid监控视图(相当于ServletRegistrationBean)
DruidStatViewServlet.java

1package com.louis.kitty.boot.config;
2
3import javax.servlet.annotation.WebInitParam;
4import javax.servlet.annotation.WebServlet;
5import com.alibaba.druid.support.http.StatViewServlet;
6
7/**
8 * druid监控视图配置
9 */
10@WebServlet(urlPatterns = "/druid/*", initParams={
11    @WebInitParam(name="allow",value="192.168.6.195"),    // IP白名单 (没有配置或者为空,则允许所有访问)
12    @WebInitParam(name="deny",value="192.168.6.73"),    // IP黑名单 (存在共同时,deny优先于allow)
13    @WebInitParam(name="loginUsername",value="admin"),    // 用户名
14    @WebInitParam(name="loginPassword",value="admin"),    // 密码
15    @WebInitParam(name="resetEnable",value="true")    // 禁用HTML页面上的“Reset All”功能
16})
17public class DruidStatViewServlet extends StatViewServlet {
18    private static final long serialVersionUID = 7359758657306626394L;
19}

应用启动问题
到这里Druid的配置就完成了,但是此时启动应用,发现出错了,错误内容大致如下,提示 log4j 相关的类查找不到,然后查看依赖,发现确实没有 log4j 的依赖,有些奇怪,尝试了一下,也没发现其他办法,手动加一下吧。

1org.springframework.beans.factory.UnsatisfiedDependencyException: Error creating bean with name 'mybatisConfig': Unsatisfied dependency expressed through field 'dataSource'; nested exception is org.springframework.beans.factory.BeanCreationException: Error creating bean with name 'druidDataSource' defined in class path resource [com/louis/kitty/boot/config/DruidConfig.class]: Bean instantiation via factory method failed; nested exception is org.springframework.beans.BeanInstantiationException: Failed to instantiate [javax.sql.DataSource]: Factory method 'druidDataSource' threw exception; nested exception is java.lang.NoClassDefFoundError: org/apache/log4j/Priority
2    at org.springframework.beans.factory.annotation.AutowiredAnnotationBeanPostProcessor$AutowiredFieldElement.inject(AutowiredAnnotationBeanPostProcessor.java:586) ~[spring-beans-5.0.8.RELEASE.jar:5.0.8.RELEASE]
3    at org.springframework.beans.factory.annotation.InjectionMetadata.inject(InjectionMetadata.java:91) ~[spring-beans-5.0.8.RELEASE.jar:5.0.8.RELEASE]
4    at org.springframework.beans.factory.annotation.AutowiredAnnotationBeanPostProcessor.postProcessPropertyValues(AutowiredAnnotationBeanPostProcessor.java:372) ~[spring-beans-5.0.8.RELEASE.jar:5.0.8.RELEASE]
5    at org.springframework.beans.factory.support.AbstractAutowireCapableBeanFactory.populateBean(AbstractAutowireCapableBeanFactory.java:1341) ~[spring-beans-5.0.8.RELEASE.jar:5.0.8.RELEASE]
6    at org.springframework.beans.factory.support.AbstractAutowireCapableBeanFactory.doCreateBean(AbstractAutowireCapableBeanFactory.java:572) ~[spring-beans-5.0.8.RELEASE.jar:5.0.8.RELEASE]
7    at org.springframework.beans.factory.support.AbstractAutowireCapableBeanFactory.createBean(AbstractAutowireCapableBeanFactory.java:495) ~[spring-beans-5.0.8.RELEASE.jar:5.0.8.RELEASE]
8    at org.springframework.beans.factory.support.AbstractBeanFactory.lambda$doGetBean$0(AbstractBeanFactory.java:317) ~[spring-beans-5.0.8.RELEASE.jar:5.0.8.RELEASE]
9    at org.springframework.beans.factory.support.DefaultSingletonBeanRegistry.getSingleton(DefaultSingletonBeanRegistry.java:222) ~[spring-beans-5.0.8.RELEASE.jar:5.0.8.RELEASE]
10    at org.springframework.beans.factory.support.AbstractBeanFactory.doGetBean(AbstractBeanFactory.java:315) ~[spring-beans-5.0.8.RELEASE.jar:5.0.8.RELEASE]
11    at org.springframework.beans.factory.support.AbstractBeanFactory.getBean(AbstractBeanFactory.java:199) ~[spring-beans-5.0.8.RELEASE.jar:5.0.8.RELEASE]
12    at org.springframework.beans.factory.support.DefaultListableBeanFactory.preInstantiateSingletons(DefaultListableBeanFactory.java:759) ~[spring-beans-5.0.8.RELEASE.jar:5.0.8.RELEASE]
13    at org.springframework.context.support.AbstractApplicationContext.finishBeanFactoryInitialization(AbstractApplicationContext.java:869) ~[spring-context-5.0.8.RELEASE.jar:5.0.8.RELEASE]
14    at org.springframework.context.support.AbstractApplicationContext.refresh(AbstractApplicationContext.java:550) ~[spring-context-5.0.8.RELEASE.jar:5.0.8.RELEASE]
15    at org.springframework.boot.web.servlet.context.ServletWebServerApplicationContext.refresh(ServletWebServerApplicationContext.java:140) ~[spring-boot-2.0.4.RELEASE.jar:2.0.4.RELEASE]
16    at org.springframework.boot.SpringApplication.refresh(SpringApplication.java:762) [spring-boot-2.0.4.RELEASE.jar:2.0.4.RELEASE]
17    at org.springframework.boot.SpringApplication.refreshContext(SpringApplication.java:398) [spring-boot-2.0.4.RELEASE.jar:2.0.4.RELEASE]
18    at org.springframework.boot.SpringApplication.run(SpringApplication.java:330) [spring-boot-2.0.4.RELEASE.jar:2.0.4.RELEASE]
19    at org.springframework.boot.SpringApplication.run(SpringApplication.java:1258) [spring-boot-2.0.4.RELEASE.jar:2.0.4.RELEASE]
20    at org.springframework.boot.SpringApplication.run(SpringApplication.java:1246) [spring-boot-2.0.4.RELEASE.jar:2.0.4.RELEASE]
21    at com.louis.kitty.boot.KittyApplication.main(KittyApplication.java:10) [classes/:na]
...
Caused by: java.lang.ClassNotFoundException: org.apache.log4j.Priority
at java.net.URLClassLoader.findClass(URLClassLoader.java:381) ~[na:1.8.0_131]
at java.lang.ClassLoader.loadClass(ClassLoader.java:424) ~[na:1.8.0_131]
at sun.misc.Launcher$AppClassLoader.loadClass(Launcher.java:335) ~[na:1.8.0_131]
at java.lang.ClassLoader.loadClass(ClassLoader.java:357) ~[na:1.8.0_131]
... 49 common frames omitted

添加 log4j 依赖
pom.xml 添加 log4j 依赖,最新版本是 1.2.17。
1<!-- log4j -->
2<dependency>
3    <groupId>log4j</groupId>
4    <artifactId>log4j</artifactId>
5    <version>1.2.17</version>
6</dependency>
添加 log4j 配置
在 resources 目录下,新建一个 log4j.properties 参数配置文件,并键入如下内容:

1### set log levels ###
2log4j.rootLogger = INFO,DEBUG, console, infoFile, errorFile ,debugfile,mail
3LocationInfo=true
4
5log4j.appender.console = org.apache.log4j.ConsoleAppender
6log4j.appender.console.Target = System.out
7log4j.appender.console.layout = org.apache.log4j.PatternLayout
8
9log4j.appender.console.layout.ConversionPattern =[%d{yyyy-MM-dd HH:mm:ss,SSS}]-[%p]:%m   %x %n
10
11log4j.appender.infoFile = org.apache.log4j.DailyRollingFileAppender
12log4j.appender.infoFile.Threshold = INFO
13log4j.appender.infoFile.File = D:/logs/log
14log4j.appender.infoFile.DatePattern = '.'yyyy-MM-dd'.log'
15log4j.appender.infoFile.Append=true
16log4j.appender.infoFile.layout = org.apache.log4j.PatternLayout
17log4j.appender.infoFile.layout.ConversionPattern =[%d{yyyy-MM-dd HH:mm:ss,SSS}]-[%p]:%m  %x %n
18
19log4j.appender.errorFile = org.apache.log4j.DailyRollingFileAppender
20log4j.appender.errorFile.Threshold = ERROR
21log4j.appender.errorFile.File = D:/logs/error
22log4j.appender.errorFile.DatePattern = '.'yyyy-MM-dd'.log'
23log4j.appender.errorFile.Append=true
24log4j.appender.errorFile.layout = org.apache.log4j.PatternLayout
25log4j.appender.errorFile.layout.ConversionPattern =[%d{yyyy-MM-dd HH:mm:ss,SSS}]-[%p]:%m  %x %n
26
27#log4j.appender.debugfile = org.apache.log4j.DailyRollingFileAppender
28#log4j.appender.debugfile.Threshold = DEBUG
29#log4j.appender.debugfile.File = D:/logs/debug
30#log4j.appender.debugfile.DatePattern = '.'yyyy-MM-dd'.log'
31#log4j.appender.debugfile.Append=true
32#log4j.appender.debugfile.layout = org.apache.log4j.PatternLayout
33#log4j.appender.debugfile.layout.ConversionPattern =[%d{yyyy-MM-dd HH:mm:ss,SSS}]-[%p]:%m  %x %n

配置完成后,重新编译启动,发现已经可以启动了。按理说,Spring Boot 已经集成了 log4j, 这个问题出现的有点奇怪,有知道答案的朋友,欢迎赐教,感激不尽。
查看监控视图
登录界面
启动应用,访问: http://localhost:8080/druid/login.html, 进入Druid监控后台页面。
注意:登录用户名和密码,就是在DruidConfig配置类中配置的,查看并进行登录。
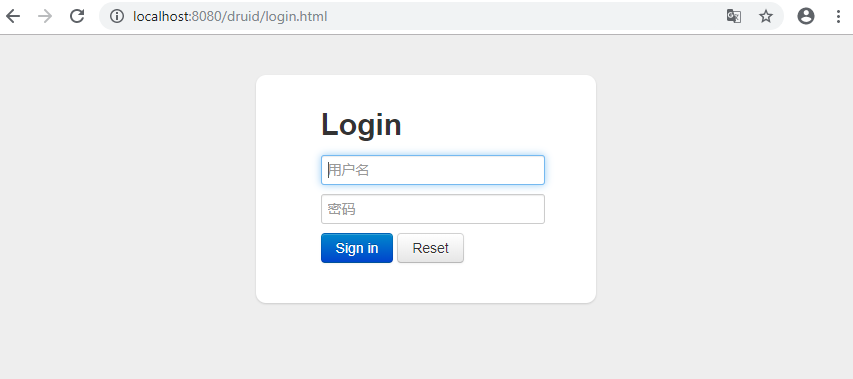
登录首页
首页信息。
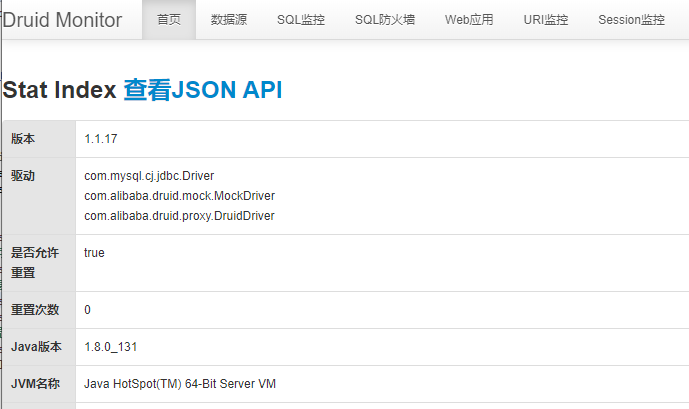
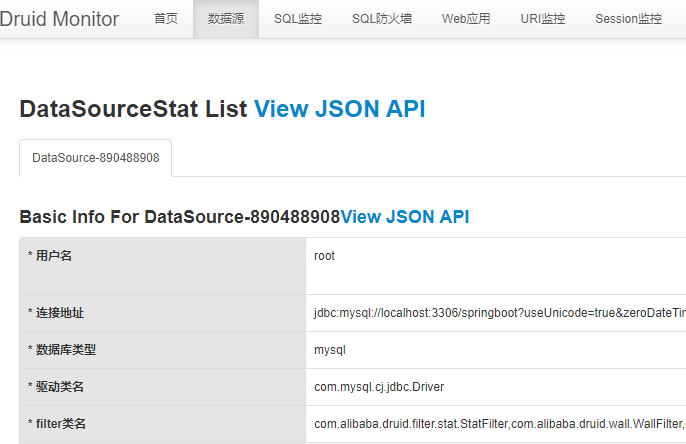
数据源
显示连接数据源的相关信息。
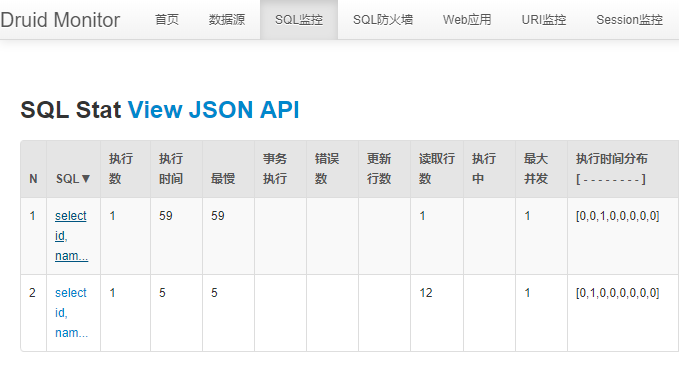
SQL监控
分别访问下面两个接口之后,SQL监控的记录结果。
http://localhost:8080/user/findByUserId?userId=1
http://localhost:8080/user/findAll
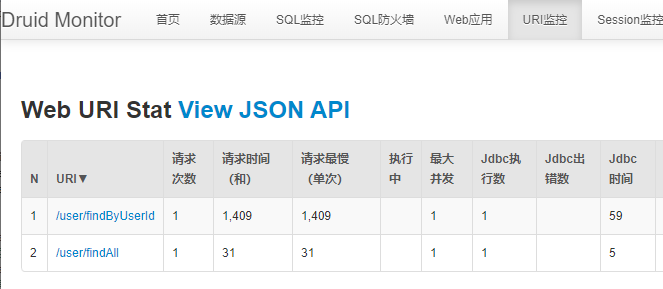
URI监控
分别访问下面两个接口之后,URI监控的记录结果。
http://localhost:8080/user/findByUserId?userId=1
http://localhost:8080/user/findAll
胡言乱语
要想数据库性能好,数据库调优少不了。
服务器配置需要弄,SQL调优也得搞。
要问数据源哪家好,阿里DRUID准没跑。
SQL监控做得好,语句调优没烦恼。
参考资料
官方网站:https://druid.apache.org/