
VUE学习总结
VUE基本语法
VUE是基于ES6进行开发的。
VUE安装
1、安装node.js
node.js下载地址:https://nodejs.org/en/download
下载好后,点击安装,一直下一步即可。安装成功后在控制台通过下面命令如果出现版本号,则安装成功。
1node -v          #查看vue版本号
2npm -v           #查看npm版本
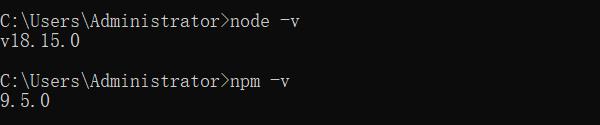
npm就是一个软件报的管理工具,和linux下的apt软件安装一样。
安装Node.js淘宝镜像加速器(cnpm)
使用cnpm下载镜像会比npm快很多,cnpm是国内镜像。虽然使用cnpm会下载快,但是尽量少用。
1#安装cnpm镜像    -g:全局安装
2npm install cnpm -g
3# 或者使用下面语句解决,npm速度慢的问题
4npm install --registry=https://registry.npm.taobao.org
5#查看cnpm镜像源
6cnpm config get registry
7#查看cnpm版本
8cnpm -v
安装cnpm成功后,使用cnpm -v 和cnpm config get registry命令。

2、vue-cli
**概念:**vue-cli是vue官方提供的一个脚手架,用于快速生成一个vue的项目模板。
预先定义好的目录结构及基础代码,就好比我们在创建Maven项目时可以选择一个骨架项目,这个骨架项目就是脚手架,便利于我们开发。
官方文档地址:https://cli.vuejs.org/zh/guide/#cli
参考狂神笔记:https://www.kuangstudy.com/bbs/1355379516364627970
主要功能:
- 统一的目录结构
- 本地调试
- 热部署
- 单元测试
- 集成打包上线
安装背景:
安装node.js环境,安装cnpm淘宝镜像命令
安装vue-cli
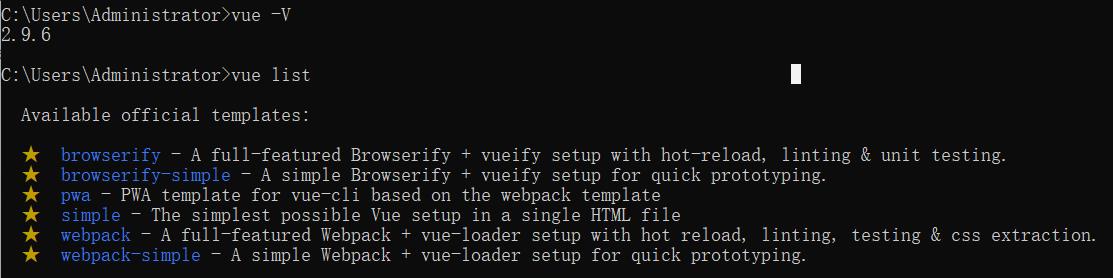
1sudo npm install vue-cli -g              #安装vue-cli
2vue list                             #得到官方推荐的模板
3vue -V                               #查看vue版本
安装vue-cli成功后,通过vue-v和vue list可以查看版本和支持模板信息
创建vue项目
1vue init webpack myvue             #创建一个webpack模板的myvue前端工程
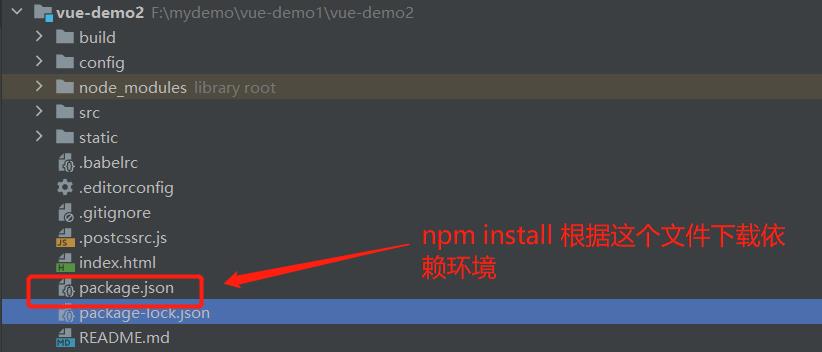
2npm install                        #进入myvue项目目录下,执行npm install安装依赖环境
3npm install --legacy-peer-deps     #如果npm install报错使用该命令代替
4npm run dev                        #启动项目
npm install是根据package.json文件下载依赖环境,npm install安装成功后项目会多一个node_modules目录
npm run dev启动项目
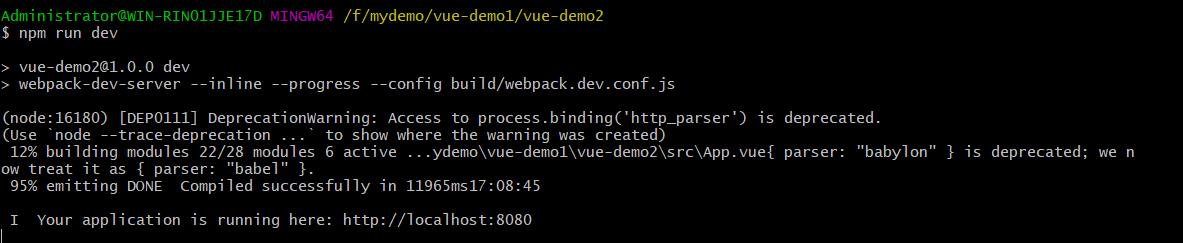
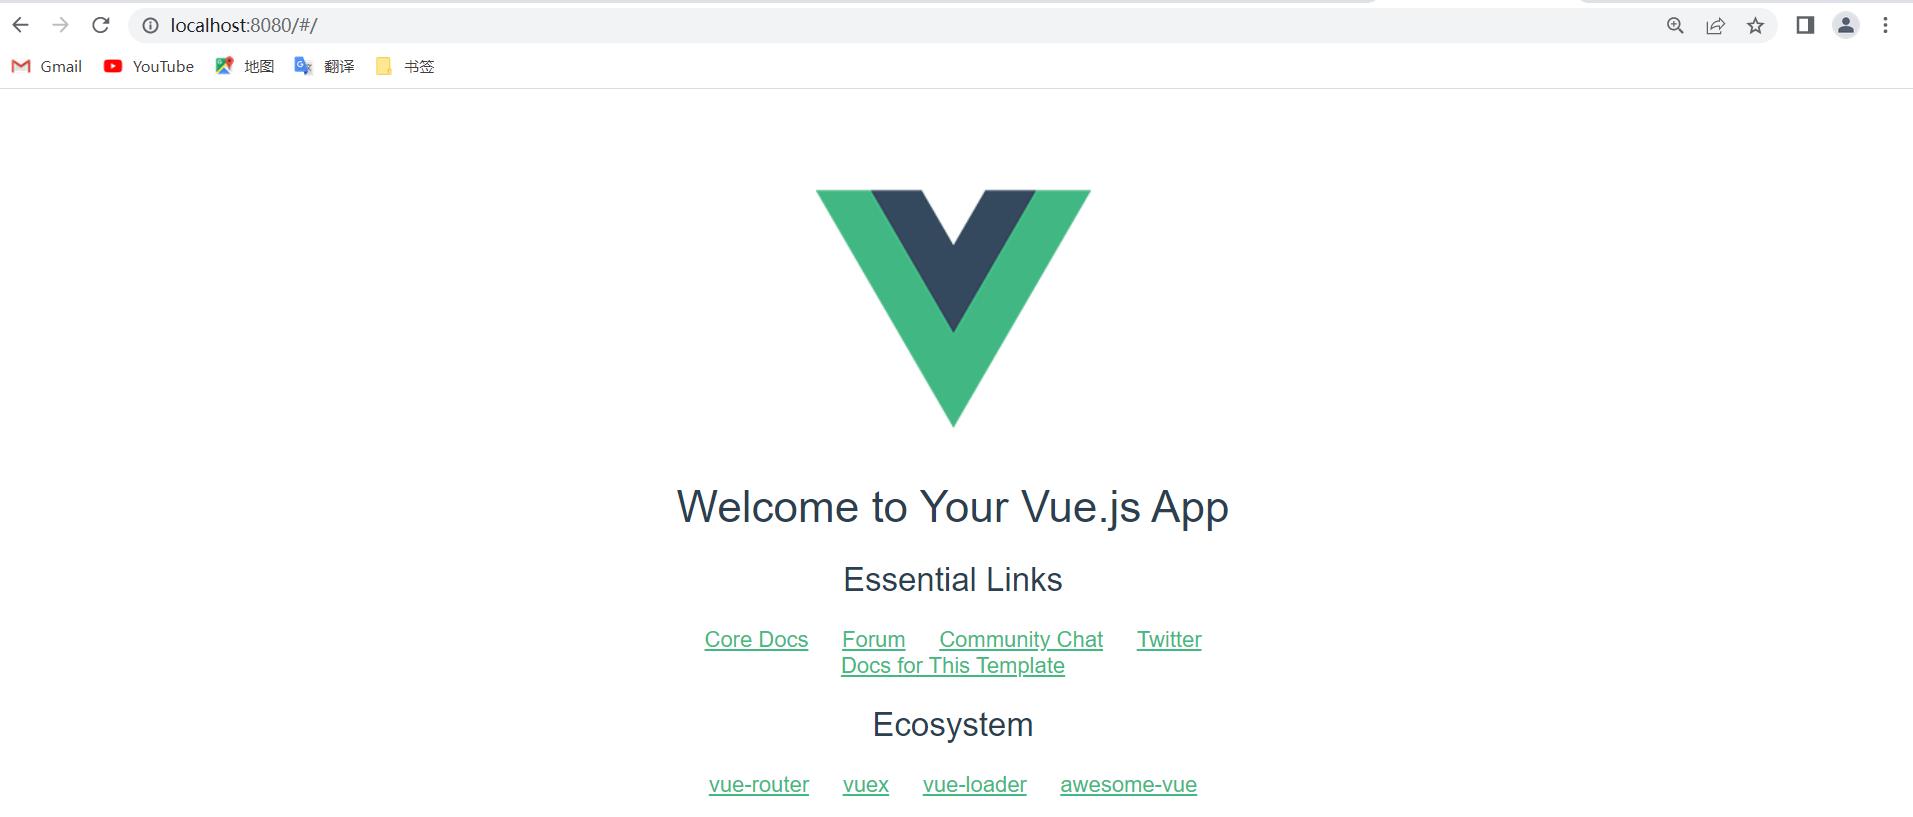
启动项目后通过http://localhost:8080可以访问主页
3、webpack
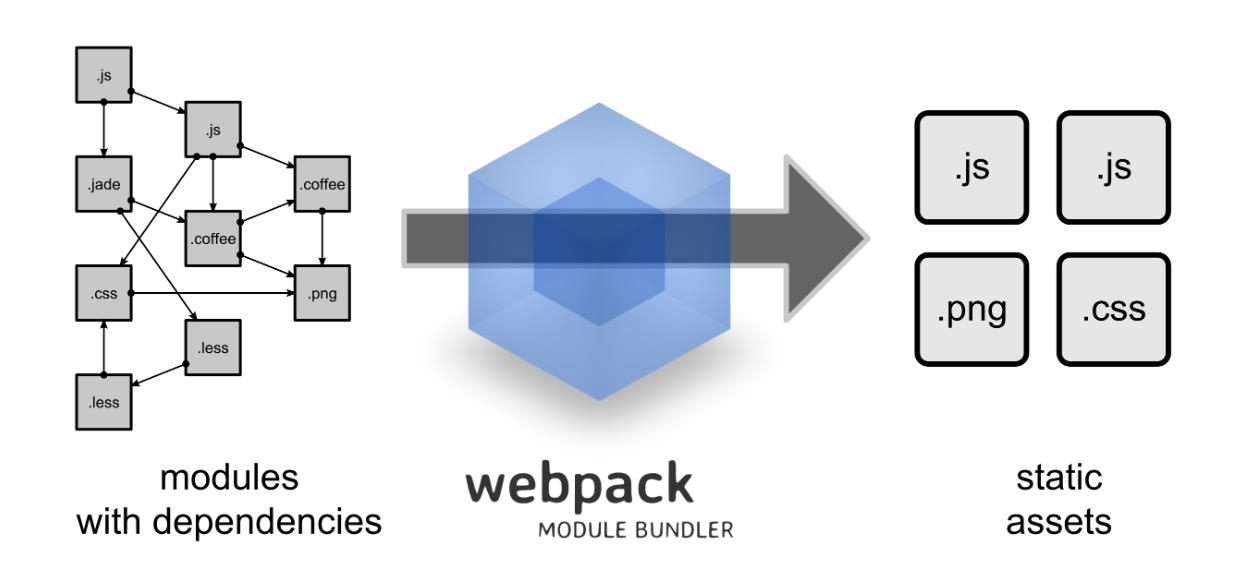
webpack作用是将js、css、less和sass这类静态资源打包成静态文件,减少前端页面转换。简单来说就是将前端多个静态资源,根据规则生成一个静态资源。
**webpack官网:**https://webpack.docschina.org/
webpack安装:
1npm install webpack -g                    #全局安装webpack
2npm install webpack-cli -g                #全局安装webpack-cli
3npm install -g webpack webpack-cli        #全局安装webpack和webpack-cli,如果npm下载不了,使用cnpm
4npm install -d webpack webpack-cli        #局部安装webpack和webpack-cli,如果npm下载不了,使用cnpm
5webpack -v                                #查看webpack版本
6#webpack-cli是webpack的依赖,要使用webpack打包必须安装webpack-cli
使用webpack打包简单案例:
-
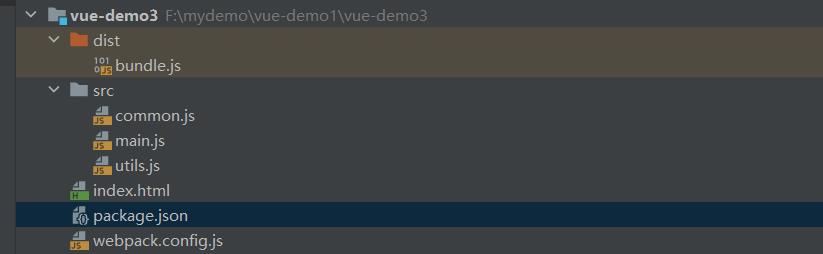
1、创建vue-demo3目录,通过npm init -y将目录转换为一个前端项目,此时目录中会生成一个package.json文件。
-
2、后续我们在vue-demo3项目下创建src目录,并且创建main.js、utils.js和common.js文件,其中main.js是入口文件。
main.js文件:
1//将所有的js文件进行引入到一个文件中
2const common = require('./common');
3const utils = require('./utils');
4utils.info('Welcome LiuJun go to Hello world!');
5common.info('Hello world!' + utils.add(100, 200));
utils.js文件:
1exports.info = function (str) {
2    //往浏览器输出
3    document.write(str);
4}
common.js文件:
1exports.add = function (a, b) {
2    return a + b;
3}
- 3、创建webpack打包配置文件webpack.config.js文件
webpack.config.js文件:
1const path = require("path"); //Node.js内置模块
2module.exports = {
3    devServer: {
4        open: true,
5        host: '127.0.0.1',
6        port: 8888,
7        //设置devServer开发服务器静态资源目录
8        //默认为项目的根目录(与package.json同路径)
9        contentBase: path.join(__dirname, './')
10    },
11    entry: './src/main.js', //配置入口文件
12    output: {
13        path: path.resolve(__dirname, './dist'), //输出路径,__dirname:当前文件所在路径
14        filename: 'bundle.js' //输出文件
15    }
16}
17//执行webpack时会找到这个文件,然后根据entry找到main.js从而将需要的文件进行打包
18//合并完成后,写入到dist目录下的bundle.js文件
-
4、此时我们在控制台输入webpack或者webpack --mode=development命令即可打包,打包后会生成bundle.js压缩文件,这个就是打包后的文件。
-
5、在根目录创建index.html文件,index.html中引入bundle.js资源,即可访问项目所有资源。
-
6、可以直接使用npm run build命令直接打包(不需要4和5步骤)。
案例项目结构如下图:
4、vue-router
vue-router是vue官方指定的路由,通过vue-router可以进行前端项目的页面跳转。
vue-router官方中文文档:https://router.vuejs.org/zh/
vue-router安装:
1npm install vue-router@4          #指定版本安装vue-router
2npm install vue-router            #默认版本安装vue-router
3npm uninstall vue-router          #卸载vue-router
vue-router实现案例:
- 1、新建组件文件
Hello.vue文件:
1<template>
2  <div>
3    <h1>Hello World</h1>
4  </div>
5</template>
6
7<script>
8export default {
9  name: 'Hello'
10}
11</script>
12
13<style scoped>
14
15</style>
main.vue文件:
1<template>
2  <div>
3    <h1>首页</h1>
4  </div>
5</template>
6
7<script>
8export default {
9  name: 'Main'
10}
11</script>
12
13<style scoped>
14
15</style>
HelloWorld.vue文件:
1<template>
2  <div class="hello">
3    <h1>{{ msg }}</h1>
4    <h2>Essential Links</h2>
5    <ul>
6      <li>
7        <a
8          href="https://vuejs.org"
9          target="_blank"
10        >
11          Core Docs
12        </a>
13      </li>
14      <li>
15        <a
16          href="https://forum.vuejs.org"
17          target="_blank"
18        >
19          Forum
20        </a>
21      </li>
22      <li>
23        <a
24          href="https://chat.vuejs.org"
25          target="_blank"
26        >
27          Community Chat
28        </a>
29      </li>
30      <li>
31        <a
32          href="https://twitter.com/vuejs"
33          target="_blank"
34        >
35          Twitter
36        </a>
37      </li>
38      <br>
39      <li>
40        <a
41          href="http://vuejs-templates.github.io/webpack/"
42          target="_blank"
43        >
44          Docs for This Template
45        </a>
46      </li>
47    </ul>
48    <h2>Ecosystem</h2>
49    <ul>
50      <li>
51        <a
52          href="http://router.vuejs.org/"
53          target="_blank"
54        >
55          vue-router
56        </a>
57      </li>
58      <li>
59        <a
60          href="http://vuex.vuejs.org/"
61          target="_blank"
62        >
63          vuex
64        </a>
65      </li>
66      <li>
67        <a
68          href="http://vue-loader.vuejs.org/"
69          target="_blank"
70        >
71          vue-loader
72        </a>
73      </li>
74      <li>
75        <a
76          href="https://github.com/vuejs/awesome-vue"
77          target="_blank"
78        >
79          awesome-vue
80        </a>
81      </li>
82    </ul>
83  </div>
84</template>
85
86<script>
87export default {
88  name: 'HelloWorld',
89  data () {
90    return {
91      msg: 'Welcome to Your Vue.js App'
92    }
93  }
94}
95</script>
96
97<!-- Add "scoped" attribute to limit CSS to this component only -->
98<style scoped>
99h1, h2 {
100  font-weight: normal;
101}
102ul {
103  list-style-type: none;
104  padding: 0;
105}
106li {
107  display: inline-block;
108  margin: 0 10px;
109}
110a {
111  color: #42b983;
112}
113</style>
- 2、工程主入口main.js和App.vue文件
App.vue文件:
1<template>
2  <div id="app">
3    <img src="./assets/logo.png">
4    <router-link to="Main">首页</router-link>
5    <router-link to="Hello">Hello页</router-link>
6    <router-view/>
7  </div>
8</template>
9
10<script>
11export default {
12  name: 'App'
13}
14</script>
15
16<style>
17#app {
18  font-family: 'Avenir', Helvetica, Arial, sans-serif;
19  -webkit-font-smoothing: antialiased;
20  -moz-osx-font-smoothing: grayscale;
21  text-align: center;
22  color: #2c3e50;
23  margin-top: 60px;
24}
25</style>
main.js文件:
1// The Vue build version to load with the `import` command
2// (runtime-only or standalone) has been set in webpack.base.conf with an alias.
3import Vue from 'vue'
4import App from './App'
5import router from './router'
6
7Vue.config.productionTip = false
8
9/* eslint-disable no-new */
10new Vue({
11  el: '#app',
12  router,
13  components: { App },
14  template: '<App/>'
15})
- 3、添加路由文件index.js
index.js文件:
1import Vue from 'vue'
2import Router from 'vue-router'
3import HelloWorld from '../components/HelloWorld'
4import Hello from '../components/Hello'
5import Main from '../components/Main'
6
7Vue.use(Router)
8
9export default new Router({
10  routes: [
11    {
12      path: '/',
13      component: HelloWorld
14    },
15    {
16      path: '/Hello',
17      name: 'hello',
18      component: Hello
19    },
20    {
21      path: '/Main',
22      name: 'main',
23      component: Main
24    }
25  ]
26})
项目目录结构:
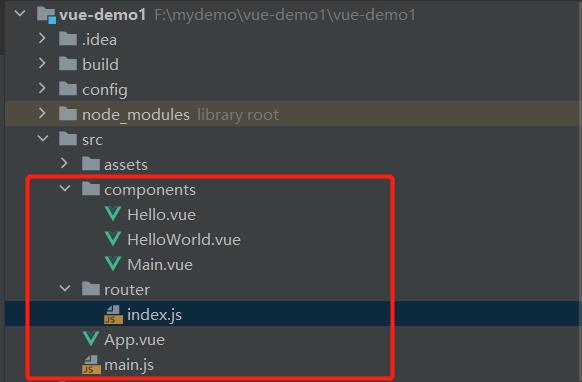
已验证过通过vue-router实现路由Hello.vue和Main.vue组件
5、Element UI
中文官方文档:https://element.eleme.cn/#/zh-CN/
Element,一套为开发者、设计师和产品经理准备的基于 Vue 2.0 的桌面端组件库
Element安装:
1npm i element-ui -S #安装element-ui
安装,导入方式使用:
在main.js文件中导入element,后续vue文件就可以使用element UI
1//导入element
2import Element from 'element-ui'
3import 'element-ui/lib/theme-chalk/index.css';//使用
4Vue.use(Element);
不安装,引用的方式使用:
1<!-- 引入样式 -->
2<link rel="stylesheet" href="https://unpkg.com/element-ui/lib/theme-chalk/index.css">
3<!-- 引入组件库 -->
4<script src="https://unpkg.com/element-ui/lib/index.js"></script>
6、vue-axios
中文官方文档:http://axios-js.com/zh-cn/docs/
Axios 是一个基于 promise 的 HTTP 库,可以用在浏览器和 node.js 中。可以整合vue-axios,nuxtjs-axios,react-axios框架。
axios安装
1#安装axios
2npm install axios
3#通过引用的方式使用
4<script src="https://unpkg.com/axios/dist/axios.min.js"></script>
axios使用
1    //导入axios
2    import axios from "axios";
3
4    //接口函数传入id,返回的文件流
5    axios({
6      method: 'post',
7      url: 'http://localhost:3144/ctryj/home/getMessage',
8      headers: {
9        'Content-Type': 'application/json; charset=utf-8'
10      },
11      data: {
12        firstName: 'Fred',
13        lastName: 'Flintstone'
14      }
15    }).then((res)=>{
16       //接口响应正常处理
17    }).catch((res)=>{
18       //接口异常处理
19    })
封装axios
1、创建request.js文件,内容如下:
1/****   request.js   ****/
2// 导入axios
3import axios from 'axios'
4axios.defaults.withCredentials = true;
5// 使用element-ui Message做消息提醒
6import { Message} from 'element-ui';
7import { Loading} from 'element-ui';
8
9/**
10 * 模拟一个出入栈
11 */
12let loadingInstance = null; // 记录页面中存在的loading
13let loadingCount = 0; // 记录当前正在请求的数量
14
15function showLoading(data) {
16  if (loadingCount === 0) {
17    loadingInstance = Loading.service({
18      lock: true,
19      text: data || '正在加载……'
20    });
21  }
22  loadingCount++
23};
24
25function hideLoading() {
26  loadingCount--
27  if (loadingInstance && loadingCount === 0) {
28    loadingInstance.close()
29    loadingInstance = null
30  }
31}
32
33function getCookie(name) {
34  let arr,reg=new RegExp("(^| )"+name+"=([^;]*)(;|$)");
35  if(arr=document.cookie.match(reg))
36    return unescape(arr[2]);
37  else
38    return null;
39}
40
41//1. 创建新的axios实例,
42const service = axios.create({
43  // 公共接口--这里注意后面会讲
44  baseURL: 'http://localhost:3144/ctryj/',
45  // 超时时间 单位是ms,这里设置了3s的超时时间
46  timeout: 20 * 1000
47});
48// 2.请求拦截器
49service.interceptors.request.use(config => {
50  //使用element-ui做加载
51  if (!config.loadingHide) {//有的请求隐藏loading
52    showLoading();
53  }
54  //发请求前做的一些处理,数据转化,配置请求头,设置token,设置loading等,根据需求去添加
55  config.data = JSON.stringify(config.data); //数据转化,也可以使用qs转换
56  config.headers = {
57    'Content-Type': 'application/json; charset=utf-8', //配置请求头
58  };
59  /*config.responseType = 'blob';*/
60  //如有需要:注意使用token的时候需要引入cookie方法或者用本地localStorage等方法,推荐js-cookie
61  /*const token = getCookie("Jsession");  //这里取token之前,你肯定需要先拿到token,存一下
62  if(token){
63    config.params = {'token':token} //如果要求携带在参数中
64    config.headers.token= token; //如果要求携带在请求头中
65  }*/
66  return config
67}, error => {
68  Promise.reject(error);
69})
70
71// 3.响应拦截器
72service.interceptors.response.use(response => {
73  //接收到响应数据并成功后的一些共有的处理,关闭loading等
74  hideLoading();
75  let res = response.data;
76  // 如果是返回文件
77  if (response.config.responseType === 'blob') {
78    return res;
79  }
80  // 兼容服务器返回的字符串数据
81  if (typeof res === 'string') {
82    res = res?JSON.parse(res) : res
83  }
84
85  return res;
86}, error => {
87  /***** 接收到异常响应的处理开始 *****/
88  if (error && error.response) {
89    // 1.公共错误处理
90    // 2.根据响应码具体处理
91    switch (error.response.status) {
92      case 400:
93        error.message = '错误请求'
94        break;
95      case 401:
96        error.message = '未授权,请重新登录'
97        break;
98      case 403:
99        error.message = '拒绝访问'
100        break;
101      case 404:
102        error.message = '请求错误,未找到该资源'
103        //window.location.href = "/NotFound"
104        break;
105      case 405:
106        error.message = '请求方法未允许'
107        break;
108      case 408:
109        error.message = '请求超时'
110        break;
111      case 500:
112        error.message = '服务器端出错'
113        break;
114      case 501:
115        error.message = '网络未实现'
116        break;
117      case 502:
118        error.message = '网络错误'
119        break;
120      case 503:
121        error.message = '服务不可用'
122        break;
123      case 504:
124        error.message = '网络超时'
125        break;
126      case 505:
127        error.message = 'http版本不支持该请求'
128        break;
129      default:
130        error.message = `连接错误${error.response.status}`
131    }
132  } else {
133    // 超时处理
134    if (JSON.stringify(error).includes('timeout')) {
135      Message.error('服务器响应超时,请刷新当前页')
136    }
137    error.message = '连接服务器失败'
138  }
139  //关闭加载
140  hideLoading();
141
142  Message.error(error.message)
143  /***** 处理结束 *****/
144  //如果不需要错误处理,以上的处理过程都可省略
145  return Promise.resolve(error.response)
146})
147//4.导入文件
148export default service
2、使用封装组件
1import service from "../utils/request";           //引入组件
2
3//方法中使用组件
4methods:{
5  noteList(){
6    let data = {"userid":"c_liujun"};
7    service.post("note/queryNoteList",data).then((res)=>{
8      this.notes = res.data;
9    })
10  }
11}
7、vue-pdf
**概念:**vue-pdf是Vue的一个包,它使您能够通过Vue组件轻松地显示和查看pdf。
vue-pdf安装:
1npm install vue-pdf                       #安装VUE-PDF组件
2npm install vue-pdf --legacy-peer-deps    #如果安装报错,使用该命令
vue-pdf使用:
1、引入插件
1import pdf from "vue-pdf"; #引入vue-pdf插件
2、定义组件
1export default {
2  name: "Pdf",
3  components: {
4    pdf,                                  #定义pdf组件
5  },
6  ....
3、使用组件
1 #使用<pdf>组件
2 <div class="pdfArea">
3     # <!-- // 不要改动这里的方法和属性,下次用到复制就直接可以用 -->
4      <pdf
5        :src="src"
6        ref="pdf"
7        v-show="loadedRatio === 1"
8        :page="currentPage"
9        @num-pages="pageCount = $event"
10        @progress="loadedRatio = $event"
11        @page-loaded="currentPage = $event"
12        @loaded="loadPdfHandler"
13        @link-clicked="currentPage = $event"
14        style="display: inline-block; width: 100%"
15        id="pdfID"
16      ></pdf>
17 </div>
封装pdf-vue插件:
创建Pdf.vue文件,内容如下:
1<template>
2  <div id="container">
3    <!-- 上一页、下一页 -->
4    <div class="right-btn">
5      <!-- 输入页码 -->
6      <div class="pageNum">
7        <input
8          v-model.number="currentPage"
9          type="number"
10          class="inputNumber"
11          @input="inputEvent()"
12        />
13        / {{ pageCount }}
14      </div>
15      <div @click="changePdfPage('first')" class="turn">首页</div>
16      <!-- 在按钮不符合条件时禁用 -->
17      <div
18        @click="changePdfPage('pre')"
19        class="turn-btn"
20        :style="currentPage === 1 ? 'cursor: not-allowed;' : ''"
21      >
22        上一页
23      </div>
24      <div
25        @click="changePdfPage('next')"
26        class="turn-btn"
27        :style="currentPage === pageCount ? 'cursor: not-allowed;' : ''"
28      >
29        下一页
30      </div>
31      <div @click="changePdfPage('last')" class="turn">尾页</div>
32    </div>
33
34    <div class="pdfArea">
35      <!-- // 不要改动这里的方法和属性,下次用到复制就直接可以用 -->
36      <pdf
37        :src="src"
38        ref="pdf"
39        v-show="loadedRatio === 1"
40        :page="currentPage"
41        @num-pages="pageCount = $event"
42        @progress="loadedRatio = $event"
43        @page-loaded="currentPage = $event"
44        @loaded="loadPdfHandler"
45        @link-clicked="currentPage = $event"
46        style="display: inline-block; width: 100%"
47        id="pdfID"
48      ></pdf>
49    </div>
50    <!-- 加载未完成时,展示进度条组件并计算进度 -->
51    <div class="progress" v-if="loadedRatio != 1">
52      <el-progress
53        type="circle"
54        :width="70"
55        color="#53a7ff"
56        :percentage="Math.floor(loadedRatio * 100) ? Math.floor(loadedRatio * 100) : 0"
57      ></el-progress>
58      <br />
59      <!-- 加载提示语 -->
60      <span>{{ remindShow }}</span>
61    </div>
62  </div>
63</template>
64
65<script>
66import pdf from "vue-pdf";
67import service from "../utils/request";
68
69export default {
70  name: "Pdf",
71  components: {
72    pdf,
73  },
74  data() {
75    return {
76      // ----- loading -----
77      remindText: {
78        loading: "加载文件中,文件较大请耐心等待...",
79        refresh: "若卡住不动,可刷新页面重新加载...",
80      },
81      remindShow: "加载文件中,文件较大请耐心等待...",
82      intervalID: "",
83
84      src: "",
85      data : {
86        fileId : "",
87        fileType : "pdf"
88      },
89      // 当前页数
90      currentPage: 0,
91      // 总页数
92      pageCount: 0,
93      // 加载进度
94      loadedRatio: 0,
95    };
96  },
97
98  created() {
99    this.data.fileId = this.$route.query.fileId;
100    this.data.fileType = this.$route.query.fileType;
101    this.viewFile(this.data);
102  },
103  mounted() {
104    // // 更改 loading 文字
105    this.intervalID = setInterval(() => {
106      this.remindShow === this.remindText.refresh
107        ? (this.remindShow = this.remindText.loading)
108        : (this.remindShow = this.remindText.refresh);
109    }, 4000);
110  },
111  methods: {
112    //查看源文件
113    viewFile(data){
114      if((data.fileType).indexOf('docx') !== -1){
115        //Todo:这里代码是docx文件预览,此处省略
116
117      }else {
118        this.loading = this.$loading({
119          lock: true,
120          text: "正在加载...",
121          spinner: 'el-icon-loading',
122          background: 'rgba(0, 0, 0, 0.6)'
123        });
124        //接口函数传入id,返回的文件流
125        let config = {responseType: 'blob'};
126        service.post("home/getPdf", data, config).then((res) => {
127          let data = res;
128          let binaryData = [];
129          binaryData.push(data);
130          const blob = new Blob(binaryData, {type: 'application/pdf'});
131          let url = window.URL.createObjectURL(blob);
132          console.log(url);
133          if (url != null && url != undefined && url) {
134            //页面加载,拿到路由中的url复制给data中的src
135            this.src = url;
136            this.loading.close()
137          }
138        })
139      }
140    },
141    // 页面回到顶部
142    toTop() {
143      document.getElementById("container").scrollTop = 0;
144    },
145    // 输入页码时校验
146    inputEvent() {
147      if (this.currentPage > this.pageCount) {
148        // 1. 大于max
149        this.currentPage = this.pageCount;
150      } else if (this.currentPage < 1) {
151        // 2. 小于min
152        this.currentPage = 1;
153      }
154    },
155    // 切换页数
156    changePdfPage(val) {
157      if (val === "pre" && this.currentPage > 1) {
158        // 切换后页面回到顶部
159        this.currentPage--;
160        this.toTop();
161      } else if (val === "next" && this.currentPage < this.pageCount) {
162        this.currentPage++;
163        this.toTop();
164      } else if (val === "first") {
165        this.currentPage = 1;
166        this.toTop();
167      } else if (val === "last" && this.currentPage < this.pageCount) {
168        this.currentPage = this.pageCount;
169        this.toTop();
170      }
171    },
172
173    // pdf加载时
174    loadPdfHandler(e) {
175      // 加载的时候先加载第一页
176      this.currentPage = 1;
177    },
178  },
179  destroyed() {
180    // 在页面销毁时记得清空 setInterval
181    clearInterval(this.intervalID);
182  },
183};
184</script>
185
186<style scoped>
187#container {
188  background: #f4f7fd;
189  /*overflow: auto;*/
190  font-family: PingFang SC;
191  width: 100%;
192  display: flex;
193  justify-content: center;
194  position: relative;
195}
196
197/* 右侧功能按钮区 */
198.right-btn {
199  position: fixed;
200  right: 5%;
201  bottom: 15%;
202  width: 120px;
203  display: flex;
204  flex-wrap: wrap;
205  justify-content: center;
206  z-index: 99;
207}
208
209.pdfArea {
210  width: 900px;
211  margin: 0 auto;
212}
213
214/* ------------------- 输入页码 ------------------- */
215.pageNum {
216  margin: 10px 0;
217  font-size: 18px;
218}
219
220/*在谷歌下移除input[number]的上下箭头*/
221input::-webkit-outer-spin-button,
222input::-webkit-inner-spin-button {
223  -webkit-appearance: none !important;
224  margin: 0;
225}
226
227/*在firefox下移除input[number]的上下箭头*/
228input[type="number"] {
229  -moz-appearance: textfield;
230}
231
232.inputNumber {
233  border-radius: 8px;
234  border: 1px solid #999999;
235  height: 35px;
236  font-size: 18px;
237  width: 60px;
238  text-align: center;
239}
240
241.inputNumber:focus {
242  border: 1px solid #00aeff;
243  background-color: rgba(18, 163, 230, 0.096);
244  outline: none;
245  transition: 0.2s;
246}
247
248/* ------------------- 切换页码 ------------------- */
249.turn {
250  background-color: #164fcc;
251  opacity: 0.9;
252  color: #ffffff;
253  height: 70px;
254  width: 70px;
255  border-radius: 50%;
256  display: flex;
257  align-items: center;
258  justify-content: center;
259  margin: 5px 0;
260}
261
262.turn-btn {
263  background-color: #164fcc;
264  opacity: 0.9;
265  color: #ffffff;
266  height: 70px;
267  width: 70px;
268  border-radius: 50%;
269  margin: 5px 0;
270  display: flex;
271  align-items: center;
272  justify-content: center;
273}
274
275.turn-btn:hover,
276.turn:hover {
277  transition: 0.3s;
278  opacity: 0.5;
279  cursor: pointer;
280}
281
282/* ------------------- 进度条 ------------------- */
283.progress {
284  position: absolute;
285  right: 50%;
286  top: 50%;
287  text-align: center;
288}
289
290.progress > span {
291  color: #199edb;
292  font-size: 14px;
293}
294</style>
使用封装组件:
1  methods: {
2    viewFile() {
3      this.$router.push({
4        path:'/main/pdf',
5        //要传的参数
6        query: {
7          fileId : this.fileId,
8          fileType : 'pdf',
9        }
10      })
11    }
12  }
8、vue-iframe
vue-iframe安装
1npm install vue-iframe                       #安装vue-iframe
2npm install vue-iframe --legacy-peer-deps    #如果上面安装失败,使用该命令
3
9、vue-video-player
vue-video-player安装
1npm install --save vue-video-player@4.0.6                      #安装vue-video-player
2npm install --save vue-video-player@4.0.6 --legacy-peer-deps   #如果上面安装失败,使用该命令
VUE特殊功能实现
1、控制网页按比例缩放
在vue中控制页面按比例缩放,代码实现如下:
js内容:
1export default {
2  data(){
3      return{
4        // 缩放比
5        screenRatio: Math.round((window.outerWidth / window.innerWidth) * 100),
6      }
7    }
8    watch: {
9      screenRatio: {
10        immediate: true, // 开启一直监听
11        handler: function(val) { // val是获取到的缩放比
12          if (val < 125) { // 不同缩放比下进行不同的操作
13            document.querySelector("#content").classList.add("small");
14          } else {
15            document.querySelector("#content").classList.remove("small");
16          }
17        },
18      },
19    },
20    mounted() {
21      window.onresize = () => { // 不使用window.onresize只能监听一次,使用可以一直监听
22        return (() => {
23          window.screenRatio = Math.round( (window.outerWidth / window.innerWidth) * 100 );
24          this.screenRatio = window.screenRatio;
25        })();
26      };
27    },
28 }
css内容:
1<style>
2  .el-icon-body{
3    margin-top: -15px;
4    display: flex;
5    flex-direction: column;
6    justify-content: center;
7    width: 96rem;
8    height: 54rem;
9   }
10  .small {
11    position: absolute;
12    top:0%;
13    left: 50%;
14    transform: translate(-50%, -0%);
15  }
16</style>
html内容:
1<template>
2  <div class="el-icon-body small">
3     /**
4      * Todo:页面内容
5      */
6  </div>
7</template>
2、通过事件总线,组件A控制组件B页面赋值和刷新
如果A和B组件非父子组件,A与B组件中的通信就需要使用的事件总线。
1、创建event-bus.js文件
1import Vue from 'vue';
2const EventBus = new Vue();
3export default EventBus;
2、在B组件中定义监听事件,
1import EventBus from "../../utils/event-bus";
2
3// 在组件B中监听组件A触发的自定义事件 'refresh-video'
4  mounted() {
5    EventBus.$on('refresh-video', (url) => {
6      this.refreshPage(url);
7    })
8  },
9  methods:{
10    refreshPage(url) {
11      // 在这里进行组件B的刷新操作
12      // 例如:重新获取数据、重置状态等
13      this.playerOptions.sources[0].src=url;
14    }
15  }
3、在A组件中设置触发事件
1<template>
2   <div @click="playerVideo"></div>
3</template>
4
5<script>
6  import EventBus from "../../utils/event-bus";
7
8  export default {
9    methods:{
10      playerVideo(){
11        // 触发自定义事件 'refresh-video'
12        EventBus.$emit('refresh-video',
13  "https://stream7.iqilu.com/10339/upload_transcode/202002/18/20200218114723HDu3hhxqIT.mp4");
14      }
15    }
16  }
17</script>