
前言:上一篇:django-allauth(一)小试牛刀 介绍了django-allauth的安装及基本使用(如用户的注册,登录,邮箱验证和密码重置),然而allauth并没有提供展示和修改用户资料的功能,也没有对用户资料进行扩展。那么本篇就来介绍如何拓展用户个人资料和修改个人资料。一个在用户登录后跳转到个人信息页面(/accounts/profile/),一个允许登录用户编辑个人资料/accounts/profile/update/)。
1.创建一个APP,叫做myaccount
这里教大家一个便捷使用 python manage.py shell 的方法。 首先打开manage.py文件,然后在pycharm中找到菜单栏的工具,如图:
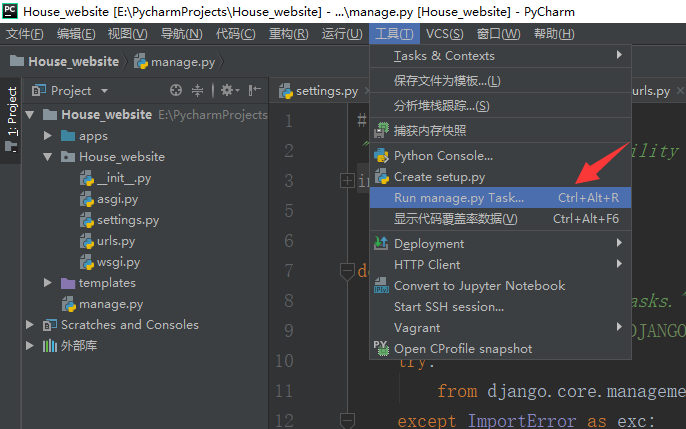 点击后,会出现
 这样就可以不用每次在terminal中输入python manage.py ...
比如createsuperuser, startapp, migrate,makemigrations
其次呢我创建一个源码目录apps/,用来放自己的APP,
这样就可以不用每次在terminal中输入python manage.py ...
比如createsuperuser, startapp, migrate,makemigrations
其次呢我创建一个源码目录apps/,用来放自己的APP,
 再创建一个源码目录extra_apps/,用来存放额外添加的APP,比如百度的富文本编辑器UEditor,xadmin等
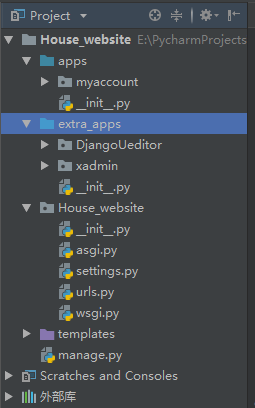 将其加入到settings.py配置文件INSTALLED_APP里去,同时把urls也加入到项目的urls里去,如下图所示。
House_website/settings.py
将其加入到settings.py配置文件INSTALLED_APP里去,同时把urls也加入到项目的urls里去,如下图所示。
House_website/settings.py
1INSTALLED_APPS = [
2    'django.contrib.admin',
3    'django.contrib.auth',
4    'django.contrib.contenttypes',
5    'django.contrib.sessions',
6    'django.contrib.messages',
7    'django.contrib.staticfiles',
8    'django.contrib.sites',
9    'allauth',
10    'allauth.account',
11    'allauth.socialaccount',
12    'allauth.socialaccount.providers.github',
13    'myaccount',
14]
为了方便国内开发者,我建议在settings.py里添加
1LANGUAGE_CODE = 'zh-hans'  # 中文支持,时区为中国上海
2
3TIME_ZONE = 'Asia/Shanghai'
4
5USE_I18N = True
6
7USE_L10N = True
8
9USE_TZ = False
10
2.编写模型
由于Django自带的User模型字段邮箱,所以我们需要对其扩展,最便捷的方式就是创建UserProfile的模型,如下所示。我们添加了需要拓展的字段。
myaccount/models.py
1from django.db import models
2from django.contrib.auth.models import User
3from allauth.account.models import EmailAddress
4# Create your models here.
5
6
7class UserProfile(models.Model):
8    """用户"""
9    user = models.OneToOneField(User, on_delete=models.CASCADE, related_name='profile')
10    org = models.CharField('Organization', max_length=128, blank=True)
11    birthday = models.DateField(null=True, blank=True, verbose_name='出生日期')
12    gender = models.CharField(max_length=6, choices=(('male', u'男'), ('female', u'女')), default='female',
13                              verbose_name='性别')
14    age = models.IntegerField(verbose_name='年龄', null=True)
15    QQ = models.CharField(max_length=20, null=True, blank=True, verbose_name='QQ', default='')
16
17    telephone = models.CharField(max_length=50, null=True, blank=True, verbose_name='电话', default='')
18
19    signature = models.TextField(max_length=500, verbose_name='个性签名',default='',null=True)
20
21    mod_date = models.DateTimeField('Last modified', auto_now=True, )
22
23    is_delete = models.BooleanField(default=False, verbose_name='是否删除')
24
25    class Meta:
26        verbose_name = 'User Profile'
27
28    def __str__(self):
29        return "{}'s profile".format(self.user.__str__())
30
31# models.py中新定义一个account_verified方法,来提醒邮箱是否验证
32    def account_verified(self):
33        if self.user.is_authenticated:
34            result = EmailAddress.objects.filter(email=self.user.email)
35            if len(result):
36                return result[0].verified
37            else:
38                return False
39        else:
40            return False
41
42
3.编写urls
House_website/House_website/urls.py
1from django.contrib import admin
2from django.urls import path, include
3
4urlpatterns = [
5    path('admin/', admin.site.urls),
6    path('accounts/', include('allauth.urls')),
7    path('accounts/', include('myaccount.urls')),
8]
9
4.编写视图函数
myaccount/views.py
1from django.shortcuts import render, get_object_or_404
2from .models import UserProfile
3from .forms import ProfileForm
4from django.http import HttpResponseRedirect
5from django.urls import reverse
6from django.contrib.auth.decorators import login_required
7
8
9@login_required
10def profile(request):
11    user = request.user
12    return render(request, 'account/profile.html', {'user': user})
13
14
15@login_required
16def profile_update(request):
17    user = request.user
18    user_profile = get_object_or_404(UserProfile, user=user)
19
20    if request.method == "POST":
21        form = ProfileForm(request.POST)
22
23        if form.is_valid():
24            user.first_name = form.cleaned_data['first_name']
25            user.last_name = form.cleaned_data['last_name']
26            user.save()
27
28            user_profile.org = form.cleaned_data['org']
29            user_profile.birthday = form.cleaned_data['birthday']
30            user_profile.age = form.cleaned_data['age']
31            user_profile.gender = form.cleaned_data['gender']
32            user_profile.QQ = form.cleaned_data['QQ']
33            user_profile.telephone = form.cleaned_data['telephone']
34            user_profile.signature = form.cleaned_data['signature']
35            user_profile.save()
36
37            return HttpResponseRedirect(reverse('myaccount:profile'))
38    else:
39        default_data = {'first_name': user.first_name, 'last_name': user.last_name, 'org': user_profile.org,
40                        'telephone': user_profile.telephone, }
41        form = ProfileForm(default_data)
42
43    return render(request, 'account/profile_update.html', {'form': form, 'user': user})
5.编写表单
在myaccount/下新建一个forms.py 我们用户更新资料需要用到表单,所以我们把表单单独放在forms.py, 代码如下所示。我们创建了两个表单:一个是更新用户资料时使用,一个是重写用户注册表单。
1from django import forms
2from .models import UserProfile
3
4
5class ProfileForm(forms.Form):
6    first_name = forms.CharField(label='First Name', max_length=50, required=False)
7    last_name = forms.CharField(label='Last Name', max_length=50, required=False)
8    org = forms.CharField(label='Organization', max_length=50, required=False)
9    telephone = forms.CharField(label='Telephone', max_length=50, required=False)
10    birthday = forms.DateField(label="birthday", required=False)
11    age = forms.IntegerField(label='age', required=False)
12    gender = forms.CharField(label="gender", widget=forms.RadioSelect(
13        choices=(('female', '女'), ('male', '男'))), initial=('female', '女'), required=False)
14    QQ = forms.CharField(label='QQ', required=False, max_length=20)
15    signature = forms.CharField(label='signature', required=False, max_length=500)
16
17
18class SignupForm(forms.Form):
19
20    def signup(self, request, user):
21        user_profile = UserProfile()
22
23        user_profile.user = user
24        user.save()
25        user_profile.save()
26
为什么我们需要重写用户注册表单?因为django-allauth在用户注册只会创建User对象,不会创建与之关联的UserProfile对象,我们希望用户在注册时两个对象一起被创建,并存储到数据库中。这点非常重要。通过重写表单,你还可以很容易添加其它字段。
要告诉django-allauth使用我们自定义的注册表单,我们只需要在settings.py里加入一行。
1ACCOUNT_SIGNUP_FORM_CLASS = 'myaccount.forms.SignupForm'
6.编写模板
因为django-allauth默认会在templates/account/文件夹下寻找模板文件,为方便后续集中美化模板,我们也把模板文件放在这个文件夹中。 templates/account/profile.html
1{% load account %}
2{% block content %}
3{% if user.is_authenticated %}
4<a href="{% url 'myaccount:profile_update' %}">Update Profile</a> | <a href="{% url 'account_email' %}">Manage Email</a>  | <a href="{% url 'account_change_password' %}">Change Password</a> |
5<a href="{% url 'account_logout' %}">Logout</a>
6{% endif %}
7<p>Welcome, {{ user.username }}.
8    {% if not user.profile.account_verified %}
9    (Unverified email.)
10    {% endif %}
11</p>
12
13
14<h2>My Profile</h2>
15<ul>
16    <li>First Name: {{ user.first_name }} </li>
17    <li>Last Name: {{ user.last_name }} </li>
18    <li>Organization: {{ user.profile.org }} </li>
19    <li>Telephone: {{ user.profile.telephone }} </li>
20        <li>birthday: {{ user.profile.birthday }} </li>
21        <li>age: {{ user.profile.age }} </li>
22        <li>gender: {{ user.profile.gender }} </li>
23        <li>QQ: {{ user.profile.QQ }} </li>
24        <li>signature: {{ user.profile.signature }}</li>
25</ul>
26
27
28{% endblock %}
templates/account/profile_update.html
1{% block content %}
2{% if user.is_authenticated %}
3<a href="{% url 'myaccount:profile_update' %}">Update Profile</a> | <a href="{% url 'account_email' %}">Manage Email</a>  | <a href="{% url 'account_change_password' %}">Change Password</a> |
4<a href="{% url 'account_logout' %}">Logout</a>
5{% endif %}
6<h2>Update My Profile</h2>
7
8<div class="form-wrapper">
9   <form method="post" action="" enctype="multipart/form-data">
10      {% csrf_token %}
11      {% for field in form %}
12           <div class="fieldWrapper">
13        {{ field.errors }}
14        {{ field.label_tag }} {{ field }}
15        {% if field.help_text %}
16             <p class="help">{{ field.help_text|safe }}</p>
17        {% endif %}
18           </div>
19        {% endfor %}
20      <div class="button-wrapper submit">
21         <input type="submit" value="Update" />
22      </div>
23   </form>
24</div>
25
26
27{% endblock %}
7.查看效果
在Terminal输入以下命令:
1python manage.py makemigrations  # 生成映射文件
2# 如果之前生成过映射文件,那就把之前的映射文件删除
3# \House_website\apps\myaccount\migrations\0001_initial.py
4python manage.py migrate  # 执行映射文件,创建数据表
5python manage.py runserver   # 运行服务
下面是django_allauth所有内置的URLs,均可以访问的。
/accounts/login/(URL名account_login): 登录
/accounts/signup/ (URL名account_signup): 注册
/accounts/password/reset/(URL名: account_reset_password) :重置密码
/accounts/logout/ (URL名account_logout): 退出登录
/accounts/password/set/ (URL名:account_set_password): 设置密码
/accounts/password/change/ (URL名: account_change_password): 改变密码(需登录)
/accounts/email/(URL名: account_email) 用户可以添加和移除email,并验证
/accounts/social/connections/(URL名:socialaccount_connections): 管理第三方账户
如果没账号,先注册一个,我就不演示了,
登录之后会进入profile页面:
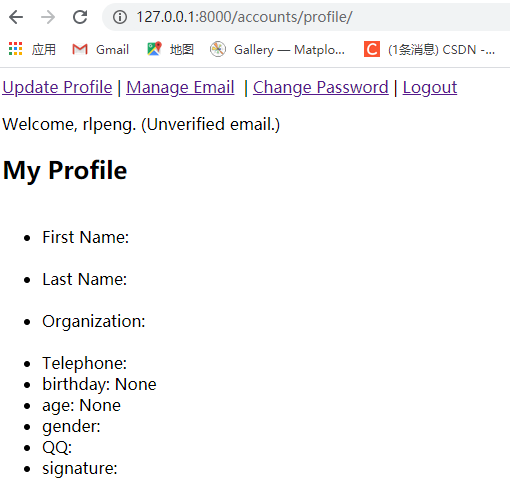
点击上方Update Profile,进入个人信息修改页面:
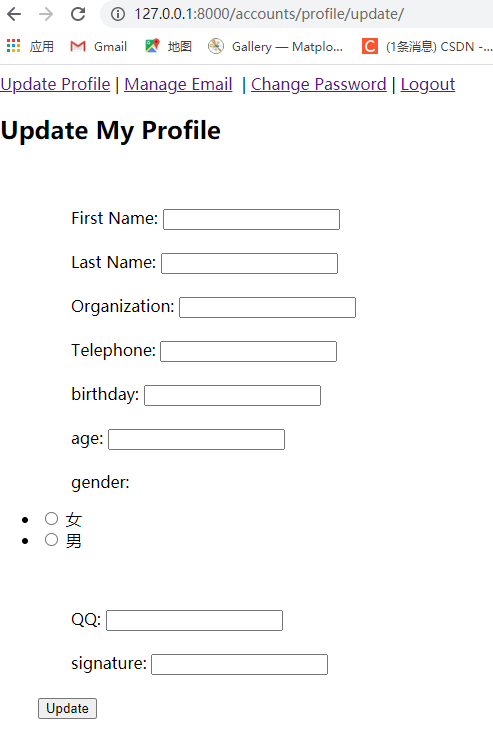
输入信息后点击下方的Update 按钮就可以完后修改,重定向到/accounts/profile/ ,个人信息就修改完成了!
到这里本篇久写完了,希望大家点个赞支持一下!
特别鸣谢:大江狗前辈 声明:我写博客只是记录自己的学习进度和总结并分享给大家,并不保证原创,如有引用您的博文,请您理解!