
工程目录
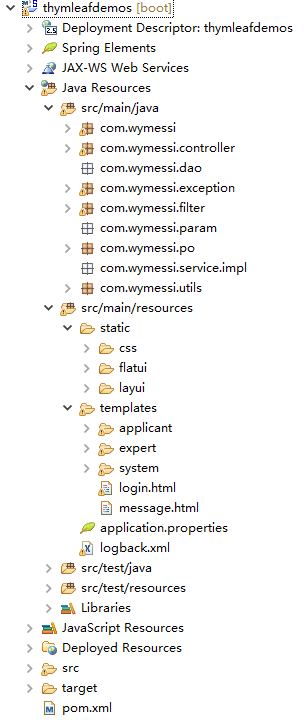
pom文件注意点
1<packaging>war</packaging>
2
3<dependency>
4          <groupId>org.springframework.boot</groupId>
5          <artifactId>spring-boot-starter-tomcat</artifactId>
6          <scope>provided</scope>
7        </dependency>
8
9<build>
10        <finalName>prs</finalName>
11        <plugins>
12          <plugin>
13            <groupId>org.apache.maven.plugins</groupId>
14            <artifactId>maven-compiler-plugin</artifactId>
15          </plugin>
16        </plugins>
17    </build>
配置文件application.properties
1server.port=8013
2server.session.timeout=3000
3server.context-path=/prs
4
5#thymelea模板配置
6spring.thymeleaf.prefix=classpath:/templates/
7spring.thymeleaf.suffix=.html
8spring.thymeleaf.mode=HTML5
9spring.thymeleaf.encoding=UTF-8
10spring.thymeleaf.content-type=text/html
11spring.thymeleaf.cache=false
12#spring.resources.chain.strategy.content.enabled=true
13#spring.resources.chain.strategy.content.paths=/**
14
15# 上传文件大小配置
16spring.http.multipart.maxFileSize=10MB
17spring.http.multipart.maxRequestSize=10MB
18
19#spring.mvc.async.request-timeout=600000
20#spring.http.multipart.max-request-size=200MB
21
22#spring.aop.auto=true
23#spring.aop.proxy-target-class=false
24
25#server.tomcat.uri-encoding=UTF-8
26#server.tomcat.max-threads=100
27logging.config=classpath:logback.xml
28
29#mybatis.configLocation=classpath:mybatis/mybatis-config.xml
30#mybatis.mapperLocations=classpath:mybatis/mapper/*.xml
31
32#spring.datasource.driverClassName = com.mysql.jdbc.Driver
33#com.microsoft.sqlserver.jdbc.SQLServerDriver
34#spring.datasource.url = jdbc:mysql://127.0.0.1:3306/test
35#jdbc:sqlserver://104.15.202.101:1105;DatabaseName=tt
36#spring.datasource.username = root
37#spring.datasource.password = 123456
38
39#spring.datasource.initialSize=2
40#spring.datasource.minIdle=0
41#spring.datasource.maxActive=5
42#spring.datasource.maxWait=60000
43#spring.datasource.validationQuery=select 1
44#spring.datasource.timeBetweenEvictionRunsMillis=60000
45#spring.datasource.testWhileIdle=true
46#spring.datasource.testOnBorrow=true
47#spring.datasource.testOnReturn=false
48#spring.datasource.poolPreparedStatements=true
49#spring.datasource.maxPoolPreparedStatementPerConnectionSize=20
50
51server.context-path=/prs这里的路径名最好和上面pom里的finalName最好是一致的,因为当我们把打包好的war包放到tomcat的webapp里时,访问路径前缀就是这个finalName
启动类
1@ComponentScan(basePackages= {"com.wymessi"})//扫描组件
2@SpringBootApplication
3@EnableAspectJAutoProxy
4@EnableTransactionManagement(proxyTargetClass = true)
5@EnableAutoConfiguration(exclude = { DataSourceAutoConfiguration.class})
6public class SpringbootApplication extends SpringBootServletInitializer {
7
8    public static void main(String[] args) {
9        SpringApplication.run(SpringbootApplication.class, args);
10    }
11
12    @Override
13    protected SpringApplicationBuilder configure(SpringApplicationBuilder builder) {
14        // 注意这里要指向原先用main方法执行的Application启动类
15        return builder.sources(SpringbootApplication.class);
16    }
17
18//    @Bean
19//    public HttpMessageConverters fastJsonHttpMessageConverters() {
20//        FastJsonHttpMessageConverter fastConverter = new FastJsonHttpMessageConverter();
21//        FastJsonConfig fastJsonConfig = new FastJsonConfig();
22//        // fastJsonConfig.setSerializerFeatures(SerializerFeature.BrowserCompatible);
23//        // fastJsonConfig.setSerializerFeatures(SerializerFeature.BrowserSecure);
24//        fastJsonConfig.setSerializerFeatures(SerializerFeature.DisableCircularReferenceDetect);
25//        // fastJsonConfig.setSerializerFeatures(SerializerFeature.WriteMapNullValue);
26//        SerializeConfig config = new SerializeConfig();
27//        config.put(Date.class, new SimpleDateFormatSerializer("yyyy-MM-dd HH:mm:ss"));
28//        fastJsonConfig.setSerializeConfig(config);
29//        fastConverter.setFastJsonConfig(fastJsonConfig);
30//        HttpMessageConverter<?> converter = fastConverter;
31//        return new HttpMessageConverters(converter);
32//    }
33
34}
和打jar包的区别是继承了SpringBootServletInitializer这个类,然后重写了configure方法。
运行程序
eclipse里运行
右击项目名,run as - spring boot app。
浏览器里输入http://127.0.0.1:8013/prs
打包成war包在tomcat里运行
右击项目名,run as - maven - build,看到success就代表打包成功了。

把打包好的prs放到tomcat的webapp里,然后启动tomcat。
这里要注意,tomcat的访问端口要设置成和配置文件里的一样,不然用配置文件里的port是访问不到的。
打包的名称要和server.context-path=/prs的名称一致,不然也是访问不到的,这个上面已经说过了。