
一、简单介绍:
CaffeineCache和Guava的Cache是应用广泛的本地缓存。
在开发中,为了达到降低依赖、提高访问速度的目的。会使用它存储一些维表接口的返回值和数据库查询结果,在有些场景下也会在分布式缓存上再加上一层本地缓存,用来减少对远程服务和数据库的请求次数。
CaffeineCache是以Guava Cache为原型库开发和扩展的一种本地缓存,并且适配Guava Cache的Api,但是CaffeineCache的性能更好。
二、CaffeineCache的使用:
CaffeineCache官方介绍有提供一些例子,不过这些例子不能直接运行。
下面围绕比较常用的API介绍下CaffeineCache的使用,列举一些可直接执行的Demo,看起来明了一些。
1.存数据:
Caffeine提供了四种缓存添加策略:手动加载,自动加载,手动异步加载和自动异步加载。
1.1手动加载:
1        Cache<String, String> cache = Caffeine.newBuilder()
2                 //过期时间
3                .expireAfterWrite(10, TimeUnit.MINUTES)
4                 //最大容量
5                .maximumSize(10_000)
6                .build();
7        String key = "test";
8        // 查找一个缓存元素, 没有查找到的时候返回null
9        String res = cache.get(key, k -> createValue(key));
10        // 添加或者更新一个缓存元素
11        cache.put(key, "testValue");
12        // 移除一个缓存元素
13        cache.invalidate(key);
14    }
15
16     // 模拟从外部数据源加载数据的逻辑
17    static String createValue(String key) {
18        return "value";
19    }
推荐使用 get(K var1, Function<? super K, ? extends V> var2);
get方法可以在缓存中不存在该key对应的值时进行计算,生成并直接写入至缓存内,最后将结果返回,而当该key对应的值存在时将会直接返回值。
注意到createValue方法有可能会出现异常,根据官网所说:“当缓存的元素无法生成或者在生成的过程中抛出异常而导致生成元素失败,cache.get 也许会返回 null ”,那么实际情况怎么样呢?我们来试一下。
1public class TestCaffeineCache {
2    public static void main(String[] args) {
3        Cache<String, String> cache = Caffeine.newBuilder()
4                .expireAfterWrite(10, TimeUnit.MINUTES)
5                .maximumSize(10_000)
6                .build();
7        String key = "test";
8        String res = cache.get(key, k -> createValue(key));
9        System.out.println(res);
10    }
11
12    // 模拟从外部数据源加载数据的逻辑
13    static String createValue(String key) {
14        //模拟异常情况
15        int a = 1/0;
16        return "";
17    }
18}
运行结果:
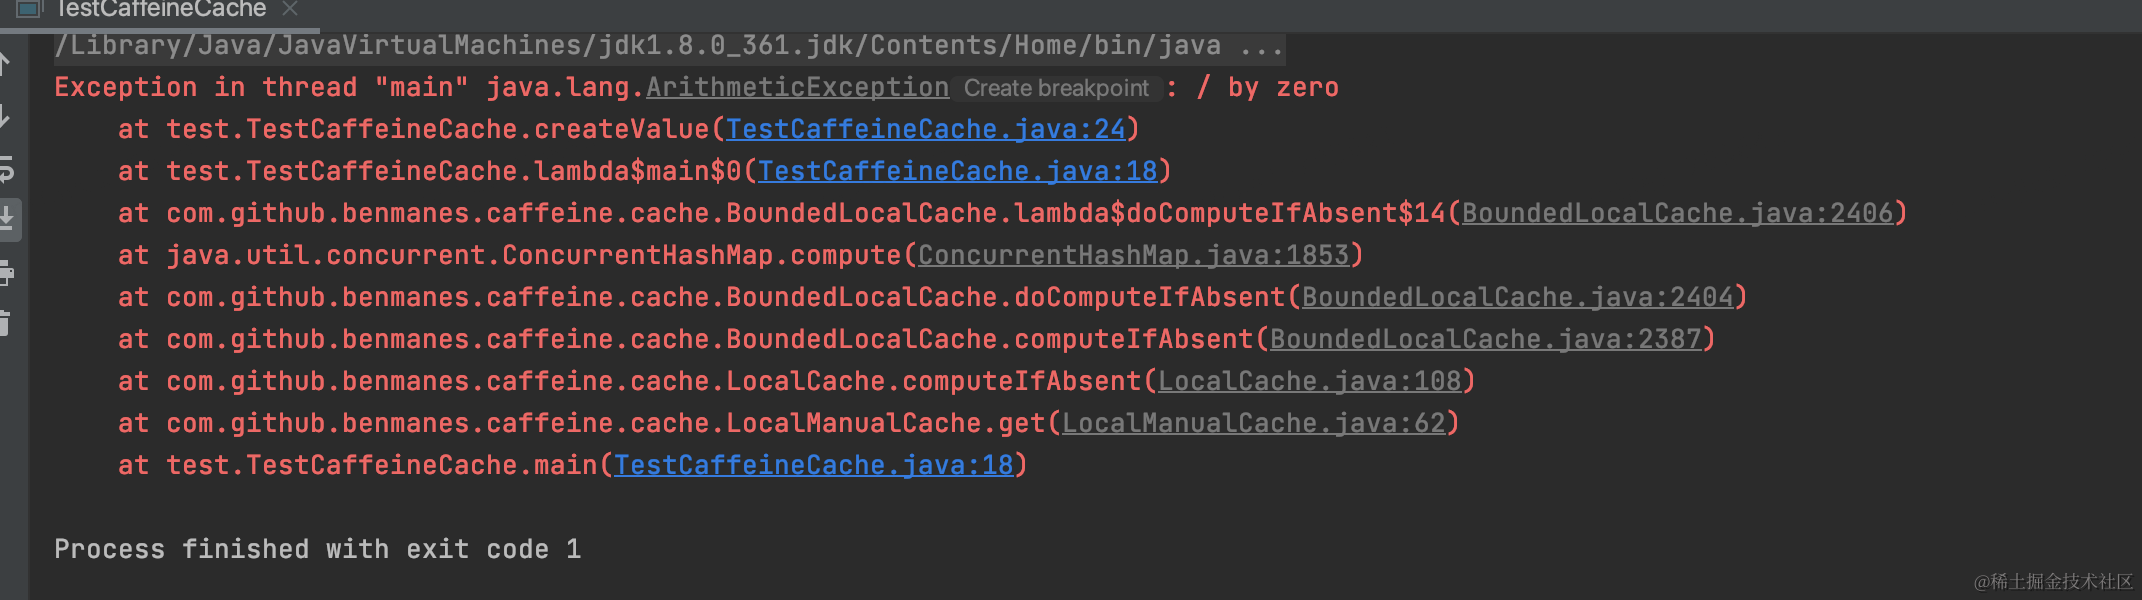
可以看到,执行cache.get时,在生成结果的过程中如果出现异常了,cache.get不会返回null,仍会直接报错。
1.2自动加载
1public class TestCaffeineCache {
2    public static void main(String[] args) {
3         LoadingCache<String, String> cache = Caffeine.newBuilder()
4                .build(new CacheLoader<String, String>() {
5                    @Override
6                    public String load(String key) {
7                        return getValue(key);
8                    }
9                });
10
11        String value = cache.get("key");
12        System.out.println(value);
13    }
14
15    // 模拟从外部数据源加载数据的逻辑
16    private static String getValue(String key) {
17        // 实际情况下,这里会有从数据库、远程服务加载数据的逻辑
18        return "value";
19    }
20}
可以用lambda简化它:
1public class TestCaffeineCache {
2    public static void main(String[] args) {
3        LoadingCache<String, String> cache = Caffeine.newBuilder()
4                .build(key -> getValue(key));
5
6        String value = cache.get("key");
7        System.out.println(value);
8    }
9
10    // 模拟从外部数据源加载数据的逻辑
11    private static String getValue(String key) {
12        return "value";
13    }
14}
上面的示例中, build方法传入的CacheLoader定义了加载缓存的逻辑。调用cache.get("key")时,如果缓存中不存在对应的值,CacheLoader会调用load方法来加载和缓存值。
可以通过重写和CacheLoader.load和loadAll并手动调用,在LoadingCache创建之前提前加载一些数据。
1    public static void main(String[] args) throws Exception {
2        CacheLoader loader = new CacheLoader<String,String>() {
3            @Override
4            public String load( String s) throws Exception {
5                return getValue(s);
6            }
7            @Override
8            public Map<String, String> loadAll(Iterable<? extends String> keys) throws Exception {
9                Map currentMap = new HashMap<String,String>();
10                for (String key : keys) {
11                    currentMap.put(key, getValue(key));
12                }
13                return currentMap;
14            }
15        };
16
17        loader.load("key1");
18        loader.loadAll(new ArrayList( Arrays.asList("key2","key3")));
19        LoadingCache<String, String> cache = Caffeine.newBuilder().build(loader);
20        String value = cache.get("key1");
21        String value2 = cache.get("key2");
22        System.out.println(value+value2);
23    }
24
25    // 模拟从外部数据源加载数据的逻辑
26    private static String getValue(String key) {
27        return "value";
28    }
1.3手动异步加载:
1    public static void main(String[] args) throws Exception {
2
3        AsyncCache<String, String> cache = Caffeine.newBuilder()
4                .expireAfterWrite(10, TimeUnit.MINUTES)
5                .maximumSize(10_000).buildAsync();
6        String key ="test";
7        CompletableFuture<String> res = cache.get(key,k-> getValue(key));
8        res.thenAccept(result -> System.out.println(result));
9    }
10
11    // 模拟从外部数据源加载数据的逻辑
12    private static String getValue(String key) {
13        return "value";
14    }
15
异步加载使用的类是AsyncCache,使用方法和Cache类似。cache.get(key, k -> getValue(key))将会返回一个CompletableFuture,这一步骤会在一个异步任务中执行,而不会阻塞主线程。res.thenAccept方法将在数据加载完成后得到结果。
1.4自动异步加载:
1
2    public static void main(String[] args) throws Exception {
3        Executor executor = Executors.newFixedThreadPool(5);
4        AsyncLoadingCache<String, String> cache = Caffeine.newBuilder()
5                .expireAfterWrite(10, TimeUnit.MINUTES)
6                .maximumSize(10_000)
7                //异步的封装一段同步操作来生成缓存元素
8                .buildAsync(key -> getValue(key))
9                //OR建一个异步缓存元素操作并返回一个future
10                .buildAsync((key,executor1) -> getValue(key,executor));
11        String key = "test";
12        CompletableFuture<String> res = cache.get(key);
13        res.thenAccept(result -> System.out.println(result));
14    }
15
16    // 模拟从外部数据源加载数据的逻辑
17    private static CompletableFuture<String> getValue(String key,Executor executor) {
18        return CompletableFuture.supplyAsync(() -> "value for " + key, executor);
19    }
20     private static String getValue(String key) {
21         return "value";
22    }
23
24
自动异步加载使用方法和手动异步加载类似,getValue可接收一个Executor对象,用于自定义执行异步操作的线程池。
2.驱逐:
2.1基于容量:
1Cache<String, String> cache = Caffeine.newBuilder()
2                .maximumSize(10_000)
3                .build();
最常用的驱逐策略了,Caffeine提供多种算法根据最近使用频率和使用时间来驱逐元素 ref:Window-TinyLFU
2.2基于权重:
1class Product {
2    private String name;
3    private int weight;
4
5    public Product(String s, int i) {
6        name=s;
7        weight=i;
8    }
9    public String getName() {
10        return name;
11    }
12    public int getWeight() {
13        return weight;
14    }
15    @Override
16    public String toString(){
17        return getName();
18    }
19}
20
21public class TestCaffeineCache {
22    public static void main(String[] args) {
23        Cache<String, Product> cache = Caffeine.newBuilder()
24                .maximumWeight(1000)
25                .weigher((String key, Product value) -> value.getWeight())
26                //使用当前线程进行驱逐和刷新
27                .executor(runnable -> runnable.run())
28                //监听器,如果有元素被驱逐则会输出
29                .removalListener(((key, value, cause) -> {
30                    System.out.printf("Key %s was evicted (%s)%n", key, cause);
31                }))
32                .build();
33        // 向缓存中添加商品信息
34        cache.put("product1", new Product("Product 1", 200));
35        cache.put("product2", new Product("Product 2", 400));
36        cache.put("product3", new Product("Product 3", 500));
37        // 获取缓存中的商品信息
38        System.out.println(cache.getIfPresent("product1"));
39        System.out.println(cache.getIfPresent("product2"));
40        System.out.println(cache.getIfPresent("product3"));
41    }
42}
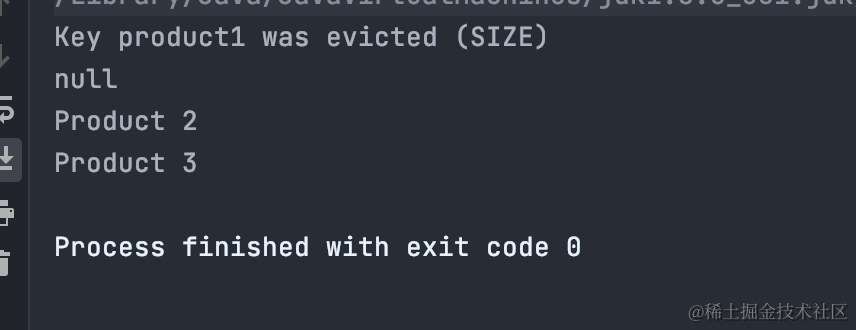
.weigher((String key, Product value) -> value.getWeight()) 制定了一个权重计算器,Product对象的getWeight()方法来计算权重。
通过示例中的返回结果可以看到,当product3被put后,总容量超过了1000,product1就被驱逐了。
2.3基于时间:
附上官方的例子:
1// 基于固定的过期时间驱逐策略
2LoadingCache<Key, Graph> graphs = Caffeine.newBuilder()
3    .expireAfterAccess(5, TimeUnit.MINUTES)
4    .build(key -> createExpensiveGraph(key));
5LoadingCache<Key, Graph> graphs = Caffeine.newBuilder()
6    .expireAfterWrite(10, TimeUnit.MINUTES)
7    .build(key -> createExpensiveGraph(key));
8
9// 基于不同的过期驱逐策略
10LoadingCache<Key, Graph> graphs = Caffeine.newBuilder()
11    .expireAfter(new Expiry<Key, Graph>() {
12      public long expireAfterCreate(Key key, Graph graph, long currentTime) {
13        // Use wall clock time, rather than nanotime, if from an external resource
14        long seconds = graph.creationDate().plusHours(5)
15            .minus(System.currentTimeMillis(), MILLIS)
16            .toEpochSecond();
17        return TimeUnit.SECONDS.toNanos(seconds);
18      }
19      public long expireAfterUpdate(Key key, Graph graph,
20          long currentTime, long currentDuration) {
21        return currentDuration;
22      }
23      public long expireAfterRead(Key key, Graph graph,
24          long currentTime, long currentDuration) {
25        return currentDuration;
26      }
27    })
28    .build(key -> createExpensiveGraph(key));
Caffeine提供了三种方法进行基于时间的驱逐——官方的解释:
expireAfterAccess(long, TimeUnit): 一个元素在上一次读写操作后一段时间之后,在指定的时间后没有被再次访问将会被认定为过期项。在当被缓存的元素时被绑定在一个session上时,当session因为不活跃而使元素过期的情况下,这是理想的选择。
expireAfterWrite(long, TimeUnit): 一个元素将会在其创建或者最近一次被更新之后的一段时间后被认定为过期项。在对被缓存的元素的时效性存在要求的场景下,这是理想的选择。
expireAfter(Expiry): 一个元素将会在指定的时间后被认定为过期项。当被缓存的元素过期时间收到外部资源影响的时候,这是理想的选择。
写一个Demo举例expireAfterAccess和expireAfterWrite:
1    public static void main(String[] args) {
2        //模拟时间,使用的com.google.common.testing.FakeTicker;
3        FakeTicker ticker = new FakeTicker();
4        Cache<String, String> cache = Caffeine.newBuilder()
5                 //创建20分钟后元素被删除
6                .expireAfterWrite(20, TimeUnit.MINUTES)
7                 //没有读取10分钟后元素被删除
8                .expireAfterAccess(10, TimeUnit.MINUTES)
9                .executor(Runnable::run)
10                .ticker(ticker::read)
11                .build();
12        cache.put("key1","value1");
13        cache.put("key2","value2");
14        ticker.advance(5, TimeUnit.MINUTES);
15        System.out.println("5分钟都不删除,访问一次key2:"+cache.getIfPresent("key2"));
16        ticker.advance(5, TimeUnit.MINUTES);
17        System.out.println("10分钟key1被删除,因为它已经10分钟没有被访问过了:"+cache.getIfPresent("key1"));
18        System.out.println("10分钟key2没有被删除,因为它在5分钟时被访问过了:"+cache.getIfPresent("key2"));
19        ticker.advance(10, TimeUnit.MINUTES);
20        System.out.println("20分钟key2也被删除:"+cache.getIfPresent("key2"));
21    }
这个例子设定元素创建20分钟或者没有读取10分钟后被删除。
key1和key2在创建后。5分钟时访问一次key2,十分钟时key1被删除,key2没有被删除,20分钟时key2也被删除。
运行结果正如我们期待的:

举例expireAfter:
1    public static void main(String[] args) {
2        //模拟时间,使用的com.google.common.testing.FakeTicker;
3        FakeTicker ticker = new FakeTicker();
4        Cache<String, String> cache = Caffeine.newBuilder()
5                .expireAfter(new Expiry<String, String>() {
6                    public long expireAfterCreate(String key, String value, long currentTime) {
7                        // 在创建后的24小时后过期
8                        return TimeUnit.HOURS.toNanos(24);
9                    }
10                    public long expireAfterUpdate(String key, String value, long currentTime, long currentDuration) {
11                        // 在更新后如果值为"1234",则立马过期
12                        if("1234".equals(value)){
13                            return 0;
14                        }
15                        // 在更新后的1小时后过期
16                        return TimeUnit.HOURS.toNanos(1);
17                    }
18                    public long expireAfterRead(String key, String value, long currentTime, long currentDuration) {
19                        // 在读取后的20小时后过期
20                        return TimeUnit.HOURS.toNanos(20);
21                    }
22                })
23                .executor(Runnable::run)
24                .ticker(ticker::read)
25                .build();
26        cache.put("AfterCreateKey","AfterCreate");
27        cache.put("AfterUpdate1234Key","1234key");
28        cache.put("AfterUpdateKey","AfterUpdate");
29        cache.put("AfterReadKey","AfterRead");
30        //AfterUpdate1234Key值更新为1234
31        cache.put("AfterUpdate1234Key","1234");
32        System.out.println("AfterUpdate1234Key在更新后值为1234,立马过期:"+cache.getIfPresent("AfterUpdate1234Key"));
33        System.out.println("AfterReadKey读取一次:"+cache.getIfPresent("AfterReadKey"));
34        //AfterUpdateKey更新一次
35        cache.put("AfterUpdateKey","AfterUpdate");
36        ticker.advance(1, TimeUnit.HOURS);
37        System.out.println("AfterUpdateKey更新了一个小时了,被删除:"+cache.getIfPresent("AfterUpdateKey"));
38        ticker.advance(19, TimeUnit.HOURS);
39        System.out.println("AfterReadKey再读取一次已经删除了,因为上一次读取已经过了20小时:"+cache.getIfPresent("AfterReadKey"));
40        ticker.advance(4, TimeUnit.HOURS);
41        System.out.println("AfterCreateKey被删除了,距离创建已经24小时了:"+cache.getIfPresent("AfterCreateKey"));
42    }
这个例子设定了元素在以下四种情况会过期:
•创建后的24小时
•更新后值为"1234"
•更新后的1小时
•在读取后的20小时
以下是运行结果

2.4基于引用:
基于引用的过期驱逐策略不常用,这里附上官方的例子和解释:
1// 当key和缓存元素都不再存在其他强引用的时候驱逐
2LoadingCache<Key, Graph> graphs = Caffeine.newBuilder()
3    .weakKeys()
4    .weakValues()
5    .build(key -> createExpensiveGraph(key));
6
7// 当进行GC的时候进行驱逐
8LoadingCache<Key, Graph> graphs = Caffeine.newBuilder()
9    .softValues()
10    .build(key -> createExpensiveGraph(key));
Caffeine 允许你配置缓存,以便GC去帮助清理缓存当中的元素,其中key支持弱引用,而value则支持弱引用和软引用。AsyncCache不支持软引用和弱引用。
Caffeine.weakKeys() 在保存key的时候将会进行弱引用。这允许在GC的过程中,当key没有被任何强引用指向的时候去将缓存元素回收。由于GC只依赖于引用相等性。这导致在这个情况下,缓存将会通过引用相等(==)而不是对象相等 equals()去进行key之间的比较。
Caffeine.weakValues()在保存value的时候将会使用弱引用。这允许在GC的过程中,当value没有被任何强引用指向的时候去将缓存元素回收。由于GC只依赖于引用相等性。这导致在这个情况下,缓存将会通过引用相等(==)而不是对象相等 equals()去进行value之间的比较。
Caffeine.softValues()在保存value的时候将会使用软引用。为了相应内存的需要,在GC过程中被软引用的对象将会被通过LRU算法回收。由于使用软引用可能会影响整体性能,我们还是建议通过使用基于缓存容量的驱逐策略代替软引用的使用。同样的,使用 softValues() 将会通过引用相等(==)而不是对象相等 equals()去进行value之间的比较。
3.移除:
3.1移除的三个方法:
可以调用以下三个方法移除缓存中的元素
1// 失效key
2void invalidate(@CompatibleWith("K") @NonNull Object var1);
3// 批量失效key
4void invalidateAll(@NonNull Iterable<?> var1);
5// 失效所有的key
6void invalidateAll();
3.2监听器removalListener和evictionListener
当元素从缓存中被移除时,这两个监听器可以进行指定的操作,具体有什么区别呢?先上例子:
1        Cache<String, String> cache = Caffeine.newBuilder()
2                .maximumSize(2)
3                .executor(Runnable::run)
4                //驱逐,删除key时会输出
5                .removalListener(((key, value, cause) -> {
6                    System.out.printf("removalListener—>Key %s was evicted (%s)%n", key, cause);
7                }))
8                 //驱逐key时会输出
9                .evictionListener(((key, value, cause) -> {
10                    System.out.printf("evictionListener->Key %s was evicted (%s)%n", key, cause);
11                }))
12                .build();
13        // 向缓存中添加商品信息
14        cache.put("product1", "product1");
15        cache.put("product2", "product2");
16        cache.put("product3", "product3");
17        // 获取缓存中的商品信息
18        System.out.println(cache.getIfPresent("product1"));
19        System.out.println(cache.getIfPresent("product2"));
20        System.out.println(cache.getIfPresent("product3"));
21        cache.invalidateAll();
结果:
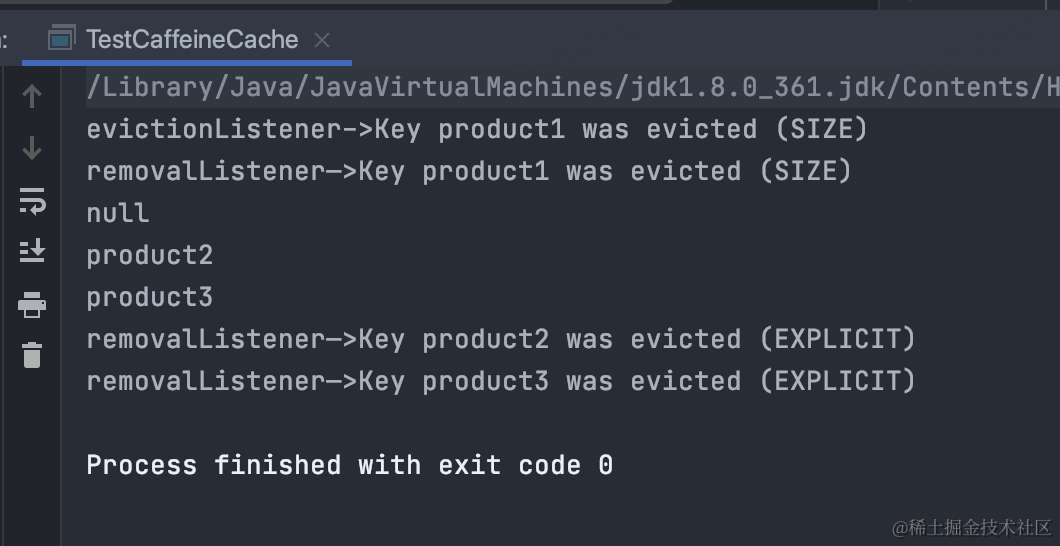
可以发现,当元素被驱逐,或者被手动移除时,removalListener都会执行指定的操作。而evictionListener只会在元素被驱逐时执行指定的操作。
4.刷新:
4.1自动刷新:
可以使用refreshAfterWrite在元素写入一段时间后刷新元素,先上代码
1    public static void main(String[] args) {
2
3        FakeTicker ticker = new FakeTicker();
4        LoadingCache<String, String> cache = Caffeine.newBuilder()
5                .refreshAfterWrite(5, TimeUnit.SECONDS) // 在写入后5秒钟自动刷新
6                .ticker(ticker::read)
7                .executor(Runnable::run)
8                .build(key -> getVale(key)); // 提供加载方法
9
10        System.out.println("Initial value for key1: " + cache.get("key1"));
11
12        // 超过自动刷新时间
13        ticker.advance(7, TimeUnit.SECONDS);
14
15        System.out.println(cache.get("key1")); // 真正执行刷新
16        System.out.println(cache.get("key1")); // 输出自动刷新后的值
17    }
18
19    private static String getVale(String key) {
20        // 这里简单地返回一个当前时间的字符串
21        return "loaded value for " + key + " at " + System.currentTimeMillis();
22    }
输出结果:
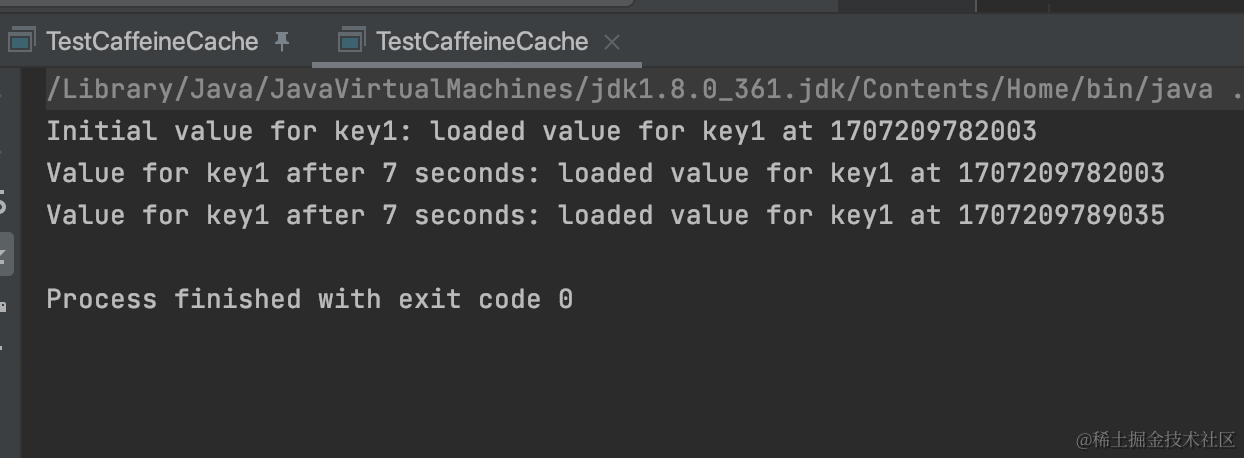
可以发现过了刷新时间后,第一次访问key1并没有返回新值,第二次访问key1时才会将刷新后的数据返回,官方的解释是元素过了刷新时间不会立即刷新,而是在在访问时才会刷新,并且没有刷新完毕,其旧值将仍被返回,直到该元素的刷新完毕后结束后才会返回刷新后的新值。
4.2手动刷新:
可以使用refresh(Key)方法进行手动刷新
1    public static void main(String[] args) {
2        LoadingCache<String, String> cache = Caffeine.newBuilder()
3                .build(key -> getVale(key)); // 提供加载方法
4
5        System.out.println("Initial value for key1: " + cache.get("key1"));
6        cache.refresh("key1");
7        System.out.println(cache.get("key1")); // 输出自动刷新后的值
8    }
9
10    private static String getVale(String key) {
11        // 这里简单地返回一个当前时间的字符串
12        return "loaded value for " + key + " at " + System.currentTimeMillis();
13    }

4.3刷新自定义处理:
可以使用CacheLoader.reload(K, V)来自定义刷新前后值的处理,下面这个例子重写了reload方法,将新值和旧值用"|"分开:
1    public static void main(String[] args) {
2        FakeTicker ticker = new FakeTicker();
3        LoadingCache<String, String> cache = Caffeine.newBuilder()
4                .refreshAfterWrite(5, TimeUnit.SECONDS) // 在写入后5秒钟自动刷新
5                .ticker(ticker::read)
6                .build(new CacheLoader<String, String>() {
7                    @Override
8                    public String load(String s) throws Exception {
9                        return getVale(s);
10                    }
11                    //将刷新前后的数据都获取出来了
12                    @Override
13                    public String reload(String s,String v){
14                        return getVale(s)+"|"+v;
15                    }
16                }); // 提供加载方法
17        System.out.println("Initial value for key1: " + cache.get("key1"));
18        // 等待超过自动刷新时间
19        ticker.advance(7, TimeUnit.SECONDS);
20        cache.get("key1");
21        System.out.println(cache.get("key1")); // 输出自动刷新后的值
22    }
23
24    private static String getVale(String key) {
25        // 这里简单地返回一个当前时间的字符串
26        return "loaded value for " + key + " at " + System.currentTimeMillis();
27    }
结果:

三、性能对比:
我们知道,Caffeine的性能比Guava Cache要好,可以写一个demo简单对比一下:
1.Caffeine Demo:
1package test;
2
3import com.github.benmanes.caffeine.cache.Cache;
4import com.github.benmanes.caffeine.cache.Caffeine;
5
6public class CaffeineCacheTest {
7
8    public static void main(String[] args) throws Exception {
9        Cache<Integer, Integer> loadingCache = Caffeine.newBuilder()
10                .build();
11
12        // 开始时间
13        Long start = System.currentTimeMillis();
14        for (int i = 0; i < 1000000; i++) {
15            loadingCache.put(i, i);
16        }
17        // 存完成时间
18        Long writeFinishTime = System.currentTimeMillis();
19        for (int i = 0; i < 1000000; i++) {
20            loadingCache.getIfPresent(i);
21        }
22        // 读取完成时间
23        Long readFinishTime = System.currentTimeMillis();
24        for (int i = 0; i < 1000000; i++) {
25            loadingCache.invalidate(i);
26        }
27        // 删除完成时间
28        Long deleteFinishTime = System.currentTimeMillis();
29        System.out.println("CaffeineCache存用时:" + (writeFinishTime - start));
30        System.out.println("CaffeineCache读用时:" + (readFinishTime - writeFinishTime));
31        System.out.println("CaffeineCache删用时:" + (deleteFinishTime - readFinishTime));
32    }
33}
运行结果:

2.Guava Cache Demo:
使用几乎一致的API,换成Guava Cache再试一次:
1
2package test;
3
4import com.google.common.cache.Cache;
5import com.google.common.cache.CacheBuilder;
6
7public class GuavaCacheTest {
8
9    public static void main(String[] args) throws Exception {
10        Cache<Integer, Integer> loadingCache = CacheBuilder.newBuilder()
11                .build();
12
13        // 开始时间
14        Long start = System.currentTimeMillis();
15        for (int i = 0; i < 1000000; i++) {
16            loadingCache.put(i, i);
17        }
18        // 存完成时间
19        Long writeFinishTime = System.currentTimeMillis();
20        for (int i = 0; i < 1000000; i++) {
21            loadingCache.getIfPresent(i);
22        }
23        // 读取完成时间
24        Long readFinishTime = System.currentTimeMillis();
25        for (int i = 0; i < 1000000; i++) {
26            loadingCache.invalidate(i);
27        }
28        // 删除完成时间
29        Long deleteFinishTime = System.currentTimeMillis();
30        System.out.println("GuavaCache存用时:"+(writeFinishTime-start));
31        System.out.println("GuavaCache取用时:"+(readFinishTime-writeFinishTime));
32        System.out.println("GuavaCache删用时:"+(deleteFinishTime-readFinishTime));
33    }
34
35}
运行结果:

3.多组测试结果:
运行环境:处理器:Apple M3 ,内存:18 GB,JDK1.8
更改循环次数,多组测试结果如下(单位ms):
| 缓存 | Caffeine | Guava Cache | Caffeine | Guava Cache | Caffeine | Guava Cache | Caffeine | Guava Cache |
|---|---|---|---|---|---|---|---|---|
| 次数 | 100 | 100 | 10000 | 10000 | 1000000 | 1000000 | 5000000 | 5000000 |
| 存用时 | 1 | 2 | 17 | 51 | 113 | 279 | 3802 | 2458 |
| 取用时 | 0 | 0 | 9 | 16 | 25 | 141 | 47 | 531 |
| 删用时 | 0 | 11 | 7 | 25 | 35 | 176 | 89 | 1073 |
可以看出Caffeine的总体性能是比Guava Cache要好的。
当然,基于本地单机的简单测试,结果受处理器,线程,内存等影响较大。可以参考下官方的测试,有更高的参考意义:官方测试。
四、总结:
本文举了很多的例子,介绍了Caffeine支持的多种基础的操作,包括存、取、删等。以及异步、监听、刷新等更多拓展的操作,能够覆盖大部分需要本地缓存的开发场景。
Caffeine的性能比Guava Cache更好,并列举了一个性能测试demo,Caffeine兼容Guava Cache的API,所以从Guava Cache迁移至Caffeine也比较容易。
最后附上Caffeine的官方网址:官方网址(中文)。
作者:京东物流 殷世杰
来源:京东云开发者社区