
1.keys命令
keys命令相信大家应该都用过,该命令会遍历整个redis的字典空间,对要查找的key进行匹配并返回。
就像官方文档所说:在生产环境使用该方法的过程中要非常小心,因为redis服务器在执行该命令的时候其他客户端读写命令都会被阻塞。
使用方法:
KEYS pattern
示例:
1127.0.0.1:6379> set why1 1
2OK
3127.0.0.1:6379> set why2 2
4OK
5127.0.0.1:6379> set why3 3
6OK
7127.0.0.1:6379> set why4 4
8OK
9127.0.0.1:6379> keys why*
101) "why3"
112) "why4"
123) "why2"
134) "why1"
14127.0.0.1:6379>
2.redis的HashTable(字典)
keys命令,是遍历整个数据库。而redis是又是一个k-v型的内存数据库,一说到k-v,不由自主就想到了Java的HashMap。那么redis的"hashtable"的数据结构是什么样的呢?
1.HashTable的数据结构上下文
我们以debug模式运行redis-server的时候,可以看到在redis.c的initServer方法中,初始化了db。
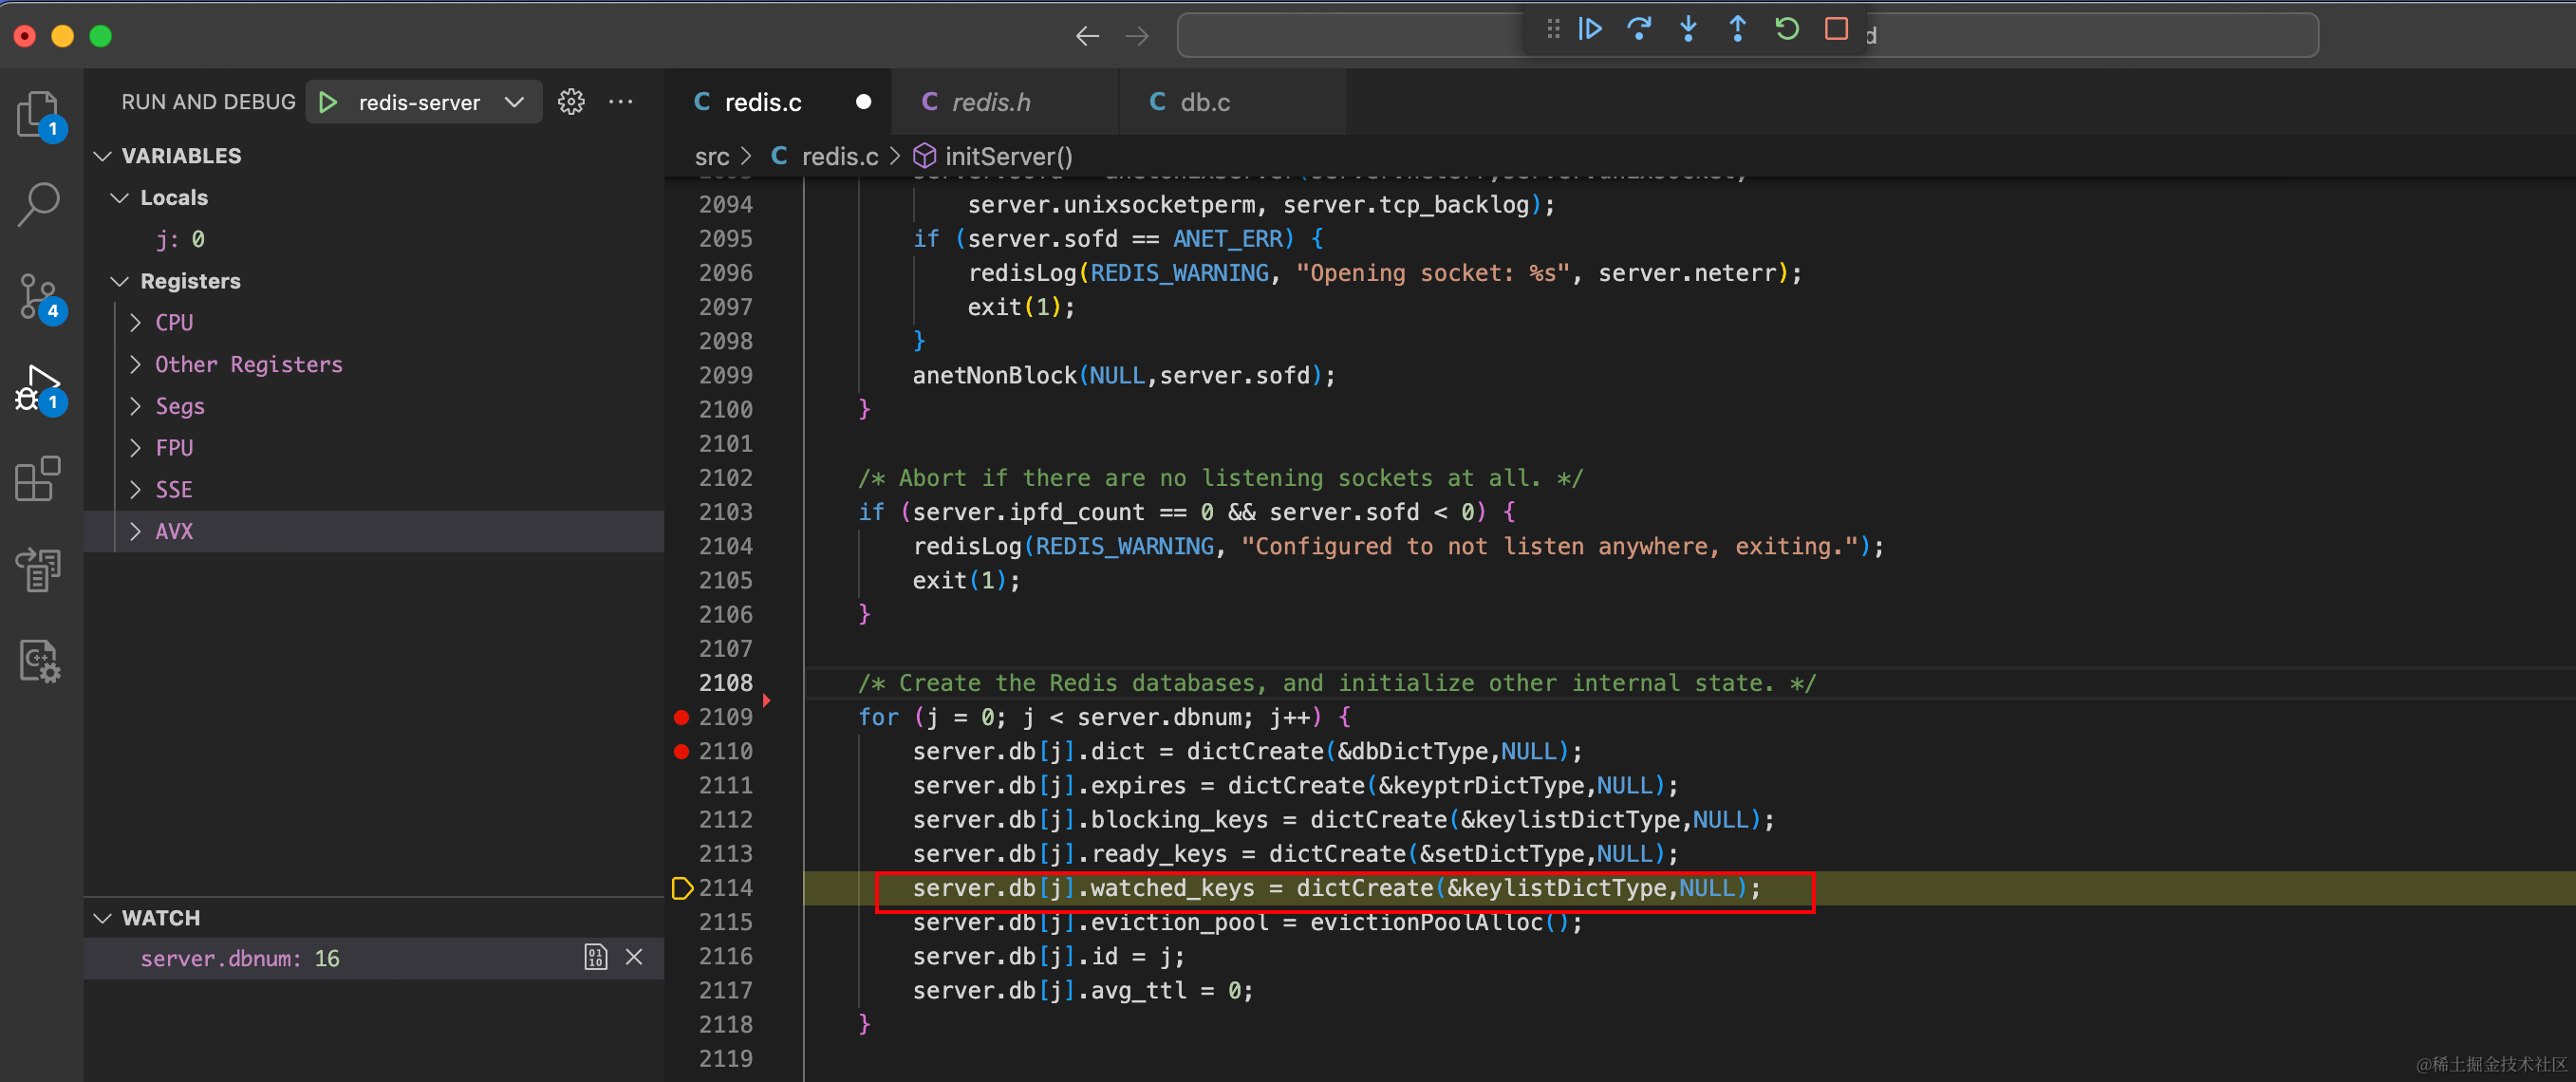
dbnum的值来源于配置:databases,默认为16。
在Redis.h中,对每个数据库实例做了定义:
1/* Redis database representation. There are multiple databases identified
2 * by integers from 0 (the default database) up to the max configured
3 * database. The database number is the 'id' field in the structure. */
4typedef struct redisDb {
5    dict *dict;                 /* The keyspace for this DB */
6  	//删除了一些参数.......
7} redisDb;
那看样子,dict可能是对应的哈希表实现了,我们看下dict的结构:
1/* This is our hash table structure. Every dictionary has two of this as we
2 * implement incremental rehashing, for the old to the new table. */
3typedef struct dict {
4    //一系列操作键值空间的函数
5    dictType *type;
6		//私有数据
7    void *privdata;
8
9    dictht ht[2];
10    int rehashidx; /* rehashing not in progress if rehashidx == -1 */
11
12    int iterators; /* number of iterators currently running */
13
14} dict;
看样子dict并不是最终的哈希表。我们继续看下dictht的结构:
1typedef struct dictht {
2
3    // hash表的数组
4    dictEntry **table;
5
6    //表的大小
7    unsigned long size;
8
9		//size-1,用于计算索引
10    unsigned long sizemask;
11
12 		//hash表中元素的数量
13    unsigned long used;
14
15} dictht;
看样子dicttht就是哈希表的实现了。可以看到dictht中定义了一个dictEntry类型的数组table,又定义了一系列的和table有关的上下文。
我们继续看下dictEntry的结构:
1typedef struct dictEntry {
2    void *key;
3    union {
4        void *val;
5        uint64_t u64;
6        int64_t s64;
7    } v;
8
9    struct dictEntry *next;
10
11} dictEntry;
看样子dictEntry就是存储我们数据的地方了,看到next指针,我们可以猜到,redis解决hash冲突的方法和HashMap一样,也是拉链法。
到这里我们可以总结一下:
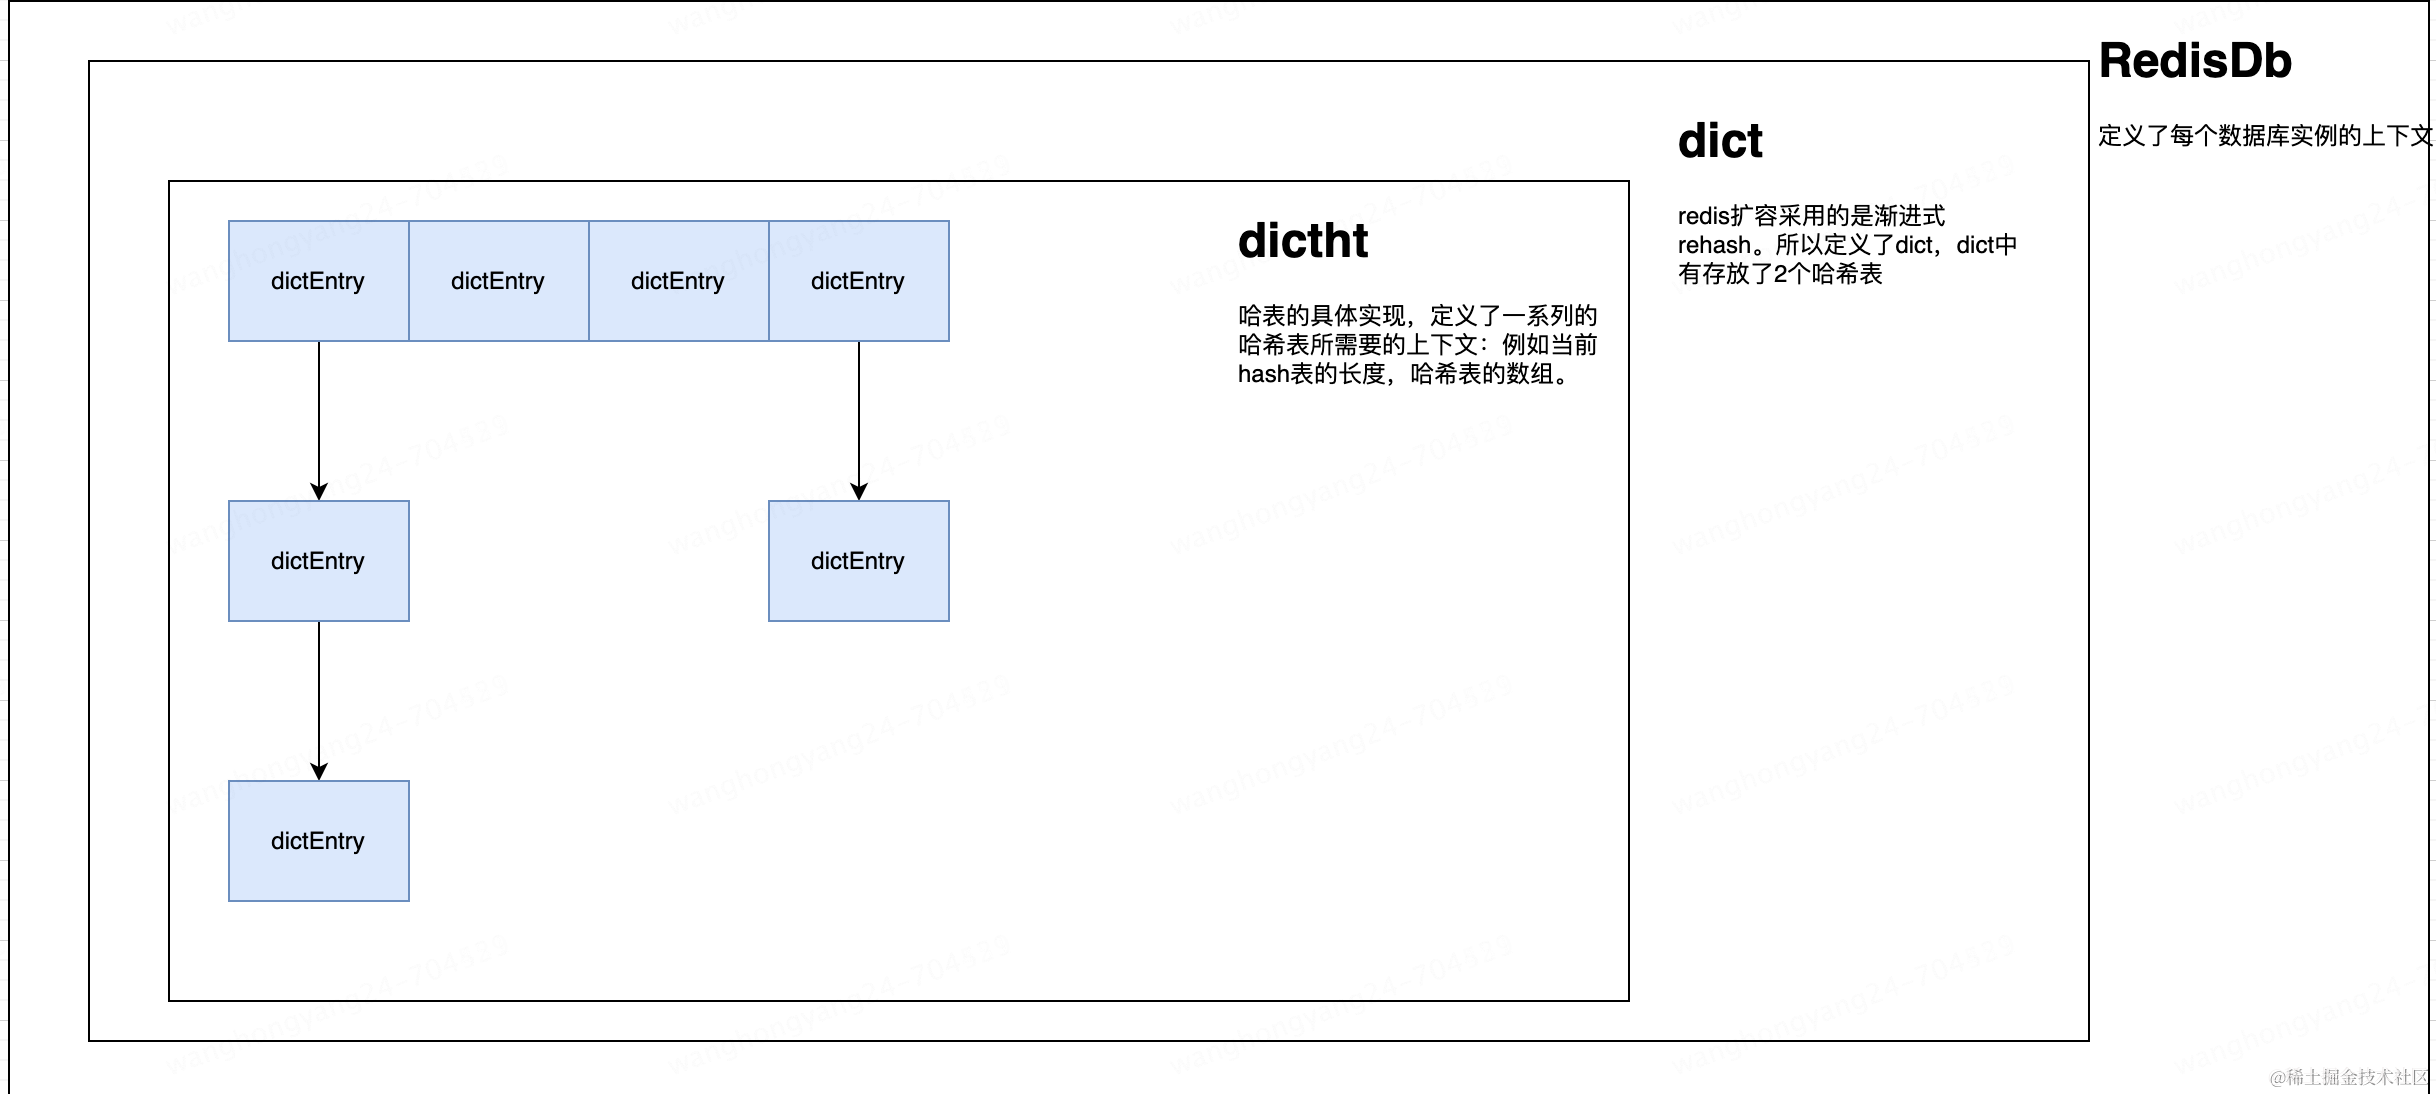
- dict是hash表的最外层,存储了整个键值空间。并通过dictType定义了一系列的操作键值的函数。
- dictht是hash表的实现,定义了hash表的数据结构。
- 而dictEntry则是定义了数据的存放结构。
2.渐进式rehash
redis的哈希表和HashMap在设计上面一个比较明显不同就是rehash操作。因为redis的定义是一个数据库。所以其存放的数据会很多很多,为了防止在rehash的过程中因为大批量数据需要做迁移而引起的服务器长时间阻塞,redis采用的方法是渐进式rehash。
首先我们重新看一下dict结构体,它定义了2个hashtable。其中ht[1]就是协助完成渐进式rehash的。
1typedef struct dict {
2    //一系列操作键值空间的函数
3    dictType *type;
4		//私有数据
5    void *privdata;
6
7    dictht ht[2];
8
9    int rehashidx; /* rehashing not in progress if rehashidx == -1 */
10
11    int iterators; /* number of iterators currently running */
12
13} dict;
1.rehash的触发
就拿新增操作来说,每次新增前,都会调用_dictExpandIfNeeded,检测一下是否要进行扩容操作:
1static int _dictExpandIfNeeded(dict *d)
2{
3    /* Incremental rehashing already in progress. Return. */
4
5    if (dictIsRehashing(d)) return DICT_OK;
6
7    /* If the hash table is empty expand it to the initial size. */
8    // T = O(1)
9    if (d->ht[0].size == 0) return dictExpand(d, DICT_HT_INITIAL_SIZE);
10
11    /* If we reached the 1:1 ratio, and we are allowed to resize the hash
12     * table (global setting) or we should avoid it but the ratio between
13     * elements/buckets is over the "safe" threshold, we resize doubling
14     * the number of buckets. */
15
16    if (d->ht[0].used >= d->ht[0].size &&
17        (dict_can_resize ||
18         d->ht[0].used/d->ht[0].size > dict_force_resize_ratio))
19    {
20        // 扩容到原来的2倍
21        return dictExpand(d, d->ht[0].used*2);
22    }
23
24    return DICT_OK;
25}
如果满足下面的case,就会调用dictExpand函数:
- 使用的数量used大于当前字典的长度size。
- 参数dict_can_resize为1或者当前数组长度满足强制扩容阈值dict_force_resize_ratio
就会去调用dictExpand函数,将当前字典扩容到已经使用元素的二倍。
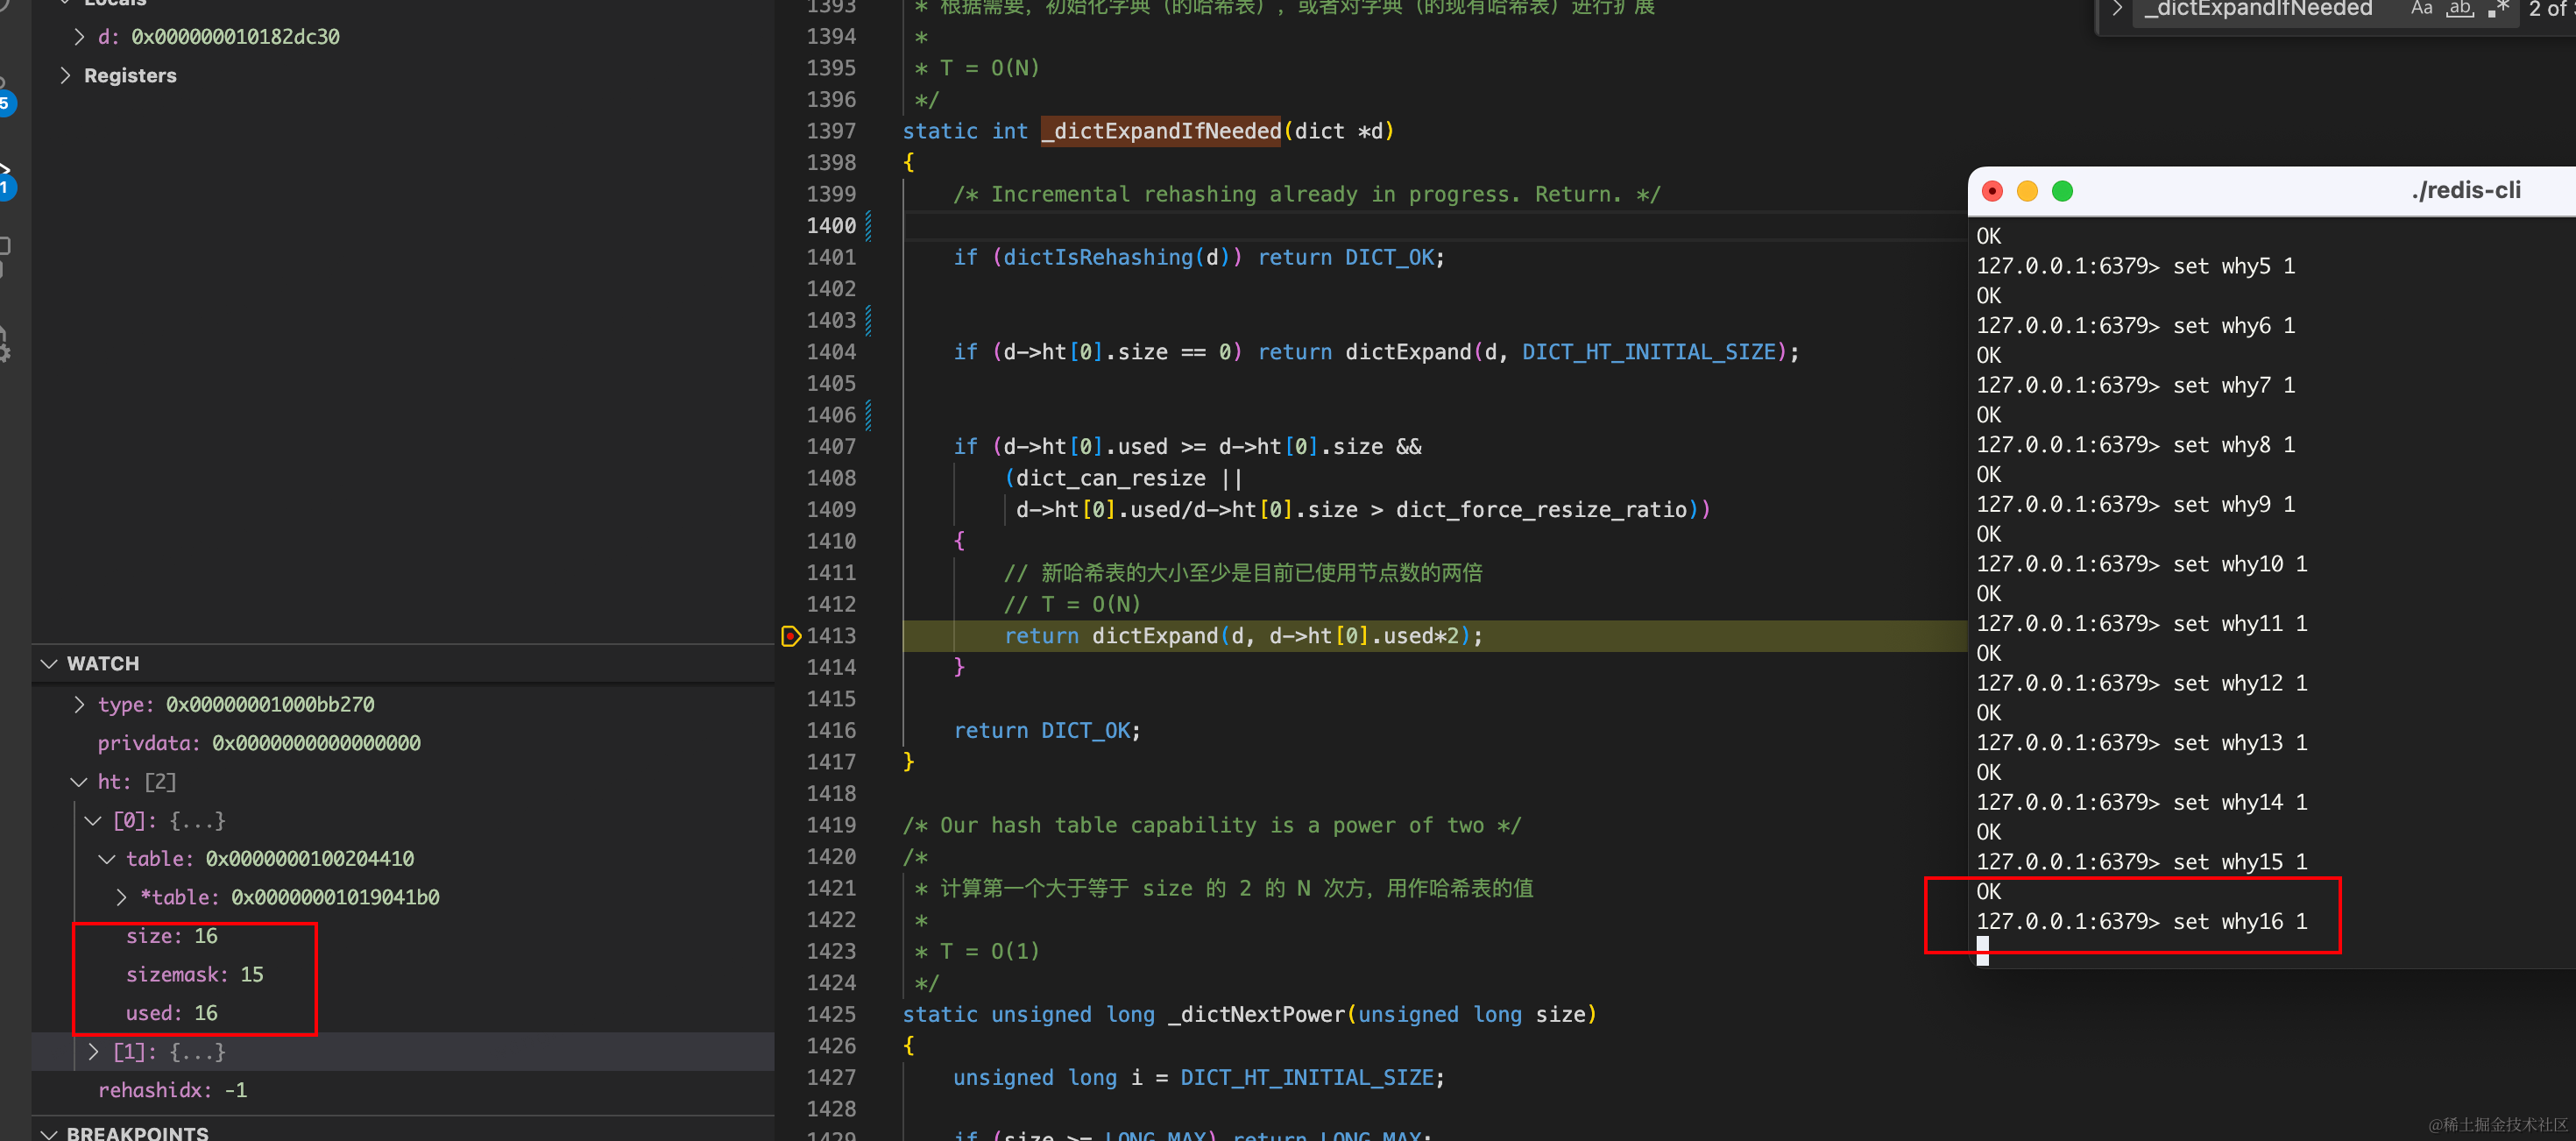
可以看到当我添加第16个元素的时候 就触发扩容操作了。
dictExpand函数负责扩容的的初始化动作(我们只看扩容部分的赋值逻辑):
- 调用_dictNextPower函数修正size,保证其大小始终是2的N次幂。
- 然后将dict中的ht[1]设置为扩容后的hashtable,并将rehashidx从-1设置为0。
1int dictExpand(dict *d, unsigned long size)
2{
3
4    dictht n; /* the new hash table */
5    unsigned long realsize = _dictNextPower(size);
6    /* the size is invalid if it is smaller than the number of
7     * elements already inside the hash table */
8    if (dictIsRehashing(d) || d->ht[0].used > size)
9        return DICT_ERR;
10
11    /* Allocate the new hash table and initialize all pointers to NULL */
12
13    n.size = realsize;
14    n.sizemask = realsize-1;
15    // T = O(N)
16    n.table = zcalloc(realsize*sizeof(dictEntry*));
17    n.used = 0;
18    /* Is this the first initialization? If so it's not really a rehashing
19     * we just set the first hash table so that it can accept keys. */
20    if (d->ht[0].table == NULL) {
21        d->ht[0] = n;
22        return DICT_OK;
23    }
24    /* Prepare a second hash table for incremental rehashing */
25
26    d->ht[1] = n;
27    d->rehashidx = 0;
28    return DICT_OK;
29}
2.dict_force_resize_ratio和dict_can_resize
允许扩容的第二个条件中,需要dict_can_resize=1才允许扩容。这个参数的作用是什么?什么情况下dict_can_resize会被更新成0?
带着这两个问题我们看下dict_can_resize变量的注释:
1/* Using dictEnableResize() / dictDisableResize() we make possible to
2 * enable/disable resizing of the hash table as needed. This is very important
3 * for Redis, as we use copy-on-write and don't want to move too much memory
4 * around when there is a child performing saving operations.
5 * Note that even when dict_can_resize is set to 0, not all resizes are
6 * prevented: a hash table is still allowed to grow if the ratio between
7 * the number of elements and the buckets > dict_force_resize_ratio.
8 */
9static int dict_can_resize = 1;
10
11static unsigned int dict_force_resize_ratio = 5;
注释中说的很清楚:不希望在执行写时复制的过程中再过多的去操作内存。
个人理解:save操作(比如 bgsave )通过fork函数创建的子进程,使用的是写时复制。执行save的过程中一方面有大量的读取内存的操作(子进程);另一方面如果在写时复制的过程中,redis服务端(父进程)又收到大量的写操作,那么就会触发共享对象的只读保护,引发缺页中断,进而触发页面的复制和页表的更新,这个时候系统负载会很大。为了降低系统负载,就尝试先关闭数据的迁移(数据迁移的过程中也涉及到了内存的读写操作)。
但是dict_can_resize并不会完全的去关闭迁移操作,如果这个时候load factor(used和size之比)超过dict_force_resize_ratio=5了,那么就强制做一次rehash。
3. 渐进rehash的处理
1.增删改查前协助rehash
进行rehash的函数是_dictRehashStep,该函数分别被dictAddRaw,dictGenericDelete,dictFind,dictGetRandomKey函数所调用。也就说redis每次在执行指令的时候都会尝试做一次数据迁移操作:
判断代码如下:
1//还记得吗?在rehash开始前,将rehashidx设置为了0.
2//如果当前rehashidx不为-1 说明在进行扩容
3  if (dictIsRehashing(d))
4{
5  _dictRehashStep(d);
6}
7
8//dictIsRehashing的判断逻辑就是判断是否等于-1
9#define dictIsRehashing(ht) ((ht)->rehashidx != -1)
具体的,协助扩容代码如下:
当不存在安全迭代器的时候,进行一次数据的迁移。
1static void _dictRehashStep(dict *d) {
2    if (d->iterators == 0)
3      dictRehash(d,1);
4}
dictRehash函数是真正做数据迁移的操作,n控制迁移的步数。可以知道的是在进行增删改查操作前,redis每次迁移1个hash槽下所有的数据到新的哈希表中:
1int dictRehash(dict *d, int n) {
2    if (!dictIsRehashing(d)) return 0;
3    // 迁移次数
4    while(n--) {
5        dictEntry *de, *nextde;
6        /* Check if we already rehashed the whole table... */
7        //在下面可以看到每次迁移完成一个元素后,used都会做一个减1的操作. 那么当used等于0的时候,说明迁移结束了
8        if (d->ht[0].used == 0) {
9           //做一些数据的释放和hashtable的替换。
10            zfree(d->ht[0].table);
11            d->ht[0] = d->ht[1];
12            _dictReset(&d->ht[1]);
13            //设置当前状态为非扩容的标记
14            d->rehashidx = -1;
15          //返回0 说明rehash结束
16            return 0;
17        }
18
19        //越界判断
20        assert(d->ht[0].size > (unsigned)d->rehashidx);
21        //在旧的hashtable中找到一个非空的链表
22        while(d->ht[0].table[d->rehashidx] == NULL) d->rehashidx++;
23
24        de = d->ht[0].table[d->rehashidx];
25
26      //迁移开始
27      //整个while循环中做的操作就是将旧链表中的元素拿出来重新计算hash值,然后放到新hashtable中,并更新新旧hashtable的used
28        while(de) {
29            unsigned int h;
30            nextde = de->next;
31            h = dictHashKey(d, de->key) & d->ht[1].sizemask;
32            de->next = d->ht[1].table[h];
33            d->ht[1].table[h] = de;
34            d->ht[0].used--;
35            d->ht[1].used++;
36            de = nextde;
37        }
38        d->ht[0].table[d->rehashidx] = NULL;
39        // 更新rehashidx。也就是说rehashidx不等于的时候,它所指向的就是下一个要进行扩容的hash槽
40        d->rehashidx++;
41    }
42
43    //返回1 说明还需要继续rehash
44    return 1;
45}
2.定时事件中处理扩容
如果说我们的redis服务器正在扩容,但是还没什么读写请求,那这扩容总不能停下来不做了吧?所以redis除了在执行命令前做一个单步扩容外,在其定时事件中,也做了一次rehash操作:
1void databasesCron(void) {
2  //省略和扩容无关的代码.....
3
4  //没有做后台线程在工作,才去做协助做rehash。
5     if (server.rdb_child_pid == -1 && server.aof_child_pid == -1) {
6        if (server.activerehashing) {
7            for (j = 0; j < dbs_per_call; j++) {
8                int work_done = incrementallyRehash(rehash_db % server.dbnum);
9                rehash_db++;
10                if (work_done) {
11                    /* If the function did some work, stop here, we'll do
12                     * more at the next cron loop. */
13                    break;
14                }
15            }
16        }
17      }
18    }
19}
定时事件做迁移的前提:
- 没有rdb和aof在执行。
- Redid.config中的activerehashing配置开启。关于该配置的介绍:
1# Active rehashing uses 1 millisecond every 100 milliseconds of CPU time in
2# order to help rehashing the main Redis hash table (the one mapping top-level
3# keys to values). The hash table implementation Redis uses (see dict.c)
4# performs a lazy rehashing: the more operation you run into a hash table
5# that is rehashing, the more rehashing "steps" are performed, so if the
6# server is idle the rehashing is never complete and some more memory is used
7# by the hash table.
8#
9# The default is to use this millisecond 10 times every second in order to
10# active rehashing the main dictionaries, freeing memory when possible.
11#
12# If unsure:
13# use "activerehashing no" if you have hard latency requirements and it is
14# not a good thing in your environment that Redis can reply form time to time
15# to queries with 2 milliseconds delay.
16#
17# use "activerehashing yes" if you don't have such hard requirements but
18# want to free memory asap when possible.
一次处理100个hash槽下面的数据:
1int dictRehashMilliseconds(dict *d, int ms) {
2    long long start = timeInMilliseconds();
3    int rehashes = 0;
4    while(dictRehash(d,100)) {
5        rehashes += 100;
6        if (timeInMilliseconds()-start > ms) break;
7    }
8
9    return rehashes;
10}
3.keys命令的处理逻辑
说完了字典的数据结构和扩容操作后,我们回到key命令,看下keys命令的处理逻辑。keys命令的处理函数是src/db.c的keysCommand函数:
1void keysCommand(redisClient *c) {
2    dictIterator *di;
3    dictEntry *de;
4    // 得到匹配模式
5    sds pattern = c->argv[1]->ptr;
6    int plen = sdslen(pattern), allkeys;
7    unsigned long numkeys = 0;
8    void *replylen = addDeferredMultiBulkLength(c);
9    // 获取一个安全迭代器  迭代当前连接的整个db
10    di = dictGetSafeIterator(c->db->dict);
11    allkeys = (pattern[0] == '*' && pattern[1] == '\0');
12    while((de = dictNext(di)) != NULL) {
13        sds key = dictGetKey(de);
14        robj *keyobj;
15        // 将键名和模式进行比对
16        if (allkeys || stringmatchlen(pattern,plen,key,sdslen(key),0)) {
17            // 创建一个保存键名字的字符串对象
18            keyobj = createStringObject(key,sdslen(key));
19            // 删除已过期键
20            if (expireIfNeeded(c->db,keyobj) == 0) {
21                addReplyBulk(c,keyobj);
22                numkeys++;
23            }
24            decrRefCount(keyobj);
25        }
26    }
27  //释放安全迭代器
28    dictReleaseIterator(di);
29    setDeferredMultiBulkLength(c,replylen,numkeys);
30}
处理逻辑很简单:解析命令,然后遍历当前连接对应的db,检查是否匹配,检查数据是否过期,最后将数据返回。
但是这个过程中,获取了一个安全迭代器,为什么有安全迭代器?安全指的是什么安全?线程安全吗?
4.安全迭代器和非安全迭代器
1.迭代器的上下文
先看下迭代器的结构体定义的参数:
1/* If safe is set to 1 this is a safe iterator, that means, you can call
2 * dictAdd, dictFind, and other functions against the dictionary even while
3 * iterating. Otherwise it is a non safe iterator, and only dictNext()
4 * should be called while iterating. */
5
6typedef struct dictIterator {
7    // 字典
8    dict *d;
9    int
10  table,    //当前迭代器指向的hashtable,因为rehash存在2个hashtable,所以迭代器需要知道当前遍历到哪个了。
11  index,   //迭代器所指向的hashtable的位置。
12  safe;   //是否为安全迭代器
13         // entry :当前迭代的节点
14        // nextEntry :当前节点的下一个节点
15    dictEntry *entry, *nextEntry;
16    long long fingerprint; //指纹。非安全迭代器释放前做验证用
17} dictIterator;
从作者的注释中我们可以知道的是:迭代器区分安全和非安全,并不是为了处理并发问题,而是决定遍历的过程中可以不可以去修改数据。
安全迭代器在其迭代过程中,允许执行其他对字典的操作(最典型的就是过期键的清理)。
而非安全迭代器只能做遍历使用。
2.安全迭代器的创建
我们先看下安全迭代器的创建过程,安全迭代器的创建函数是dictGetSafeIterator:
1
2dictIterator *dictGetSafeIterator(dict *d) {
3    dictIterator *i = dictGetIterator(d);
4
5    // 设置安全迭代器标识
6    i->safe = 1;
7
8    return i;
9}
内部调用了dictGetIterator函数,它的作用就是初始化迭代器:
1dictIterator *dictGetIterator(dict *d)
2{
3    dictIterator *iter = zmalloc(sizeof(*iter));
4
5    iter->d = d;
6    iter->table = 0;
7    iter->index = -1;
8    iter->safe = 0;
9    iter->entry = NULL;
10    iter->nextEntry = NULL;
11
12    return iter;
13}
小总结一下,初始化安全迭代器的过程有两步:
- 初始化迭代器的内存和参数。
- 设置迭代器标记为安全。
3.非安全迭代器的创建
非安全迭代器其实就是少了设置safe=1的那一步。
1dictIterator *dictGetIterator(dict *d)
2{
3    dictIterator *iter = zmalloc(sizeof(*iter));
4
5    iter->d = d;
6    iter->table = 0;
7    iter->index = -1;
8    iter->safe = 0;
9    iter->entry = NULL;
10    iter->nextEntry = NULL;
11
12    return iter;
13}
4.迭代器的使用
看下迭代器被使用的地方dictNext函数:
1dictEntry *dictNext(dictIterator *iter)
2{
3    while (1) {
4
5        //当entry=null当时候,会进入这个分支
6        if (iter->entry == NULL) {
7            dictht *ht = &iter->d->ht[iter->table];
8          //只有首次遍历,才会出现index=-1并且table等于0这种情况,这个时候会去更新iterators
9            if (iter->index == -1 && iter->table == 0) {
10                if (iter->safe)
11                  //还记得我们的dict结构体中定义的变量吗?当安全迭代器首次进行遍历的时候
12                  //就会增加该变量的值
13                    iter->d->iterators++;
14                else
15                  //非安全迭代器
16                    iter->fingerprint = dictFingerprint(iter->d);
17            }
18            iter->index++;
19            if (iter->index >= (signed) ht->size) {
20              //遍历结束前判断是否在rehash,如果是,更新index=0,table=1。
21                if (dictIsRehashing(iter->d) && iter->table == 0) {
22                    iter->table++;
23                    iter->index = 0;
24                    ht = &iter->d->ht[1];
25                } else {
26                    break;
27                }
28            }
29            //综上所述,触发这个赋值的情况有2种:
30            //1.首次遍历hashtable[0]
31          	//2.字典在进行rehash,首次遍历hashtable[1]
32            iter->entry = ht->table[iter->index];
33        } else {
34            iter->entry = iter->nextEntry;
35        }
36        if (iter->entry) {
37          //记录这次遍历的下一个节点
38            iter->nextEntry = iter->entry->next;
39            return iter->entry;
40        }
41    }
42    return NULL;
43}
- 该函数其实就是使用迭代器获取一个字典中的元素。
- 如果当前传入的是安全迭代器,在进行第一次遍历的时候,iterators会做一个增加。
- 如果当前是非安全迭代器,会计算一个fingerprint(不展开了,简单理解就是如果使用非安全迭代器的过程中,有数据被修改了那么指纹就会发生变化,当释放迭代器的时候会做指纹检测)。
- 如果当前在进行rehash,那么table[1]也会被遍历。
- 在函数返回前, iter->nextEntry = iter->entry->next记录了这次遍历过程中的下一条数据。并且下一次遍历会使用 iter->nextEntry。
iterators++的作用?
还记得分步rehash的函数判断吗?
1static void _dictRehashStep(dict *d) {
2    if (d->iterators == 0) dictRehash(d,1);
3}
也就是说,当有安全迭代器存在的时候,单步rehash的操作会被禁止。
为什么要记录下一次要遍历的节点?
首先安全迭代器的定义是遍历的过程中可以做读写操作。如果迭代器返回的当前节点设置了过期时间,那么就可能因为过期导致该节点被清理掉,也就是从链表中移除。那么下一次迭代就会终止进而导致数据遍历的缺失。
5.迭代器的释放
迭代器的释放函数是dictReleaseIterator:
1void dictReleaseIterator(dictIterator *iter)
2{
3
4    if (!(iter->index == -1 && iter->table == 0)) {
5        // 释放安全迭代器对渐进式rehash的阻止
6        if (iter->safe)
7            iter->d->iterators--;
8        // 如果当前是非安全迭代器,需要看一下指纹是否有变化,如果有变化会触发一个警告:
9
10      /**
11      === REDIS BUG REPORT START: Cut & paste starting from here ===
12[23085] 20 Jan 22:45:08.802 * DB saved on disk
13[23086] 20 Jan 22:45:08.804 # === ASSERTION FAILED ===
14[23086] 20 Jan 22:45:08.808 # ==> dict.c:1029 'iter->fingerprint == dictFingerprint(iter->d)' is not true
15      */
16        else
17            assert(iter->fingerprint == dictFingerprint(iter->d));
18    }
19    zfree(iter);
20}
5.总结
最后我们做一个总结:首先我们从keys命令出发对redis的字典结构和渐进式rehash做了一个分析。
渐进rehash的触发有2种情况:一个是redis读写的时候做一次rehash,一个是定时事件定时协助rehash(前提是配置开启并且没有进行rdb和aof)。
然后我们又从keys命令的处理函数出发,对redis的两种迭代器做了一次分析:
安全迭代器:安全迭代器会让渐进式rehash停止,并且还允许在迭代的过程中对数据做增删,能够保证不会遍历到重复的数据。
除了keys使用了安全迭代器外,像rdb持久化和BGREWRITEAOF都使用的安全迭代器去遍历的数据,来防止重复的数据和过期数据的写入。
我理解安全迭代器其实是给后台进程做各种数据的持久化用的。我上面说安全迭代器存在的时候,**单步rehash的操作会被禁止。**但是我们还有定时事件也在做rehash呀?那里并没有判断 if (d->iterators == 0) 。
但是它做了这个判断:if (server.rdb_child_pid == -1 && server.aof_child_pid == -1),在没有 BGSAVE 或者 BGREWRITEAOF 执行时,才对哈希表进行 rehash。
非安全迭代器:非安全迭代器只允许做遍历操作,可能遍历到重复数据(因为没有对rehash做限制,此时如果发生rehash操作,那么就可能将遍历过的数据迁移到未遍历过的位置上)。并且非安全迭代器还有一个fingerprint,每次释放迭代器前都会看一下指纹是否被修改过。
我个人理解,非安全迭代器其实是给redis的主进程用的。因为有fingerprint的存在,如果说后台进程使用了非安全迭代器,在后台进程使用的过程中,主进程做了大批量的数据修改,那么在释放的迭代器的时候,对fingerprint做的校验就会不通过。
全文完
参考资料:
redis官方文档:https://redis.io/
redis源码:https://github.com/redis/redis
书籍:《Redis设计与实现》
最后,本人能力有限,可能有分析不到位或者错误的地方,在此先说一声抱歉。
如果有错误的地方,请批评指正,谢谢!