用到的图片文件:
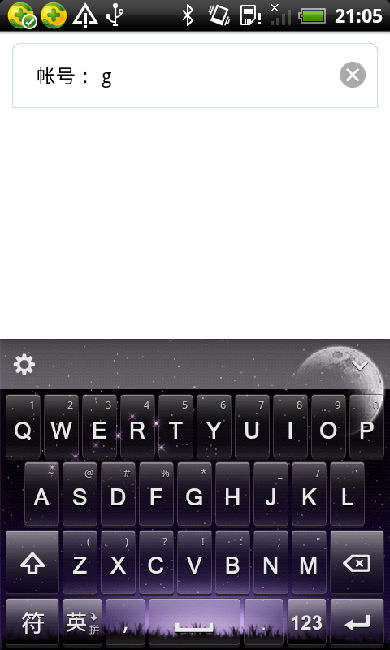
平时都是用简单的控件通过布局来组合一大堆控件,界面复杂起来的话,布局文件就很大,维护起来也很烦。就想把常用的控件组合写成自定义控件,这样维护起来也方便,代码也清爽,下面就以带消除按钮的EditText为例。平时,EditText删除输入的都是按好多下删除键的,看到很多应用的输入框,在输入内容后,会跳出一个清空按钮,点击一下,输入的都会清除,这个用户体验很好。自己尝试了一下,原先是用最简单的控件组合,发现代码量太大,重用性不高,所以想把这个封装成一个自定义控件,直接调用。直接上代码。
EditTextWithClearButton.java
1import xidian.wwf.temperature.R;
2import xidian.wwf.temperature.util.StringUtil;
3import android.content.Context;
4import android.content.res.TypedArray;
5import android.text.Editable;
6import android.text.TextWatcher;
7import android.util.AttributeSet;
8import android.view.LayoutInflater;
9import android.view.View;
10import android.widget.EditText;
11import android.widget.ImageButton;
12import android.widget.LinearLayout;
13
14/**
15 * 带清除按钮的输入框
16 * @author WWF
17 */
18public class EditTextWithClearButton extends LinearLayout{
19
20	private EditText editText;
21	private ImageButton clearImageButton;
22
23	public EditTextWithClearButton(Context context) {
24		super(context);
25	}
26
27	public EditTextWithClearButton(Context context,AttributeSet attrs){
28		super(context, attrs);
29		init(context,attrs);
30	}
31
32	/**
33	 * 初始化
34	 */
35	public void init(Context context,AttributeSet attrs){
36		View view = LayoutInflater.from(context).inflate(R.layout.weight_edit_with_clear, this, true);
37		editText = (EditText) view.findViewById(R.id.et);
38		clearImageButton = (ImageButton) view.findViewById(R.id.clear_ib);
39		clearImageButton.setOnClickListener(new OnClickListener() {
40			@Override
41			public void onClick(View v) {
42				editText.setText("");
43			}
44		});
45		editText.addTextChangedListener(new TextWatcher() {
46
47			@Override
48			public void onTextChanged(CharSequence s, int start, int before, int count) {
49				if (s.length() > 0) {
50					clearImageButton.setVisibility(View.VISIBLE);
51				} else {
52					clearImageButton.setVisibility(View.GONE);
53				}
54			}
55
56			@Override
57			public void beforeTextChanged(CharSequence s, int start, int count,
58					int after) {
59
60			}
61			@Override
62			public void afterTextChanged(Editable s) {
63
64			}
65		});
66		//将属性值设置到控件中
67		TypedArray a = context.obtainStyledAttributes(attrs, R.styleable.EditWithClearText);
68		CharSequence hint = a.getText(R.styleable.EditWithClearText_hint);
69		CharSequence text = a.getText(R.styleable.EditWithClearText_text);
70		if (text!=null&&!StringUtil.isEmpty(text.toString().trim())) {
71			editText.setText(text);
72			//设置光标位置
73			editText.setSelection(text.length());
74			this.clearImageButton.setVisibility(View.VISIBLE);
75		}else {
76			if (hint!=null&&!StringUtil.isEmpty(hint.toString().trim())) {
77				editText.setHint(hint);
78			}
79		}
80		a.recycle();
81	}
82
83	/**
84	 * 获得输入的值
85	 * @return
86	 */
87	public String getText(){
88		return this.editText.getText().toString();
89	}
90
91	/**
92	 * 设置值
93	 * @param text
94	 */
95	public void setText(String text){
96		this.editText.setText(text);
97	}
98
99	/**
100	 * 设置默认值
101	 * @param hint
102	 */
103	public void setHint(String hint){
104		this.editText.setHint(hint);
105	}
106
107	/**
108	 * 获得输入框控件
109	 * @return
110	 */
111	public EditText getEditText(){
112		return this.editText;
113	}
114
115	/**
116	 * 获得消除按钮
117	 * @return
118	 */
119	public ImageButton getClearImageButton(){
120		return this.clearImageButton;
121	}
122}
weight_edit_with_clear.xml 自定义控件布局文件
1<?xml version="1.0" encoding="utf-8"?>
2<LinearLayout xmlns:android="http://schemas.android.com/apk/res/android"
3    android:layout_width="fill_parent"
4    android:layout_height="wrap_content"
5    android:background="@null"
6    android:orientation="horizontal" >
7
8    <EditText
9        android:id="@+id/et"
10        style="@style/text_normal"
11        android:layout_width="0dp"
12        android:layout_height="wrap_content"
13        android:layout_weight="1"
14        android:background="@null"
15        android:gravity="center_vertical"
16        android:maxLength="20"
17        android:paddingLeft="5dp"
18        android:paddingRight="4dp"
19        android:singleLine="true" />
20
21    <ImageButton
22        android:id="@+id/clear_ib"
23        android:layout_width="wrap_content"
24        android:layout_height="wrap_content"
25        android:background="@null"
26        android:contentDescription="@string/image_content"
27        android:src="@drawable/common_input_box_clear"
28        android:visibility="gone" />
29
30</LinearLayout>
这个布局文件就是自定义控件组合的布局文件,我采用线性布局,然后将EditText 和ImageButton 组合起来。
属性配置文件 attrs.xml
1<?xml version="1.0" encoding="utf-8"?>
2<resources>
3    <declare-styleable name="EditTextWithClearBitton">
4        <attr name="text"  format="string"/>
5        <attr name="hint"  format="string" />
6    </declare-styleable>
7</resources>
Activity 布局文件
1<?xml version="1.0" encoding="utf-8"?>
2<LinearLayout xmlns:android="http://schemas.android.com/apk/res/android"
3    xmlns:wwf="http://schemas.android.com/apk/res/xidian.wwf.temperature"
4    android:layout_width="fill_parent"
5    android:layout_height="fill_parent"
6    android:background="@color/white"
7    android:orientation="vertical" >
8
9
10    <LinearLayout
11        android:layout_width="fill_parent"
12        android:layout_height="wrap_content"
13        android:background="@drawable/table_above_nor"
14        android:gravity="center"
15        android:orientation="horizontal"
16        android:padding="10dp"
17        android:layout_margin="10dp" >
18
19        <TextView
20            style="@style/text_normal"
21            android:layout_width="wrap_content"
22            android:layout_height="wrap_content"
23            android:layout_gravity="center_vertical"
24            android:layout_marginLeft="10dp"
25            android:singleLine="true"
26            android:text="@string/account"
27            android:textStyle="bold" />
28
29        <xidian.wwf.temperature.weight.EditTextWithClearButton
30            android:id="@+id/ssss"
31            android:layout_width="match_parent"
32            android:layout_height="wrap_content"
33            android:layout_gravity="center_vertical"
34            wwf:text="@string/system_error"
35            >
36        </xidian.wwf.temperature.weight.EditTextWithClearButton>
37    </LinearLayout>
38
39</LinearLayout>
引入我们自定义的属性,需在布局文件中加入上面的
xmlns:wwf="http://schemas.android.com/apk/res/项目包名"
在控件初始化中,获得属性值,赋给控件即可,赋值的代码
1//将属性值设置到控件中
2TypedArray a = context.obtainStyledAttributes(attrs, R.styleable.EditTextWithClearBitton);
3CharSequence hint = a.getText(R.styleable.EditTextWithClearBitton_hint);
4CharSequence text = a.getText(R.styleable.EditTextWithClearBitton_text);
5if (text!=null&&!StringUtil.isEmpty(text.toString().trim())) {
6	editText.setText(text);
7	//设置光标位置
8	editText.setSelection(text.length());
9	this.clearImageButton.setVisibility(View.VISIBLE);
10}else {
11	if (hint!=null&&!StringUtil.isEmpty(hint.toString().trim())) {
12		editText.setHint(hint);
13	}
14}
15a.recycle();
然后就可以使用这个自定义控件了
下面是我运行的结果